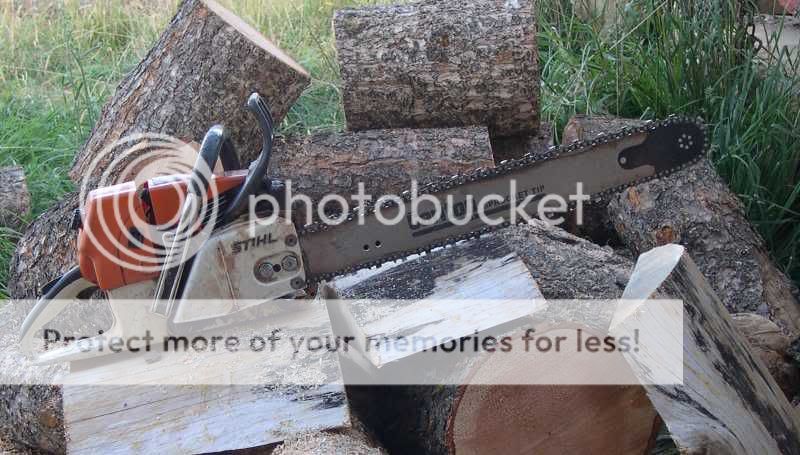
it's always something

Arborist Forum

Help Support Arborist Forum:

This site may earn a commission from merchant affiliate links, including eBay, Amazon, and others.

mtngun

Addicted to ArboristSite
Joined
May 5, 2008
Messages
4,627
Reaction score
565
Location
where the Salmon joins the Snake
Last time I posted, my Alaskan mill had cracked and the auxilary oiler had plugged up.

I filed out the crack and welded it up with stick. Stick welding small aluminum parts sux, so the repair may eventually fail, but for now it's doing the job. I can't find the pic so I'll have to post it later.

As for the plugged up oiler, I replaced the Granberg supplied fitting with a simple homemade drip tube. Now the oiler drips directly onto the sprocket. Again, I can't find the pics, so I'll have to give you an IOU.

So I was happily milling away with the repaired Alaskan..... and before the ergonomics nazis say anything, I usually mill sitting comfortably on the guide board, but it is necessary to stand up and bend over for the slab cut since the guide board has minimal support on this cut. I don't carry a forklift or sawhorses or jacks around in the woods to lift the log up to a more comfortable position.
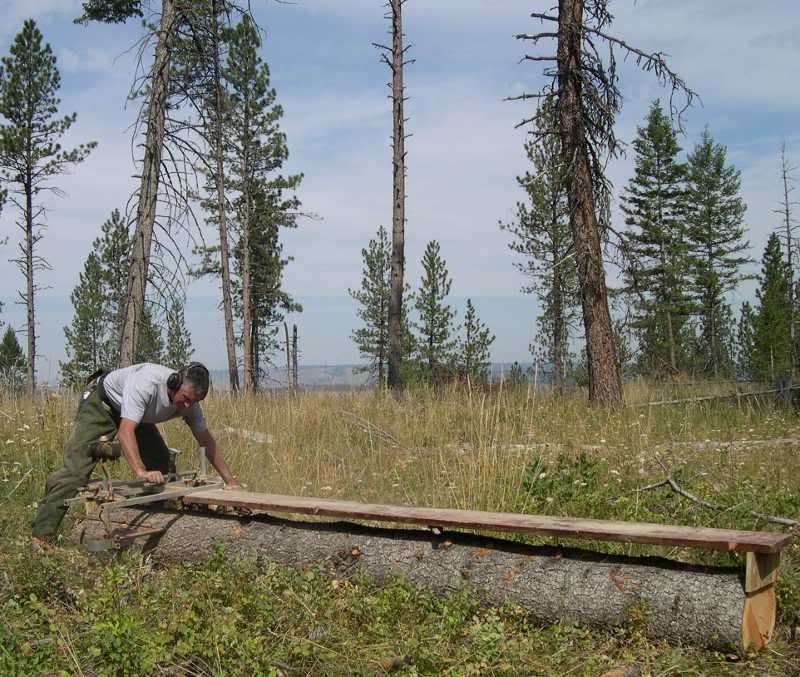
csm2_8_23.jpg


These were mostly the tops from the blowdowns I had milled the previous week. I use the tops and other small logs to make 8" x 8" posts, which will come in handy if I ever get around to building a woodshed.
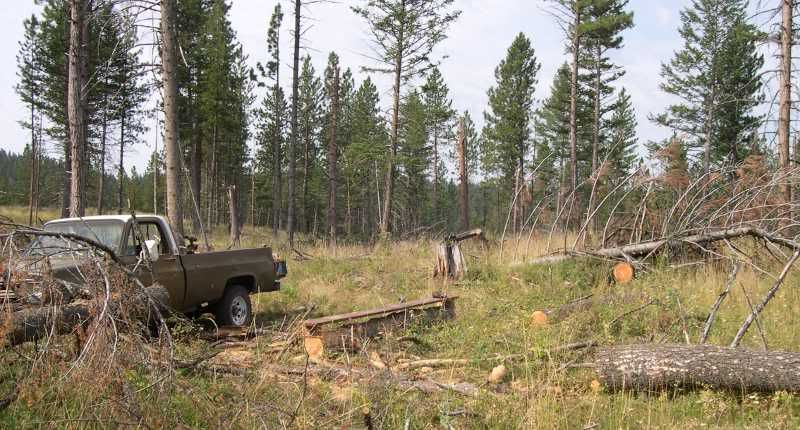
csm1_8_23.jpg


Anyway, after a few hours, the 066 had slowed down noticeably. Thinking the chain was dull, I swapped in a fresh chain, but still the saw was cutting slow.

It gradually got worse until it would bog if pushed even a little bit. "Hmmm, maybe the air filter is plugged up", though usually the Stihl air filters continue working well even when they are coated with dust. So I pulled the filter and shook the dust off.

Uh - oh, there was lots of dust inside the filter and on the inner baffle. The filter had not sealed properly. That explains why the saw had gradually gotten weaker. I think I know why it didn't seal, but you'll have to take an IOU on that story.

This 066 was tired when I acquired it, and has milled many loads of boards since then. I'd bought a BB kit, seals, a vacuum tester, and a carb kit, but never found time to put them to use. Guess now I'll have to make time. It may be a while before I can schedule the surgery, in the meantime, I'll have to get my milling fix here on Arborsite.

As Roseanne Roseannadanna said, "It's always something."
 
Last time I posted, my Alaskan mill had cracked and the auxilary oiler had plugged up.

I filed out the crack and welded it up with stick. Stick welding small aluminum parts sux, so the repair may eventually fail, but for now it's doing the job. I can't find the pic so I'll have to post it later.

As for the plugged up oiler, I replaced the Granberg supplied fitting with a simple homemade drip tube. Now the oiler drips directly onto the sprocket. Again, I can't find the pics, so I'll have to give you an IOU.

So I was happily milling away with the repaired Alaskan..... and before the ergonomics nazis say anything, I usually mill sitting comfortably on the guide board, but it is necessary to stand up and bend over for the slab cut since the guide board has minimal support on this cut. I don't carry a forklift or sawhorses or jacks around in the woods to lift the log up to a more comfortable position.
csm2_8_23.jpg


These were mostly the tops from the blowdowns I had milled the previous week. I use the tops and other small logs to make 8" x 8" posts, which will come in handy if I ever get around to building a woodshed.
csm1_8_23.jpg


Anyway, after a few hours, the 066 had slowed down noticeably. Thinking the chain was dull, I swapped in a fresh chain, but still the saw was cutting slow.

It gradually got worse until it would bog if pushed even a little bit. "Hmmm, maybe the air filter is plugged up", though usually the Stihl air filters continue working well even when they are coated with dust. So I pulled the filter and shook the dust off.

Uh - oh, there was lots of dust inside the filter and on the inner baffle. The filter had not sealed properly. That explains why the saw had gradually gotten weaker. I think I know why it didn't seal, but you'll have to take an IOU on that story.

This 066 was tired when I acquired it, and has milled many loads of boards since then. I'd bought a BB kit, seals, a vacuum tester, and a carb kit, but never found time to put them to use. Guess now I'll have to make time. It may be a while before I can schedule the surgery, in the meantime, I'll have to get my milling fix here on Arborsite.

Good to see you back to milling. What is this about surgery?

Kevin
 
Good to see you back to milling. What is this about surgery?

Kevin

Think he's talking about the upcoming open-heart surgery for his 066. :clap:


P.S. I do tree work, stump grinding and that is becoming my motto: It's always something.

My brother has a friend that he used to work for and instead of saying "If it's not one thing it's another." he said "If it's not one thing it's your mother."

lol
 
So I was happily milling away with the repaired Alaskan..... and before the ergonomics nazis say anything, I usually mill sitting comfortably on the guide board, but it is necessary to stand up and bend over for the slab cut since the guide board has minimal support on this cut. I don't carry a forklift or sawhorses or jacks around in the woods to lift the log up to a more comfortable position.
That'll be me, but I won't comment on that - Instead I'll play my where's your "visual PE" card, :) :clap:

Anyway, after a few hours, the 066 had slowed down noticeably. Thinking the chain was dull, I swapped in a fresh chain, but still the saw was cutting slow.
A few hours!!! :jawdrop: how long do you cut between touching up the chain?

This 066 was tired when I acquired it, and has milled many loads of boards since then. I'd bought a BB kit, seals, a vacuum tester, and a carb kit, but never found time to put them to use. Guess now I'll have to make time. It may be a while before I can schedule the surgery, in the meantime, I'll have to get my milling fix here on Arborsite.

As Roseanne Roseannadanna said, "It's always something."

Sure is! :cheers:
 
"Uh - oh, there was lots of dust inside the filter and on the inner baffle. The filter had not sealed properly. That explains why the saw had gradually gotten weaker. I think I know why it didn't seal, but you'll have to take an IOU on that story.

This 066 was tired when I acquired it, and has milled many loads of boards since then. I'd bought a BB kit, seals, a vacuum tester, and a carb kit, but never found time to put them to use. Guess now I'll have to make time. It may be a while before I can schedule the surgery, in the meantime, I'll have to get my milling fix here on Arborsite. " Is there a spark screen in your muffler? I'd check it out before I tore that saw apart. Unless a carb is actually packed with chips so it can't suck air, some dust shouldn't hurt. It gets sucked in, mixed with gas, burnt, and blown out the exhaust. My 3 old Homelites always have a lot of dust inside the carb boxes, especially cutting locust [hard & dry] They run just fine though.
 
How long do I run until sharpening ? It's very awkward to sharpen on an Alaskan, so I swap chains instead (it's awkward to swap chains, as well, but I keep saying I will fix that). Anyway, I swap chains around mid day. One chain in the morning, another chain in the afternoon. No aussie hardwood here.

It's got a dual port muffler, so it has two outlet screens plus a long 3/16" gap along the bottom edge of the muffler cover. I think the gap would ensure flow even if the screens plugged up. BTW, I don't recommend the dual port muffler for milling -- way too much exhaust directed at your hands.

I haven't had time to test compression yet, or anything else. However, the rope test did feel wimpy. The 066 would bog, sometimes die, and just didn't have enough grunt to cut. Something is definitely wrong.

It wasn't just a little dust inside the filter, the inside was completely coated with sawdust. The filter had not sealed around the edge, even though the filter screw was plenty tight. By the time I discovered the leak, it had been sucking sawdust for 4 - 5 hours. More info later.
 
Last edited:
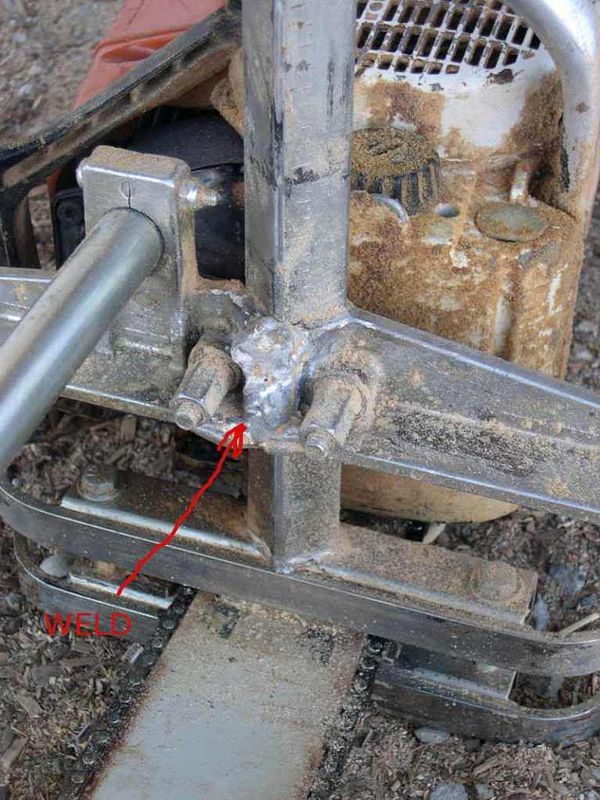
The stick-welded repair to the Alaskan. Preheated to 500 degrees F, several passes, cleaning between passes. It stayed pretty hot while welding so I skipped post heat. Stick aluminum is not the greatest and this piece is highly stressed, so it may fail eventually. The piece probably should be redesigned.
alaskan_weld.jpg


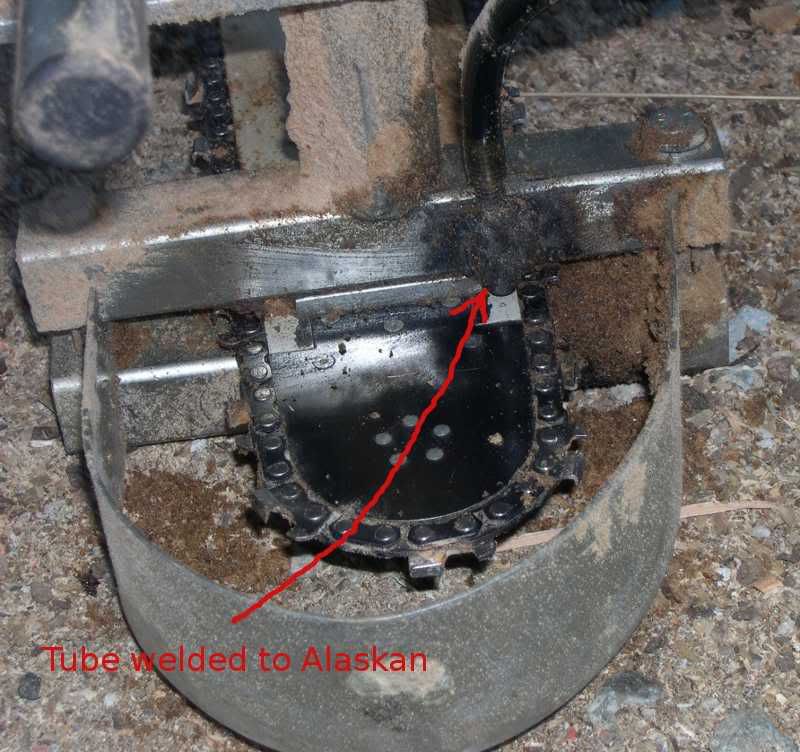
The oiler mod. I cut a couple inches off a 5/16" bolt, drilled a hole length wise through the bolt, and turned one end down to the correct diameter to accept the oil hose. Then welded the piece to the Alaskan. No need to make it adjustable for precise placement, as long as oil dribbles onto the nose of the bar, gravity and vibration will do the rest.
oiler_mod.jpg


Checked compression on the 066. At 4600 feet altitude, it blew 140 psi cold, compared to 130 psi when I acquired it a year ago. 140 psi @ 4600' is equivalent to 160+psi at sea level. Hmmmmm...... I am puzzled, because when it was hot, it had no grunt and took little effort to pull start even without engaging the compression release.

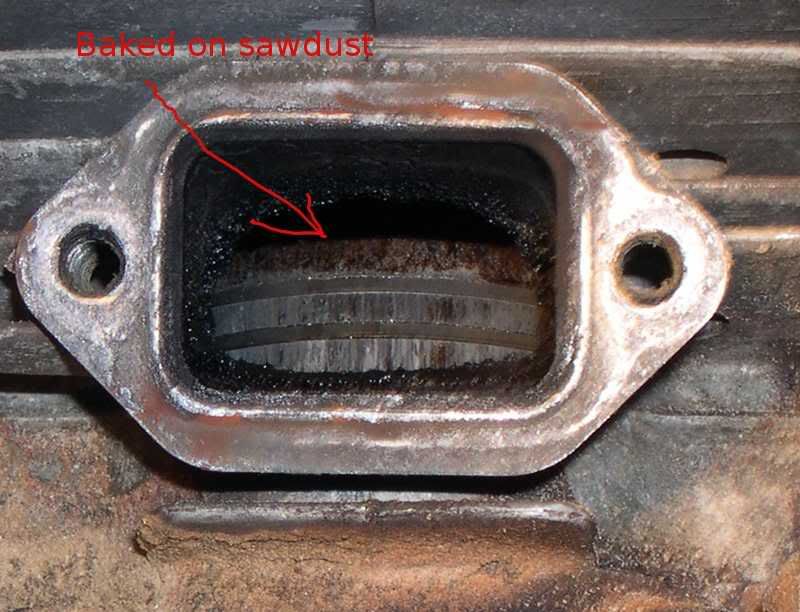
So...... let's pull the muffler. Muffler screens were sooty but otherwise clear. Exhaust side of piston has no major scoring, but lots of carbon in exhaust port, and brown baked-on gunk near top of piston. No doubt gunk is caused by inhaling sawdust.
stihl1.jpg


The camera makes the piston look worse than it really was. Except for the baked on sawdust, the piston and cylinder looked fine. However, if sawdust did damage the engine, I would expect the damage to be worse on the intake side of the piston. Even if it did not cause wear or scoring, the sawdust may have gunked up the rings.

I haven't decided whether to pull the top end. Considering the good cold compression, it is tempting to run a couple of tanks of seafoam mix through the saw and see if that un-gunks it. On the other hand, since I have a BB kit on hand, it is tempting to install the BB kit. Decisions, decisions.......

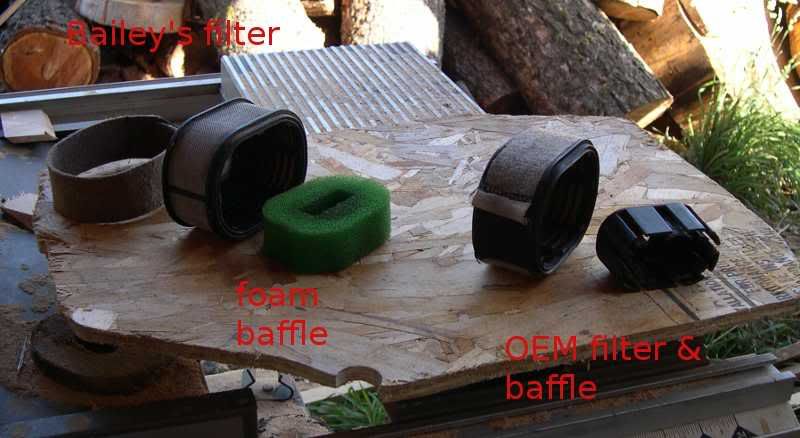
Back to the leaky filter...... I was running a Bailey's filter, which is a clone of the OEM filter, except I was using the OEM plastic baffle instead of the foam baffle that came with the Bailey's filter. Until now, I'd never noticed a difference in performance between the two filters or the two types of baffles. I've also run without any baffle and couldn't detect a difference. Most commonly, though, I use the OEM baffle, because it is easier to install and easier to clean, and because I figured Stihl must have had a good reason for switching to the plastic baffle.
filters.jpg


Problem was, the OEM baffle was bottoming out before the Bailey's filter bottomed out, so the filter didn't seal well. Hence the ingested sawdust. If I had used the foam baffle supplied by Bailey's, there would have been no problem.

And actually, the OEM filter/baffle combination has always leaked a little. The leak was just a lot worse with the Bailey filter/OEM baffle combo.

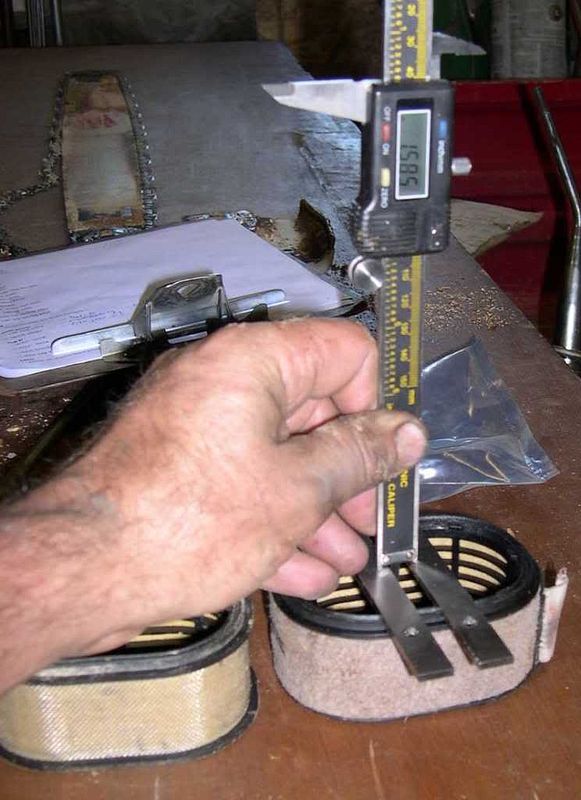
I measured both filters to see if there was a difference in dimensions.
OEM filter inside depth = 1.461"
Bailey's filter inside depth = 1.448"
OEM baffle height = 1.429"

So...... the Bailey's filter is not quite as deep as the OEM. In theory, it should have been deep enough to cover the OEM baffle, but there must have not been enough clearance remaining to allow compressing the filter lips.
filter2.jpg


I'm not knocking the Bailey's filter, but if your run the OEM hard baffle, be aware that some filters may "bottom out" on the baffle without compressing the filter lips. This problem could easily be avoided by sanding a few thou off the baffle, or by using a foam baffle.
 
Might be that the sawdust has collected in the crankcase or transfers and it messing with the charge flow; changing volume or flow rate can mess with a saws power big time.

That would likely mean a tear down. You might be able to flush the bearings and not have to split the case to get it all clean.

Let us know what you find and lots of pics please.:clap:


Mr. HE:cool:
 
140 psi sounds ok. I'm running the same filter setup with the foam baffle and it's been working good. If it were me, I'd pull the top end and clean it up/decarbonize. You can look into the crank then too but I doubt you'll find much down there but at least you'll know. Clean the intake and carb apart too-should be back in business. Good luck and keep us informed.
 
I'm still pondering the options.

Meanwhile, I sanded about 0.019" off the plastic inner baffle, so it should seal reliably with either filter -- just to make sure the problem never happens again.

This saw has never idled well, so a carb kit and vacuum test are definitely on the agenda.

I'm thinking "with the carb and muffler off, there's only 4 more bolts to yank the top end."
 
get a piece of self stick door foam--the type used to seal the door against cold. stick on top of filter, and clamp down--no more injestion--id try the seafoam also--wont hurt, and may loosen up the carbon--
 
You're lucky. To all who say that a bit of dust isn't a big deal, well, maybe you've never dealt with douglas-fir bark dust. It's so fine that it gets in every little nook and cranny, and only the very best filters can get all of it. It's also so packed with resins that it gums up and hardens just like epoxy when heated. All my saws have it baked right on all around the muffler, and it takes a good soak in Varsol followed by some NaOH degreaser to get it off.

The problem is that when sawdust burns up in a combustion chamber, it turns to almost solid carbon. When this builds up it can get harder than the aluminum of the piston and can scratch the heck out of it. Not usually as bad as straight-gassing, but the effects can be the same. Though you're right, it should also affect the intake side of the piston, if not moreso. It can also build up on the crown of the piston and the squish band of the cylinder to the degree where the piston starts to touch the top of the cylinder.

The damage you show is what I'd expect from carbon scoring, There is a pretty decent buildup there, though I do totally understand what you mean about the camera making it look worse than it is. But if it's blowing 140, that shouldn't be keeping it from running, unless the test is inaccurate because of excess oil or fuel in the cylinder.

A few hours!!! :jawdrop: how long do you cut between touching up the chain?

Even though it's one of the harder softwoods, Douglas Fir pales in comparison even to hard oak, let alone the stuff you tend to work with. I've found that the biggest factor in my chains dulling is crud in the bark. With clean, debarked logs (not normally difficult with dead standing D Fir), I can usually do a couple-few hundred BF of Douglas Fir before noticing the cut slowing significantly.

It's got a dual port muffler, so it has two outlet screens plus a long 3/16" gap along the bottom edge of the muffler cover. I think the gap would ensure flow even if the screens plugged up. BTW, I don't recommend the dual port muffler for milling -- way too much exhaust directed at your hands.

I haven't had time to test compression yet, or anything else. However, the rope test did feel wimpy. The 066 would bog, sometimes die, and just didn't have enough grunt to cut. Something is definitely wrong.

It wasn't just a little dust inside the filter, the inside was completely coated with sawdust. The filter had not sealed around the edge, even though the filter screw was plenty tight. By the time I discovered the leak, it had been sucking sawdust for 4 - 5 hours. More info later.

Well, if you keep that dual-port cover and put the BB kit on, you'll have one nice milling rig there. I do run into the same issue with the muffler mod I did on my 395 - at shallow cut depths, and especially at 1", it's blowing straight onto my right hand, and heats up the mill structure to the point of being uncomfortable to hold sometimes. It's a nice feature in cold weather though! But in the end, the extra grunt is well worth the tradeoff. It pulls WAY harder than it did stock.

I was having the same symptoms with my 066 when I was milling some cedar for my friend back in April - started bogging down and wouldn't hold an idle. No compression at the rope, so I checked filter, muffler, everything... Then I went to pull the plug, and it was only holding on by maybe a thread and a half at most! I would think that you would have noticed if this were the case with yours, but it would explain why it blew fine on the compression tester.
 
Yep, the sawdust from doug fir is like powder. I keep a couple of buckets of it around the shop for soaking up oil spills.

I'm guessing the compression gained 10 psi due to burnt sawdust build up on top of the piston and on the dome of the cylinder.

I'm guessing that as the piston heats up and expands, the burnt sawdust gunk on the piston starts to rub and creates lots of heat and friction.

I checked the spark plug, it was tight, but it'll get a new plug, anyway.

Lots of threads on poor idle over on the chainsaw forum. Sounds like it could be caused by just about anything. But, considering this saw has run OK (until it ingested the sawdust) at full throttle for a year, I'd put money on a carb issue. If it were a vacuum leak, it would have fried the motor long ago.

The saw is on the back burner at the moment -- my woodcutting permit expired, and the drying tent is nearly full, so there is no urgent need to get the saw running -- but I'm still leaning toward installing the BB kit.
 
Installed the BB kit and carb kit yesterday. Hopefully I'll have time to post pics this evening.

Found another issue that may prevent the filter from sealing well, will post pics on that, too.

Installed a 24" bar and bucked firewood for a few minutes with the BB kit. Good news is that the saw now idles pretty decent, even flywheel side down, which it never did before, so I must have accidently done something right to the carb.

As far as power from the BB kit, nothing earth shattering yet, but then again, the oiler wasn't oiling the bar, so that didn't help. The oilier had been acting during the past couple of milling trips.

Next project is to tear into the oiler. It's always something .....
 
Last edited:
BobL, I'm not sure what you mean by "crankcase pressure issue." ???

Since I acquired the saw, it never idled well, and wouldn't idle at all when turned on its side, flywheel side down. As you know, idling problems can be a symptom of an air leak ....... or half a dozen other things. Since the saw ran OK at full throttle (until it swallowed a lot of sawdust) I was pretty sure the problem was in the carb, not an air leak.

But to be sure, I did a vacuum test.

FIrst, I reviewed Four Paws' excellent thread on vacuum testing.

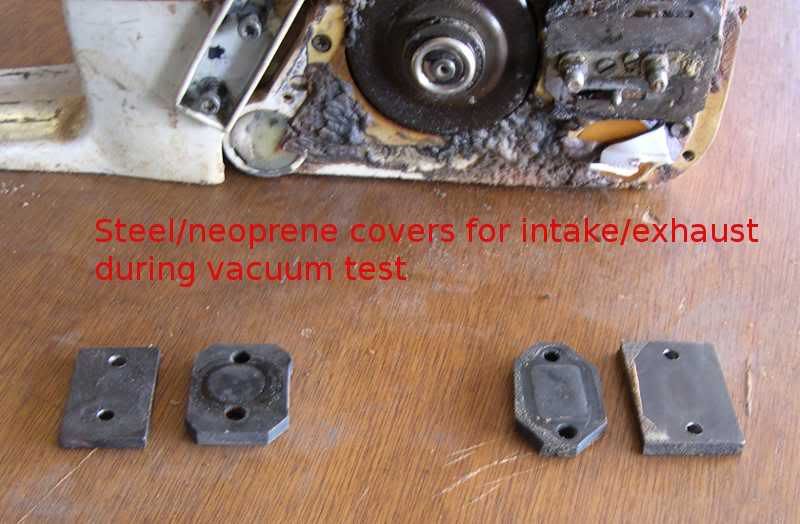
Then I made temporary covers for the intake and exhaust. I used scrap pieces of neoprene and scrap pieces of steel.
vac_test_covers.jpg


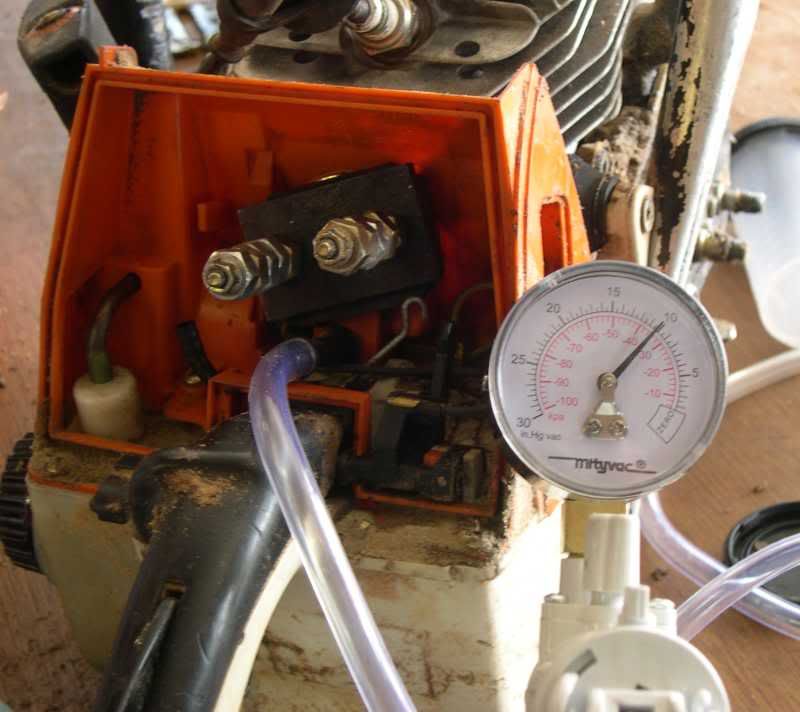
With the temporary covers sealing the intake and exhaust, the vacuum pump was connected to the impulse line and pumped down to 10 inHg vacuum.
vac_test.jpg


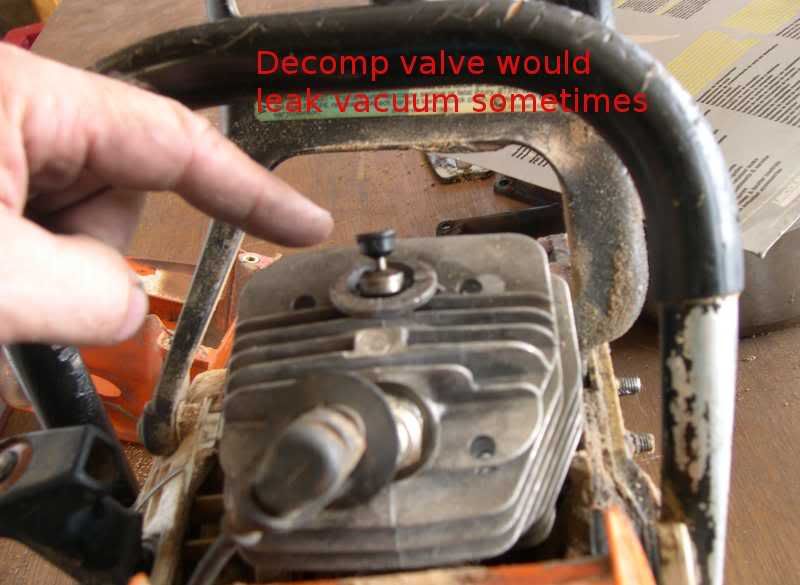
At first, it seemed to have a bad leak, however, it turned out that the decompression valve was leaking. If I twisted the decomp valve, sometimes the leak would stop. I tried installing a new decomp valve, but it did exactly the same thing. I gave up and just twisted the decomp valve until it stopped leaking. That done, the vacuum held steady.
vac_test_decomp.jpg


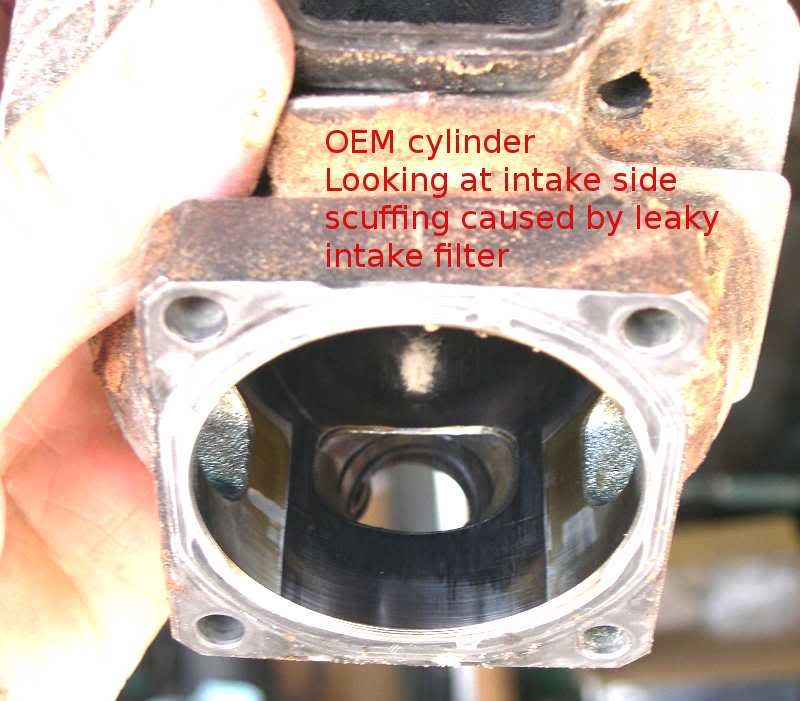
On to the rebuild.......as it turned out, the saw had an OEM piston and jug. There was some mild scuffing on the intake side below the port, probably due to ingesting sawdust.
oem_cyl_in.jpg
 
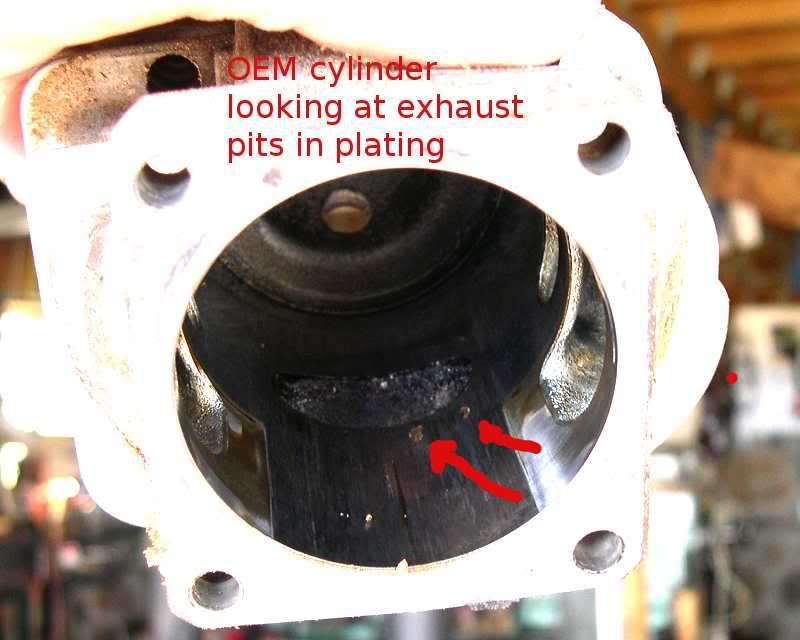
The exhaust side had a couple of pits in the plating. I don't know if the pits were caused by the sawdust, but the pits are definitely filled with sawdust gunk. The damage is all below the ports. Everything above the ports looks good, so I think the cylinder is still usable.
oem_cyl_ex.jpg


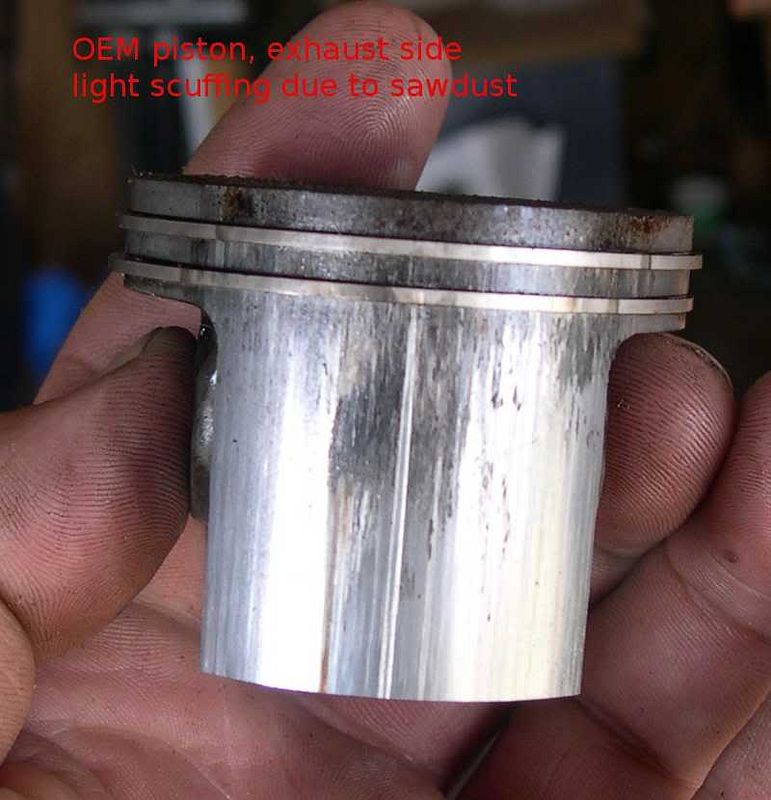
Minor scuffing on the piston, nothing major.
oem_piston_ex.jpg


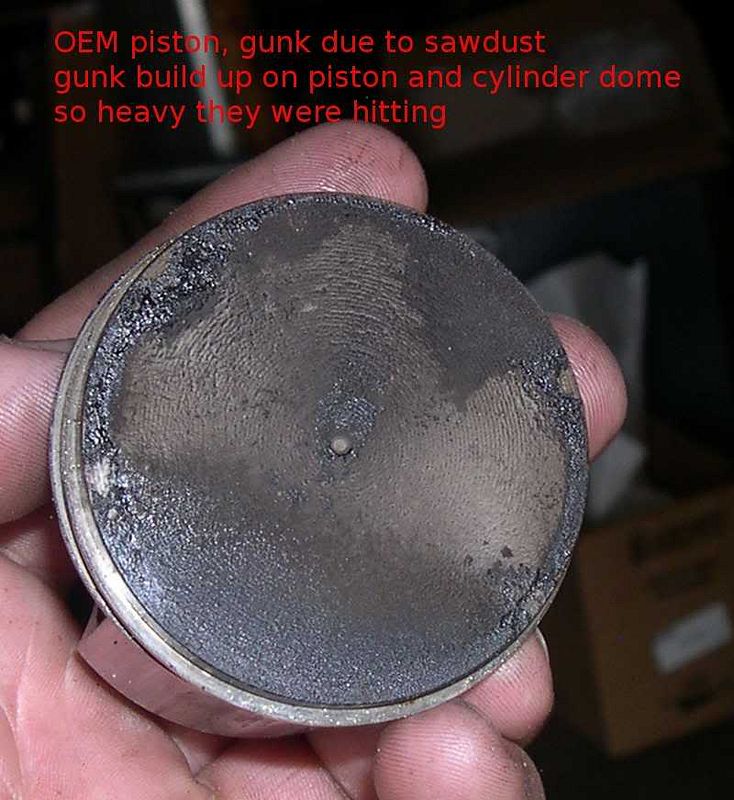
The picture isn't very clear, but the sawdust gunk buildup on the piston and cylinder dome was so thick that at TDC there was zero squish, and the piston gunk was actually hitting the cylinder dome. The heavy build up explains why the compression actually gained 10 psi even though the saw had little power.
oem_piston_top.jpg


It's about what I expected -- the sawdust gunked up the rings and the combustion chamber and created a lot of friction, but didn't do much serious damage. A new piston and rings should bring this cylinder back to life.

However, I have a Bailey's BB kit laying around, and I wanted to give it a try. This particular kit was purchased about a year ago. Since then, there have been some problems with some batches, and also some improvements made to the kits. I was extra careful to look for the problems that have been reported.

First off, will the BB piston fit in the OEM metal base gasket ? No, it wouldn't fit. I filed the inside of the metal gasket until the BB piston could fit through it.

Does the BB piston hit the crankcase at BDC ? No, it didn't hit, but it was awful close. Just to be safe, I relieved the edge of the crankcase enough to ensure the piston would never hit it. Sorry, no pics.

Then, with the OEM metal base gasket installed, I checked squish and cold compression. The metal gasket was 0.016" thick. The squish was about 0.026" and the cold compression was 105 psi. That's lousy compression, so I decided to up the compression by using a thinner gasket.

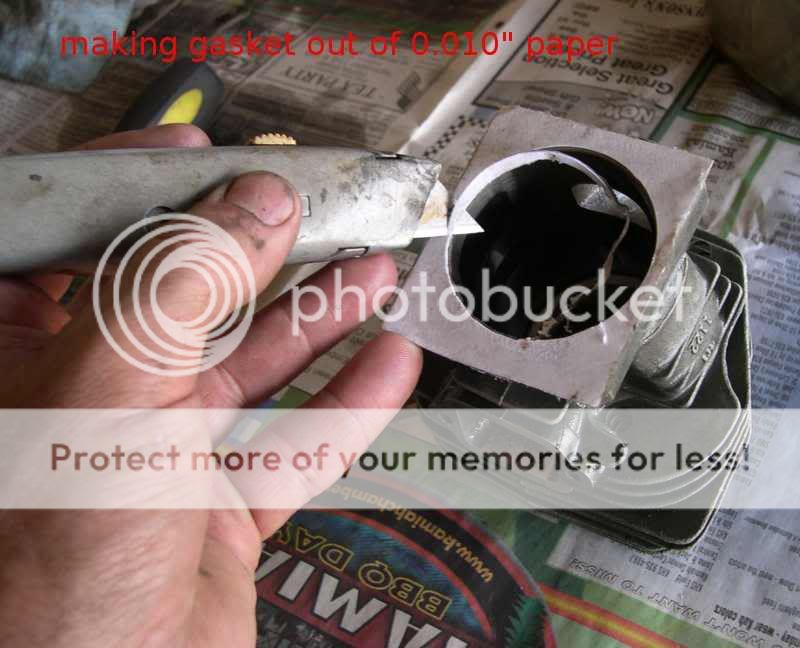
A 0.010" gasket would put the squish at 0.020", so I rummaged around until I found some heavy paper 0.010" thick. I applied a thin layer of silicone to both sides of the paper, set the cylinder on the paper, and clamped it down while the silicone dried. After the silicone has set up, I trimmed the paper using a utility knife (an exacto knive would have worked better.
making_gasket.jpg


--
 
With the paper gasket, squish was 0.018" - 0.020". Exactly what I wanted ! ! ! :rock:

Cold compression with the as-yet virgin rings was up, but only to 120 psi. I was hoping for more. Perhaps it will get better after the rings break in, but I'm concerned that the BB combustion dome may be too large for good compression with reasonable squish. The jury is still out.

While I had the saw apart, I also rebuilt the carb, using a kit purchased from Baileys. I used compressed air to blow the heck out of all the little orifices. No pics, because there was nothing exciting to photograph, no smoking gun that would explain the idle problem.

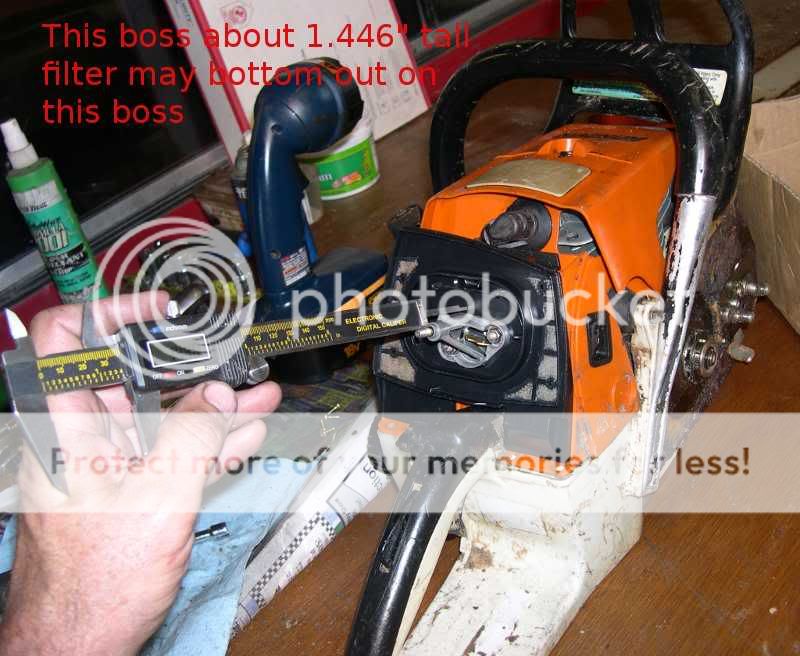
I mentioned that I found yet another issue that may prevent the intake filter from sealing well. Even if you toss the hard plastic inner baffle, the filter still bottoms out on this diecast boss (see pic). The boss protrudes about 1.450" , and that's about how deep the filters are. That's no good -- you want to be able to compress the filter slightly, so the sealing lips will give a little and form a complete seal.
filter_boss.jpg


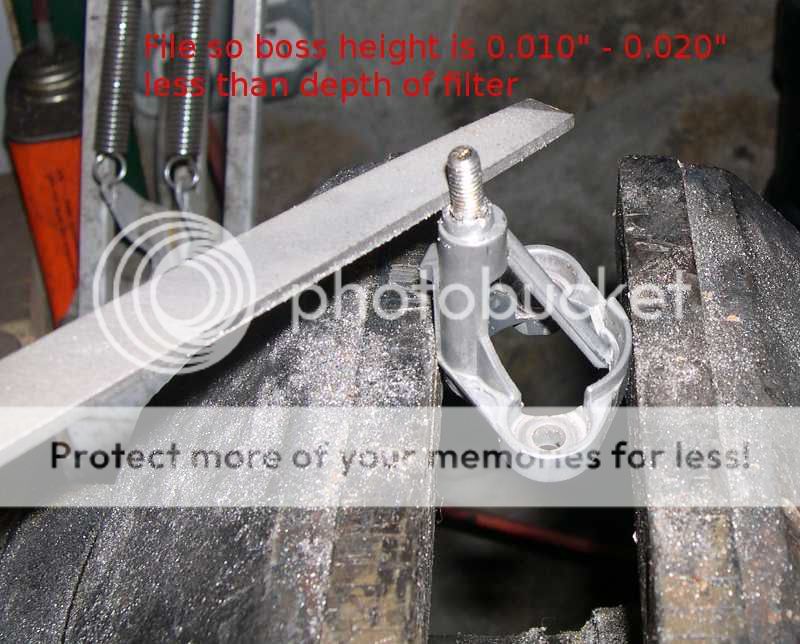
So I filed down the boss a little. With the filed-down boss, and using a foam inner baffle instead of the hard plastic inner baffle, now you can preload the air filter nice and snug.
file_boss.jpg


OK, so now we have installed a BB kit, fixed the leaky air filter, and went through the carb. To break the saw in, I installed a 24" bar and bucked some small firewood. I deliberately set the carb pig rich for break in.

As reported earlier, the saw now idles reliably, so I think the carb kit did fix something.

Power seems ho-hum, though that is partly due to the rich tune.

The oiler was not working at all, and it let me know by throwing the chain, so I shut it down.
stihl_24.jpg
 
On to the oiler problem .......:taped:

First thing I did was read Lakeside's excellent thread on the 066 oiler. It actually is broken down into several threads, but that link will get you started.

Lakeside's tutorial gave me an important clue.
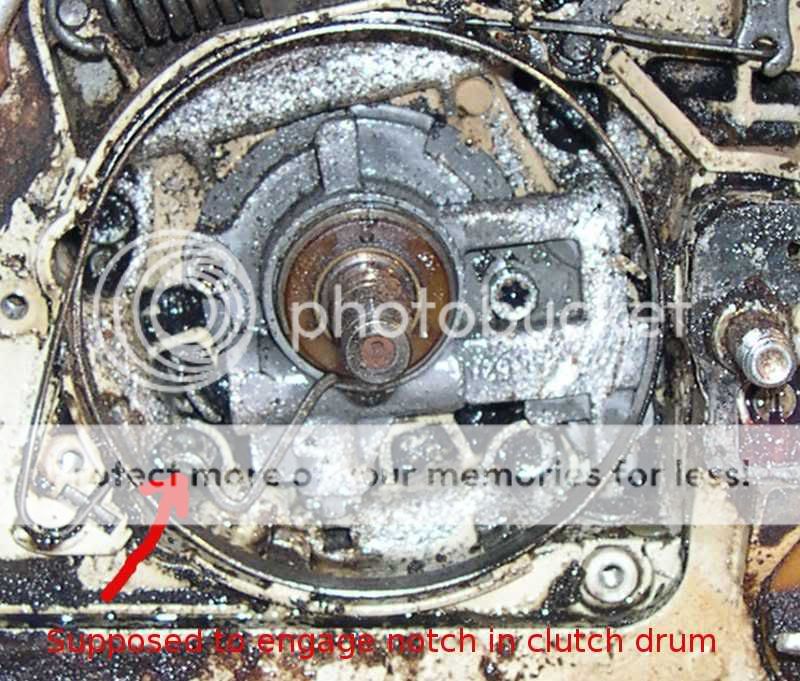
Locate the pump drive arm and be sure it locks into the clutch drum notch when you insert the drum. If not, it can damage the pump housing.

Well, now they tell me ! ! !:buttkick:

As per Lakesides advice, after every CSM session, I have faithfully lubed the clutch bearing. Lakesides believes that the clutch bearings work extra hard while milling, so they should be lubed every day. Of course, accessing the clutch bearing requires removing, then reinstalling the clutch drum.

I did not know that I was supposed to lock the drum notch into a pump drive arm. :censored: Somewhere along the way, I probably installed the drum incorrectly, so that it was merely rubbing on the pump drive arm. This is the result.
oiler_mess.jpg


It was ugly. The drum had bent the drive arm backwards so the drive arm was rubbing on things it wasn't supposed to rub on.

However, after cleaning up the mess, everything seems to be intact despite the rubbing. I put it back together and tested with no bar installed. It was pumping a little oil, but it was leaking more oil around the clutch and around the chain adjuster. I suspect the pump is not sealing properly against the crankcase, so I'll have to tear the pump apart again and give it another look.

That's as far as I've got on this project. Will post more as things progress.
 

Latest posts

Back
Top