


Pony Boy
New Member
So, I wanted to try and repair my McCulloch Power Mac 6 with standard fuel line parts, rather than the rubber bulb that is next to impossible to find. So here goes!
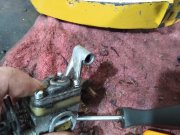
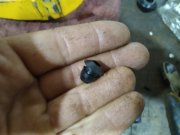
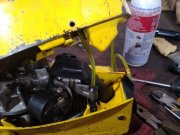
Here's what we're working with, normally the factory fuel line bulb fits into the carburetor.
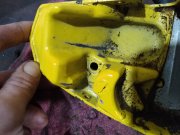
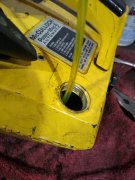
The fuel line also had a formed grommet that fit into the pull start cover/fuel tank. Obviously the hole is too big for a standard fuel line to fit, it'll leak.
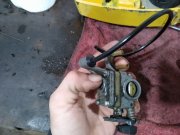
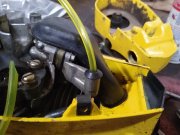
So I used a set of Stihl fuel tank grommets inserted into the fuel tank, and into the carburetor. The fuel tank grommet fits perfect in the tank, it's a very tight fit into the carburetor.


Next, insert your fuel line into the carburetor grommet. It's a really tight fit, but you want it tight, we don't want leaks. Don't mind the different color fuel line, I switched to the yellow line because it was easier to work with.
Now poke the fuel line through the grommet in the fuel tank, and run it up through the fuel cap. leave yourself plenty of extra line. This is the only picture I had of it running up out of the cap, but this is actually when it's back together.
Now here's the difficult part, you have to slowly pull the fuel line up through the fuel tank/ pull start sidecover as you put the cover and the rest of the saw together. But don't pull to hard or you'll pull the line out of the carburetor grommet! You could also use some type of adhesive on the fuel line to secure it into the grommet on the carburetor, then you wouldn't have to worry about pulling it out.
Then once everything is together, put your standard fuel line filter/weight on the end of the line sticking out of your fuel tank, and place it inside the tank!
Put your fuel in the tank and check for leaks, it worked for me! No more leaking, and the saw fired up. However, it sounds like I have an air leak somewhere, the saw starts and runs, but sounds like it's running out of fuel. So I have a carburetor rebuild kit on the way. Would anyone happen to know what the metering lever is supposed to be set at in the carb?
Hope this helps someone else!
Here's what we're working with, normally the factory fuel line bulb fits into the carburetor.
The fuel line also had a formed grommet that fit into the pull start cover/fuel tank. Obviously the hole is too big for a standard fuel line to fit, it'll leak.
So I used a set of Stihl fuel tank grommets inserted into the fuel tank, and into the carburetor. The fuel tank grommet fits perfect in the tank, it's a very tight fit into the carburetor.
Next, insert your fuel line into the carburetor grommet. It's a really tight fit, but you want it tight, we don't want leaks. Don't mind the different color fuel line, I switched to the yellow line because it was easier to work with.
Now poke the fuel line through the grommet in the fuel tank, and run it up through the fuel cap. leave yourself plenty of extra line. This is the only picture I had of it running up out of the cap, but this is actually when it's back together.
Now here's the difficult part, you have to slowly pull the fuel line up through the fuel tank/ pull start sidecover as you put the cover and the rest of the saw together. But don't pull to hard or you'll pull the line out of the carburetor grommet! You could also use some type of adhesive on the fuel line to secure it into the grommet on the carburetor, then you wouldn't have to worry about pulling it out.
Then once everything is together, put your standard fuel line filter/weight on the end of the line sticking out of your fuel tank, and place it inside the tank!
Put your fuel in the tank and check for leaks, it worked for me! No more leaking, and the saw fired up. However, it sounds like I have an air leak somewhere, the saw starts and runs, but sounds like it's running out of fuel. So I have a carburetor rebuild kit on the way. Would anyone happen to know what the metering lever is supposed to be set at in the carb?
Hope this helps someone else!
Attachments
-
 IMG_20200114_172609064-1637x1228.jpg226 KB
 -
 IMG_20200114_172530970-1637x1228.jpg360.5 KB
 -
 IMG_20200114_172637577-1637x1228.jpg325 KB
 -
 IMG_20200114_172815791-1637x1228.jpg381.2 KB
 -
 IMG_20200114_180505536-1637x1228.jpg468.9 KB
 -
 IMG_20200114_180358989-1637x1228.jpg391.3 KB
 -
 IMG_20200114_180652525-1228x1637.jpg560.2 KB
 -
 IMG_20200114_172524009-1637x1228.jpg387.6 KB
 -
 IMG_20200114_172632804-1637x1228.jpg346.9 KB
 -
 IMG_20200114_172831345-1637x1228.jpg316.9 KB