Bars & sprockets for milling?

Arborist Forum

Help Support Arborist Forum:

This site may earn a commission from merchant affiliate links, including eBay, Amazon, and others.

Lutty440

ArboristSite Member
Joined
Apr 12, 2013
Messages
81
Reaction score
40
Location
PEI
Right now I have an MS 440 with a 20" bar and am milling balsam, spruce and tamarack to build a cabin. I have a Logosol timberjig that works well.
I'm going to get a 28 inch bar for sure for initial large log cuts, but once I have a cant, say 12x10 or so would I see a benefit in speed with a smaller bar (16inch) and 8 tooth sprocket? Or some other combination for better speed and torque?
 
i think 8 tooth rim is to much for the clutch . run a 7 and lower the guides till its working hard and throwing nice big chips . CK the stickie at the top of the forum page Bob has some great info their .
 
There will be practically no difference between a 20 and 16" bar.
The 28" is a bit long for the timber jig, if you want to cut that wide you are better off going to an alaskan type rig.

BTW an 8 tooth will works fine with low profile chain on a 440 but of course you will need a special drive sprocket for this chain.
 
Thanks for the info fellas. I've read a lot of BobL's stickie already. I do have an Alaskan type homemade mill that was given to me by a guy who just built a 30 foot long steel chainsaw mill for his Husqvarrna 3120. I have yet to use it as it required a little TLC, but it should be good to go now. That's why I'm going to get a 28 inch bar, that way I can test the limits of the timberjig, witch has been working excellent for my needs. I'll likely just stick with the 7 tooth sprocket. Everything I have milled so far was with a standard 35 degree chain. Next time I mill I'll be using a 10 degree chain, and experiment with a 25 degree chain, gradually taking it to 20 and then 15 degrees to see what works best for me and my spruces. Can't wait to post the results. Any other thoughts or suggestions from anyone, or something you'd like to see me try, would be much appreciated.
 
Relatively new chains, but right now my rakers are 4mm high and my top plate is 5mm, 8mm between, at least on the 25 degree chain. As for the 10 degree chain it should be similar. Any suggestions?
 
Relatively new chains, but right now my rakers are 4mm high and my top plate is 5mm, 8mm between, at least on the 25 degree chain. As for the 10 degree chain it should be similar. Any suggestions?
absolute height doesn't matter - raker depth is the difference between the topmost part of the cutter and the top of the raker.
I guess my question really is do you know about progressive raker setting? i.e. post #106 in the Milling 101 Sticky
 
I know about progressive raker setting, as per your post. Do I understand it, you tell me. Is progressive raker setting, 1st raker lowest, 2nd raker low, 3rd raker high, 4th raker highest, back to first? or something completely different. Cause man I'm new to milling and just want to know.
 
I thought it meant you progressively lower the rakers, depth gauges, as you file back the cutters to keep the angle fairly constant, usually 6 to 6.5 degrees below the cutters. BobL will clear it up for us.
 
So how are you measuring this angel? Just plain old trigonometry or do you use some other device?
 
So how are you measuring this angel? Just plain old trigonometry or do you use some other device?

There are several ways to measure and set raker angles (progressive raker depth setting);
1) Digital Angle finder


2) If you don't have a digital angle finder and you are trigonometry limited your don't have to work to angles, instead you can use ratios.
You can put a straight edge across the top of two adjacent cutters and and measure the gap between the straight edge and the raker top with a feeler gauge - lets call this gap "g".
Then measure the gullet width using a set of callipers - lets call this distance "w"
Then divide "w" by "g" and if it is ~6º , then w/g should be about 10.

In practice to set the rakers you would first measure "w", lets say it is 0.35"
Then divide this by 10 = 0.035" which is what the rakers should be set at.

Pull out a feeler gauge and select 0.035", put the straight edge across the adjacent cutters and check if the feeler gauge fits.
If not file the rakers until it does.

After a while you get the feel for the number of strokes you will need for the feeler gauge to fit.
Don't worry if you go a bit over.

Of course you don't have to do this every time you touch the rakers. In the field in hardwood I would touch up cutters on a chain after every tank of mix. After every 3/4 cutter touch ups I would touch up the rakers by hand (just 2/3 strokes). Then at the end of a busy milling day I might set the rakers as above.

3) FOP or similar
There are small jigs like the Carlton File-o-plate (FOP) , husky and others have similar jigs, that will perform a semi-progressive raker setting. My take on these is that they are too wussy and don't set the raker angles aggressive enough and as the chain wears the angle gets even wussier but they are definitely better than fixed raker depths

4) Oregon make raker depth jigs that increment in 0,005"; i.e. 0.025, 0.030, 0.035" etc all the way up to 0.05"
Measuring the gullet width and dividing by 10 will tell you roughly which Oregon Jig to use.
So if the gullet is 0.27" you could use the 0.025 or 0.030" jig. The 0.025 would give a raker angle of 6.16º while the 0.030 will give an angle of 6.84º which might be too aggressive on wide cuts.
The downside is you need the complete set of jigs and you can't control the angle as well but some people still find it's good enough.
 
Right on Bob, thanks. I'll have to get one of those Digital Angle finders. Seems quick, easy and precise. I was just touchin' em up every time I filed. So if they're all the same exact angle then would every cutter cut the same and produce a smoother finish, and have less washboard effect?
 
What do you think about a 16 inch bar, 10º cutters, 9º raker angle, for tamarack or spruce?
 
good, bad, yes or no suffices, but for now I am just looking for speed, not quality. you don't have to be Einstien. By the way,,, my typewriter is screwed with gingerale for now and is pissssssin me off.
 
I would forgoe using a 28" bar with the 440 when milling with the timberjig, unless you set up an auxiliary oiler. The 440 will not oil enough on its own.

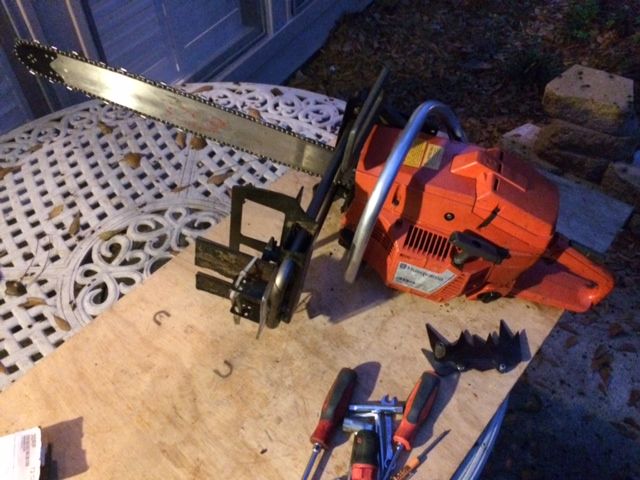
Using my 394xp, 7 tooth sprocket, 28" bar and timberjig combo, I can get 23.25" of cut with the guide rail installed and 24.5" without. It could be more but I like to use the chain brake, so the saw sits back further.

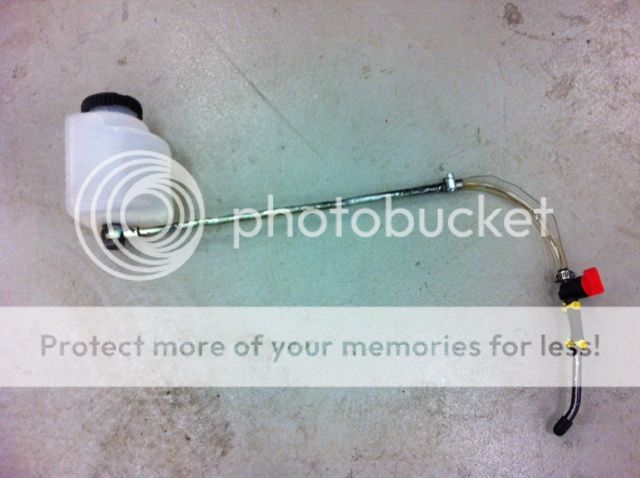
I managed to set up a crude drip oiler using items I already had. The 394 oils plenty without the help, but I like to turn its oiler down and let the auxiliary oiler pick up the slack.

Here's a photo where you can see the oiler's platform:

photo3_zps6884b3d2.jpg
 
Any other disadvantages to using a 28" bar or longer with the timberjig? And Jake, do you have any other photos of aux oiler setup, as I would like to do the same.
 
Right on Bob, thanks. I'll have to get one of those Digital Angle finders. Seems quick, easy and precise. I was just touchin' em up every time I filed. So if they're all the same exact angle then would every cutter cut the same and produce a smoother finish, and have less washboard effect?

I try to make the angles all the same but as long as they are scattered between left and right hand cutters I don't worry about getting the exact same raker angle or even the same cutter lengths. What I do is make sure they are all over a certain value (e.g. 6º) but if one is 6.5 or even 7º I don't sweat it, it will wear faster and come out in the next couple of cuts.

I don't think washboard or finish has that much to do with any cutter angles.
Operator skill at maintaining a constant forward pressure is one factor. This is why milling in a slope (which has a constant forward pressure) can help
The other facto seems to be a synchronisation between the cutting speed down the log and the chain speed in the log. If these two speed synchronise around specific numbers then washboard will happen.
Below is a photo I have posted many times,
Both cuts were made on the same log using 3/8 full comp, 10º top plate filing angle with 6.5º raker angle - with a light cutter touch up between the two cuts.
The only difference is the cut on the right is about 30% wider so the cutting speed was slower and this made the washboard disappear.
C0ntrast.jpg
 
Any other disadvantages to using a 28" bar or longer with the timberjig? And Jake, do you have any other photos of aux oiler setup, as I would like to do the same.

Using a 28" bar on the timberjig is not an issue unless it's attached to a 440. If you just want to try it, I would use full skip chain and let it self feed.

For the auxiliary oiler;
I drilled two holes at the top/arch of the timberjig and bolted a piece of plexi glass and metal bracket. Plexi glass (from an old golf cart windshield) to carry the "weight" of the oiler. Metal bracket (from an old trailer brake controller) to secure the reservoir. I drilled a hole in the bottom of the reservoir and installed a section or metal fuel line from a diesel truck project, and used the banjo bolt to sandwich the reservoir. The end of the metal line has a fuel hose and shut off valve (from a generator) which now goes into 1/4" OD copper tubbing. The copper tubbing contacts the bar's tip. It's rigged, but it works for now. I'd like an aluminum structure to hold the reservoir rather than what I have, and I'm working on it.

photo5_zps423c8f85.jpg


photo3_zps85db8d96.jpg
 
Back
Top