Help me fix a 55 Rancher with a scored piston.

Arborist Forum

Help Support Arborist Forum:

This site may earn a commission from merchant affiliate links, including eBay, Amazon, and others.

steven1955

ArboristSite Member
Joined
Aug 25, 2010
Messages
65
Reaction score
6
Location
Delaware
Hi folks,

After a 3 month hiatus I'm back to working on my neighbors Husky 55 Rancher. He actually gave the saw to me, but I'll offer it back to him for the cost of parts if and when it's running again.

I previously sought your help in this thread.

Model: Husqvarna 55 Rancher
Code on tag top line: 967 05 29.00
Code on tag bottom line: 02 2301618

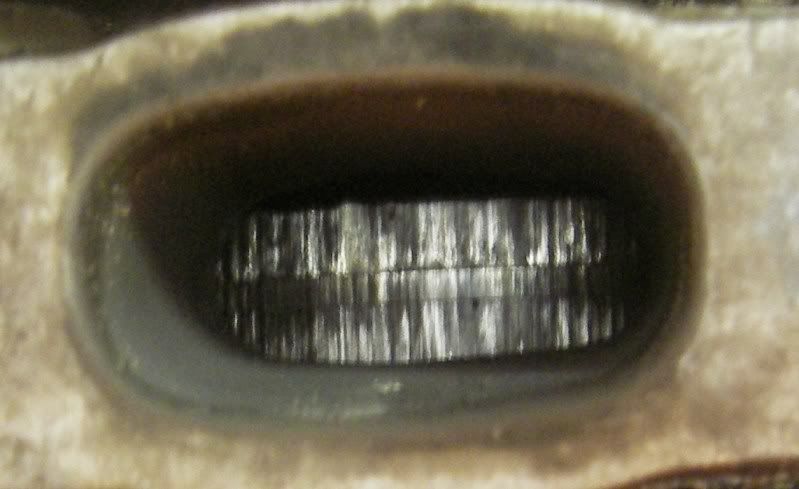
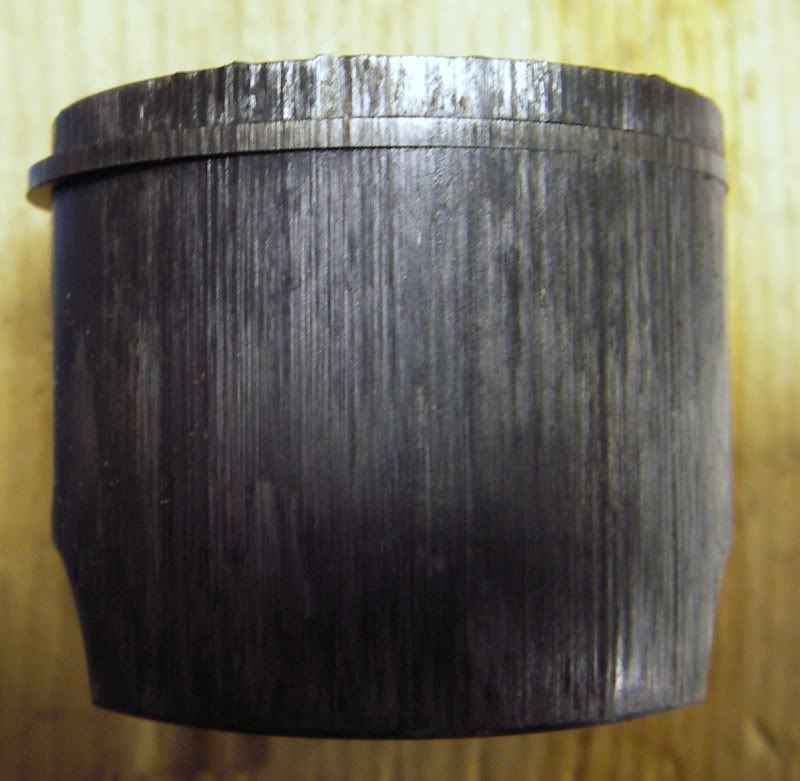
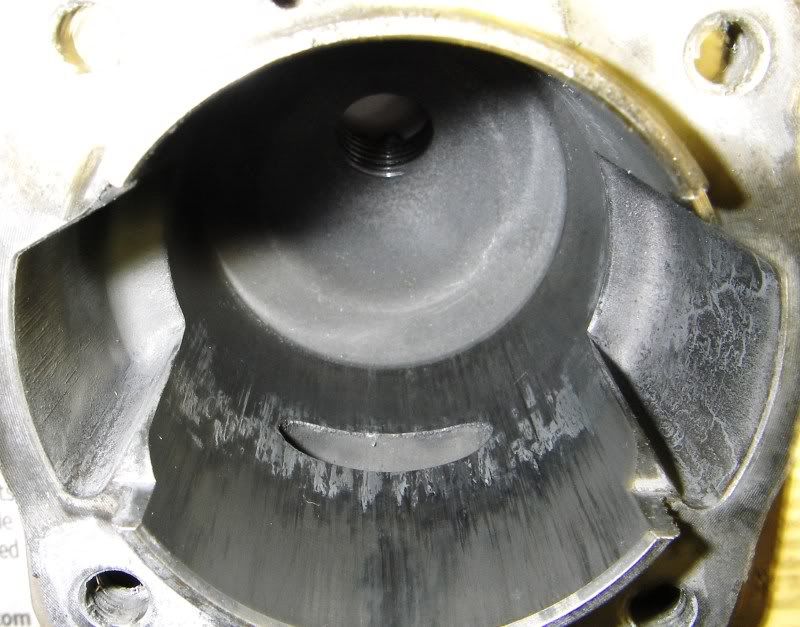
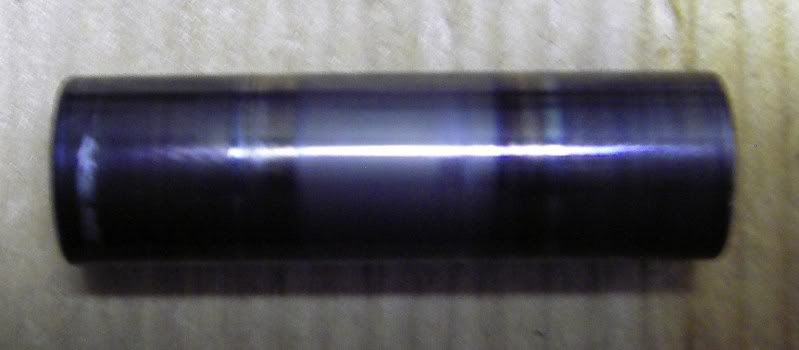
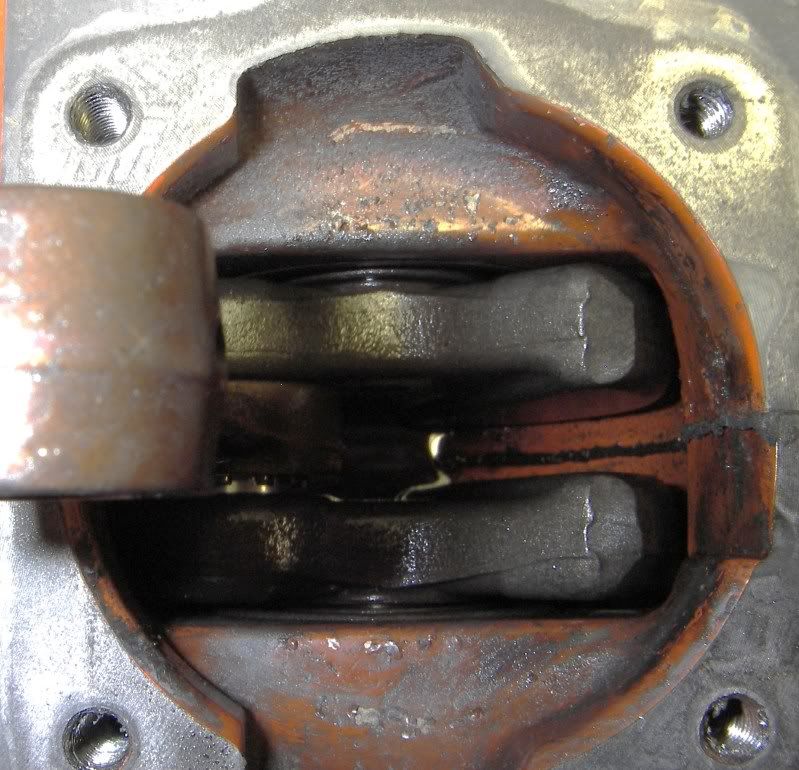
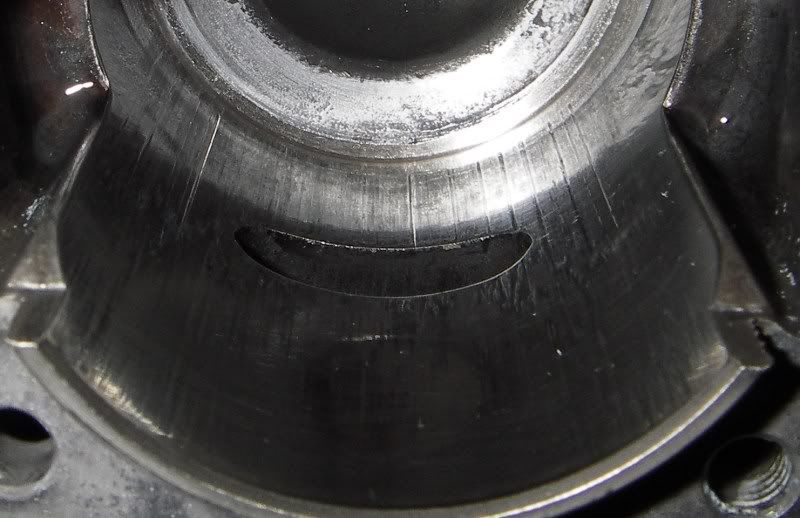
Back in September I was totally newbish and totally missed the scored piston. I looked and thought the scoring was carbon deposits and unburned oil. I should have known better and learned from your experience.

Today I vacuum and pressure tested the Husky supplying vacuum and pressure through the spark plug hole. I installed a piece of rubber from an inner tube between the muffler and cylinder and between the carb and carb mount This left the white foamy rubbery impulse coupling, the black rubber induction pipe, and the white plastic "cover" that the carb mounts to in the system that was tested. I did this because I wanted to test more than the crank seals and base gasket for leaks, and I didn't want to fabricate a fixture to block off the intake port and impulse coupling port.

Vacuum test results: I pulled 13 inHg (inches of mercury) and that vacuum held with no leakage for 30 minutes. Rotating the crank had no effect.

Pressure test:
a. 6 to 7 psi (a lot) you could hear a leak in the area of the induction pipe.
b. 5 psi held using a pressure regulator. I then bubble tested the crank seals and base gasket. No leaks. Couldn't get to the impulse coupling or induction pipe due to the white plastic cover/carb mount.
c. 5 psi no audible leaks, but pressure did drop to 3.5 psi in about two minutes.
d. 3.5 psi dropped to 1.5 psi in about 30 minutes.
e. Rotating the crank had no effect.


My suspicion is that the slow leak under pressure is either the impulse coupling, which was new three months ago, or the induction pipe, which is original. On the same hand I suspect that all Ranchers will leak some under pressure because there is no clamp on the induction pipe. It seals solely due to it's rubbery stretchyness.

I am now convinced that the piston was scored due to lack of lubrication due to bad gas. My neighbor used to buy low test 10% ethanol gas and stored it in an unsealed gas can. I don't know what was used for premix oil. (He now buys Stihl High Performance 2-Cycle Engine Oil in the orange bottle, uses high test gas, and seals his gas cans.)

It's also possible that the saw could have been running lean due to carb issues or a leaky fuel line. The carb was rebuilt in September and the fuel line and filter were replaced when I missed the scored piston. Tank vent was venting.

Question 1: Anyone have a different or better diagnosis? (I'm willing to do other checks.)

Question 2: Is the leakage rate under pressure (3.5 psi dropping to 1.5 psi in about 30 minutes) anything to be concerned about?
 
Question 1: Anyone have a different or better diagnosis? (I'm willing to do other checks.)

Question 2: Is the leakage rate under pressure (3.5 psi dropping to 1.5 psi in about 30 minutes) anything to be concerned about?


Question 1: you are on the right track, a spray bottle with a soap/water solution will allow you to see any leaks around the induction pipe etc....

Question 2: Leakdown under pressure is normal, 3.5psi down to 1.5 psi after 30 minutes is very acceptable..........usually drop is measured over 30 seconds!
 
Saws generally fail due to owers not putting oil in the fuel or not using fresh fuel after leaving the saw from season to season.

Other causes are seals or couplings/boots leaking but usually the idle speed increasing and lack of acceleration gives these away.

If your saw is holding pressure and vacuum, even for a minute or two, I would guess the original owner messed up on the fuel.

Spud
 
OK, it sounds like the consensus is that the pressure leak rate is acceptable, and the vacuum leak rate is a perfect zero. That being said I'll just replace the rubbery intake parts if I rebuild the saw. And repeat the pressure/vacuum tests after it's back together.

Next step will be to remove the piston and cylinder. (I need to buy a long 4 mm non ball end Allen wrench for that.) I may take some pics, but it may be a day or so.

If the bearings are good, and I expect they are, I'll rebuild the saw. I don't know yet if the cylinder is salvageable. That will determine if I buy a a p/c kit or just a piston.

So assuming I fix the saw, two more questions.

Question 3: Should I use the Husky OEM circlips for the piston rod? (I have read here that some aftermarket piston and p/c kits have unreliable circlips.)

Question 4: Should I put a sealing compound on the base gasket? If so, what do you recommend?
 
>Question 3: Should I use the Husky OEM circlips for the piston rod? (I have read here that some aftermarket piston and p/c kits have unreliable circlips.)

If your buying a new piston kit from Husqvarna, it should come with the wrist pin, circlips and rings. Meteor piston kits seem to be aok and come in kit form too. The problems seemed to be with the imported asian pistons that had the tapered wristpin ends.

>Question 4: Should I put a sealing compound on the base gasket? If so, what do you recommend?

I would make a brown paper gasket and seal it with Permatex Hi Tack spray copper. This makes a permanent seal that will not leak. If you would prefer to go gasketless on the cylinder base for more compression or frequent tear down, then use a flange sealant like Loctite 515.
 
With that saw, most of the problems I've seen are centered around the intake block. The pulse tube has a chicken#### design which includes a o-ring to install in the cylinder first.

Plan on buying the complete new intake block because the screws that hold the carb down usually strip when reinstalling the carb. They thread into that plastic and don't hold very well.

As I said above, when I do a carb job go ahead and figure on replacing everything between the carb and cylinder.
 
I did a 55 that had no explainable reason for leanout. I got the saw off of Craigslist so nobody could answer anything. I did find the fuel line kinda pinched where it goes through that white plastic piece. I cut with it for 1 tank then sold it on ebay.:cheers:
 
#3 strictly your choice, oem husky is expensive over aftermarket, go which ever route you with, just be sure to check ring end gap and piston to cyl clearance before installing.

#4 No sealant is required, but usually give them a coat of aviation form a gasket
 
With that saw, most of the problems I've seen are centered around the intake block. The pulse tube has a chicken#### design which includes a o-ring to install in the cylinder first.

Plan on buying the complete new intake block because the screws that hold the carb down usually strip when reinstalling the carb. They thread into that plastic and don't hold very well.

The main problem with the intake block is it being stipped of its threads. To prevent this and any time you replace a screw in plastic, turn the screw counterclock-wise till the threads drop in, then clockwise, and you will not damage the threads. The pulse feed outlet to the cylinder in mated to the intake block by a piece for formable hose.
 
The saw should hold 6-7psi with no leaks. Sounds like the induction pipe seal is a potential problem. It might be the source(air leak) of the bad piston. These saws were known for the crappy design in this area with the boot and impulse seal. You were right to test this area instead of blocking it off.
 
The saw should hold 6-7psi with no leaks. Sounds like the induction pipe seal is a potential problem. It might be the source(air leak) of the bad piston. These saws were known for the crappy design in this area with the boot and impulse seal. You were right to test this area instead of blocking it off.

Like I said in my first post, you could hear the air leaking at 6-7 psi. I think the induction pipe, a black rubber tube that doesn't get clamped, inflates like a balloon until it lifts off it's mounts, and then you get a big audible leak.

Maybe a new induction pipe will be tight enough not to leak, but I don't think so. I think it's just a marginal design. I sure wish there was a way to fit clamps, but I don't think there's even enough room.
 
This is what I saw when I first took off the muffler:
ScoredPistoninCylinder.jpg


This is the piston removed:
ScoredPiston.jpg


This is the inside of the cylinder:
InsideCylinder.jpg

I am surprised at how little aluminum has transferred to the cylinder. So I went out and bought some 20 degree Baume Muriatic acid from Lowes to try my had at cylinder reclamation. (Sure wish they had smaller than one gallon jugs.)

Here's the wrist pin:
WristPin.jpg

Question 5: Is that much blueing normal?

And here's the inside of the crankcase:
ViewIntoCrankcase.jpg

There's a small bit of black stuff, which I believe to be ex-piston, which does not feel abrasive. I believe it can all be flushed out with kerosene.
Question 6: How worried should I be about this black stuff? Do all saws with scored pistons have it?

Question 7: How much side to side motion at the top of the connecting rod is acceptable? (I can't feel any radial play.)
The Husquvarna shop manual I have says Replace the crankshaft if radial movement is detected. Slight axial movement (side-to-side) is acceptable.

Hopefully I'll have time to clean up the cylinder tonight.
 
Like I said in my first post, you could hear the air leaking at 6-7 psi. I think the induction pipe, a black rubber tube that doesn't get clamped, inflates like a balloon until it lifts off it's mounts, and then you get a big audible leak.

Maybe a new induction pipe will be tight enough not to leak, but I don't think so. I think it's just a marginal design. I sure wish there was a way to fit clamps, but I don't think there's even enough room.

A new induction pipe should fix it. If not some sealant should do the job. I've used Hylomar and that took care of the issue. If it's leaking at 6-7 psi you run the risk of having the same problem with the next piston. No way it's safe to run with a leak like you describe,imo. Just trying to help.
 
272super said:
A new induction pipe should fix it. If not some sealant should do the job.
It will get a new induction pipe no matter what.
272super said:
I've used Hylomar and that took care of the issue.
Hylomar makes sealants and adhesives. What Hylomar product are you referring to? And where can you buy it?
272super said:
If it's leaking at 6-7 psi you run the risk of having the same problem with the next piston.
How much pressure do you recommend the saw holding? (I may have to go back a re-read the posting on building and using vacuum testers.) It wouldn't surprise me if this design doesn't hold 6-7 psi even with new parts.

That being said, from the Husqvarna service manual for this saw:
From the Husqvarna Service Manual
Crankcase/cylinder
Recommended pressure: 30 kPa (0.3 kp/cm2) (4 psi)
Maximum leakage: 20 kPa/30 sec. ((0.2 kp/cm2)30 sec) (3 psi/30 sec)
This saw already met the above Husqvarna supplied leakage rate with the old parts.

steven1955 said:
Pressure test:
a. 6 to 7 psi (a lot) you could hear a leak in the area of the induction pipe.
b. 5 psi held using a pressure regulator. I then bubble tested the crank seals and base gasket. No leaks. Couldn't get to the impulse coupling or induction pipe due to the white plastic cover/carb mount.
c. 5 psi no audible leaks, but pressure did drop to 3.5 psi in about two minutes.
d. 3.5 psi dropped to 1.5 psi in about 30 minutes.
e. Rotating the crank had no effect.
 
It will get a new induction pipe no matter what.

Hylomar makes sealants and adhesives. What Hylomar product are you referring to? And where can you buy it?

How much pressure do you recommend the saw holding? (I may have to go back a re-read the posting on building and using vacuum testers.) It wouldn't surprise me if this design doesn't hold 6-7 psi even with new parts.

That being said, from the Husqvarna service manual for this saw:

This saw already met the above Husqvarna supplied leakage rate with the old parts.

I use hylomar Universal blue. Yamabond or other sealants would work too. I don't understand the service manual numbers you listed. If that is what it shows than maybe you are good to go. I checked for the 272xp and it showed 80 kPa to start and not dropping below 60 kPa within 30 secs. Much higher numbers. 6-8 PSI seems to be the number listed by most when doing this test for just about any 2 cycle. I don't know why the 55 would be any different.

You could just put it back together and see how it runs. It could be OK the way it is based on the manual numbers.
 
Last edited:
Opinions please.... I cleaned up the cylinder with solvent then soap and water just to get a better look at where I stand before I try the acid cleaning. And now that I've looked closer I don't think it's worth spending the time to clean up.

Take a look for yourselves:
CleanCylinder1B.jpg

I have marked in RED what looks to me like a scratch through the Nikasil coating. I have marked in BLUE where it looks almost like the Nikasil is worn through. As I drag a fingernail across most places in this cylinder I feel high spots, but that one area in the RED feels low.

So before I either buy a p/c kit or before I waste time on cleaning the cylinder with Muriatic acid let me know what you think.
 
I would clean that cylinder up and use it. Hit it with muratic acid and gently sand the rest off. Be patient with the acid,it will pay off. The small line won't hurt anything. Do what you want, but the existing cylinder is usable. I've saved worse.
 
For sure clean up that cylinder. For two reasons:
1. you indicated you have never done it before and so you need to practice.
2. After you clean it up, you may be surprised by how much more "usable" it appears. And if not you have experience for the next time.

What has worked well for me is the long wooden handled swabs the physicians use. Basically a Q-tip with a long handle. A regular Q-tip taped to a pencil or piece of dowel would work as well but I bet you can acquire some of the wooden handle swabs just by asking for some at any health care provider.

Dental picks, another mechanic's essential, have also been acquired by me just by asking the dentist if he had any broken ones he could spare.

I am not sure of the techniques used by different people but I just dip the swab into the acid and gently rub it on the deposits. They sort of foam up from the chemical reaction and when that stops, it is because the aluminum is gone. then move to the next spot. It's amazing how a completely trashed looking cylinder can come back to life.

This cylinder got pretty hot and has that "straight gassed" look to it. I don't think it was from running lean.

When you use the acid, do not dip the swab into the jug. Transfer some into a small container such as the quarter sized top of an aerosol can or other very small non metallic container. Discard this solution after use instead of returning it to the jug.
 
OK, I've started the cleaning process using 20 degree Baume Muriatic acid from Lowes. I dabbed the acid on using some of those 4-5 inch long medical Q-Tips, rubbing it into the questionable areas for about two minutes, then let stand for two to three minutes. Rinsed in a mild water/baking soda solution, rinsed in the sink, and wet sanded with 320 wet-or-dry sand paper. I repeated this four times, and this is what I got:
AcidCleaned2.jpg

I'd like your opinions because my untrained eye is nervous. With much of the transferred aluminum gone I see nine scratches above the exhaust port.
 
Back
Top