You are using an out of date browser. It may not display this or other websites correctly.
You should upgrade or use an alternative browser.
You should upgrade or use an alternative browser.
Mission Backpack MS460 joat/Brad/Terry project
- Thread starter joatmon
- Start date


Help Support Arborist Forum:
This site may earn a commission from merchant affiliate
links, including eBay, Amazon, and others.
At least $700 to go and less than two months to do it. C'mon boys, lets get to giving!! 
Tomorrow is machine shop day. Nik and I will working on the piston and cylinder.
OK boys and girls, we made some chips today. I'll tell the story along with the pics, kind of like a story board.
Nik, Andre, and myself spent 4-5 hours this afternoon doing the machine work on this new MS460. I'll let the cat out of the bag and tell you that I'm using a 038 Mag Meteor piston. It has wider skirts, which happen to be the same as the 064 piston I sold to Wiggs for his 460. The only real difference is the skirts on the 038 Mag piston are nearly identical in length to the 460 piston. We had to open up between the wrist pin bosses, in order to fit the piston over the rod. The same is true for the 064 piston.
We started by machining a set of soft jaws to hold the piston upside down for maching the pin bosses. Here we're using two wrist pins to indicate the piston into position.

Making the cut.

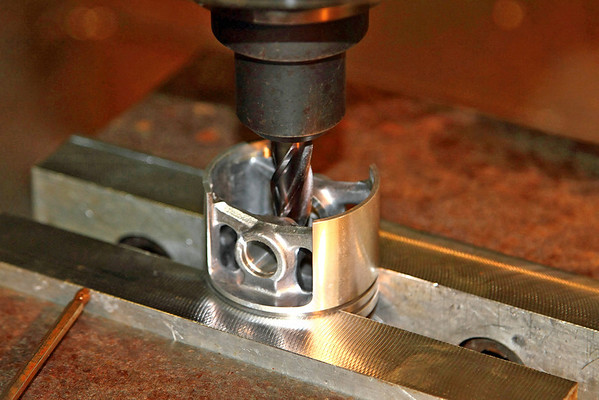

Making sure we cut to the top of the boss.

Deburring the pin bore.

Here I am setting up the piston for the popup. This is my standard job on saw machining days. Andre usually works on the lathe with the cylinder. Of course, Nik is the brains behind the operation, and we're just his grunt labor")

Nik, Andre, and myself spent 4-5 hours this afternoon doing the machine work on this new MS460. I'll let the cat out of the bag and tell you that I'm using a 038 Mag Meteor piston. It has wider skirts, which happen to be the same as the 064 piston I sold to Wiggs for his 460. The only real difference is the skirts on the 038 Mag piston are nearly identical in length to the 460 piston. We had to open up between the wrist pin bosses, in order to fit the piston over the rod. The same is true for the 064 piston.
We started by machining a set of soft jaws to hold the piston upside down for maching the pin bosses. Here we're using two wrist pins to indicate the piston into position.
Making the cut.
Making sure we cut to the top of the boss.
Deburring the pin bore.
Here I am setting up the piston for the popup. This is my standard job on saw machining days. Andre usually works on the lathe with the cylinder. Of course, Nik is the brains behind the operation, and we're just his grunt labor


$337.83
$369.99
WEN Electric Log Splitter, 6.5-Ton Capacity with Portable Stand (56208)
Amazon.com


$26.99 ($0.22 / Foot)
$29.99 ($0.25 / Foot)
VEVOR Double Braided Polyester Rope, 1/2 in x 120 ft, 48 Strands, 8000 LBS Breaking Strength Outdoor Rope, Arborist Rigging Rope for Rock Hiking Camping Swing Rappelling Rescue, Orange/Black
Amazon.com


$225.16
OREGON 295397 Type C (All Round Yukon Chainsaw Protective Trouser, Black, Small
Express Shipping ⭐⭐⭐⭐⭐

$202.29
Oregon Yukon Chainsaw Safety Protective Bib & Braces Trousers - Type A Protection, Dark Grey, Large
Express Shipping ⭐⭐⭐⭐⭐


$14.97
$19.99
Dremel A679-02 Sharpening Attachment Kit, For Sharpening Outdoor Gardening Tools, Chainsaws, and Home DIY Projects,
Amazon.com


$39.99
$79.99
SPEED FORCE Kindling Splitter Log Splitter FireWood Splitter Power Log Splitter, Long Life CAST Steel Blade, Black (XL)
SpeedForceUSA


$63.99
ZELARMAN Chainsaw Chaps Apron Wrap 8-layer for Men/Women Loggers Forest Workers Protective Chain Saw Pants Adjustable
QUALITY GARDEN & HAND TOOLS

$36.99
$59.99
SPEED FORCE Kindling Splitter-Log Splitter-FireWood Splitter–Power Log Splitter Blade Made from CAST Steel, Black Large
SpeedForceUSA


$38.99 ($0.39 / Foot)
Arborist Rope Climbing Rope Swing for Tree(1/2in x 100ft) Logging Rope 48 Strands for Pull, Swing, Knot (Orange)
SDFJKLDI

$79.99
ZELARMAN Chainsaw Chaps 8-layer Protective Apron Wrap Adjustable Chainsaw Pants/Chap for Loggers Forest Workers Class A
QUALITY GARDEN & HAND TOOLS
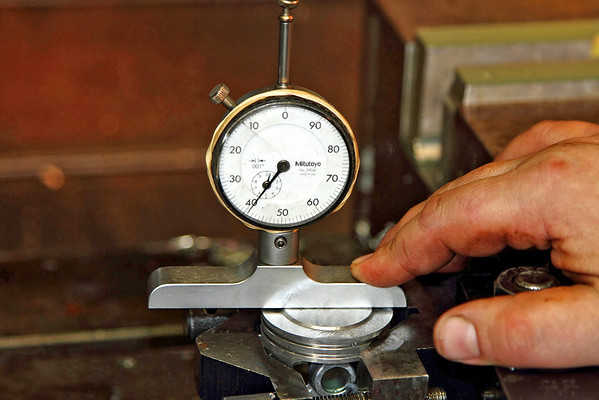
Here I'm indicating, shiming, and getting the crown of the piston flat, within .001" or less.

Here's Nik dialing in the X and Y axis', finding the dead center of the piston.


Making the first shallow pass.

Taking off some meat.

Here's a vid of cutting the popup.
<iframe width="560" height="349" src="http://www.youtube.com/embed/sDqLenkoEUA?rel=0" frameborder="0" allowfullscreen></iframe>
Deburring in order to check the popup height.

Zeroing the depth guage.

We have a .041" popup, leaving the crown .100" above the top ring groove.
Here's Nik dialing in the X and Y axis', finding the dead center of the piston.
Making the first shallow pass.
Taking off some meat.
Here's a vid of cutting the popup.
<iframe width="560" height="349" src="http://www.youtube.com/embed/sDqLenkoEUA?rel=0" frameborder="0" allowfullscreen></iframe>
Deburring in order to check the popup height.
Zeroing the depth guage.
We have a .041" popup, leaving the crown .100" above the top ring groove.
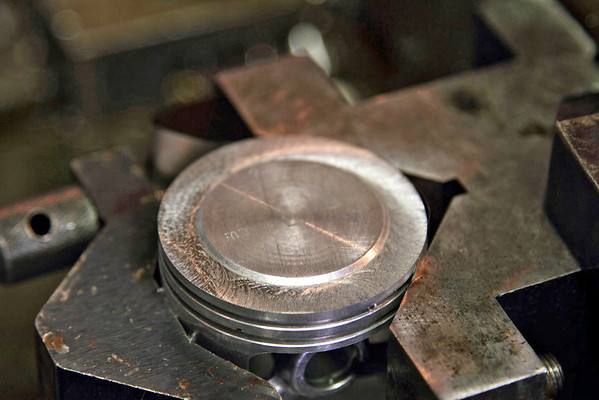
The finished product.
Layout fluid is sprayed on the crown, dropped into the cylinder, and then spun. If any part other than the squish band is touching, it will be ovbious. This is to make sure that the popup is not too big and hitting before the squish band does.

Here's Andre setting up the lathe to turn the spindle that will be used to turn the base of the cylinder down.


Turning the spindle down to size.

Ready to accept the cylinder.

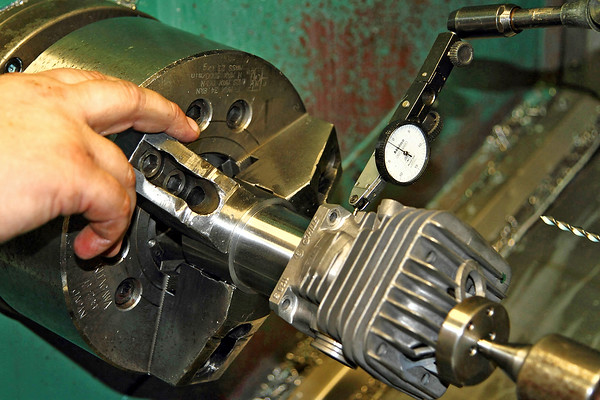
Checking runout on the cylinder base before cutting. It was within .0005". No, that isn't a typo.

Here's a vid of it. I believe the dial is in .0005 increments.
<iframe width="560" height="349" src="http://www.youtube.com/embed/Wag-Ej3F7IY?rel=0" frameborder="0" allowfullscreen></iframe>
Layout fluid is sprayed on the crown, dropped into the cylinder, and then spun. If any part other than the squish band is touching, it will be ovbious. This is to make sure that the popup is not too big and hitting before the squish band does.
Here's Andre setting up the lathe to turn the spindle that will be used to turn the base of the cylinder down.
Turning the spindle down to size.
Ready to accept the cylinder.
Checking runout on the cylinder base before cutting. It was within .0005". No, that isn't a typo.
Here's a vid of it. I believe the dial is in .0005 increments.
<iframe width="560" height="349" src="http://www.youtube.com/embed/Wag-Ej3F7IY?rel=0" frameborder="0" allowfullscreen></iframe>
Last edited:
Cutting .011" off the cylinder base. This will allow me to use a factory base gasket.


The finished product.
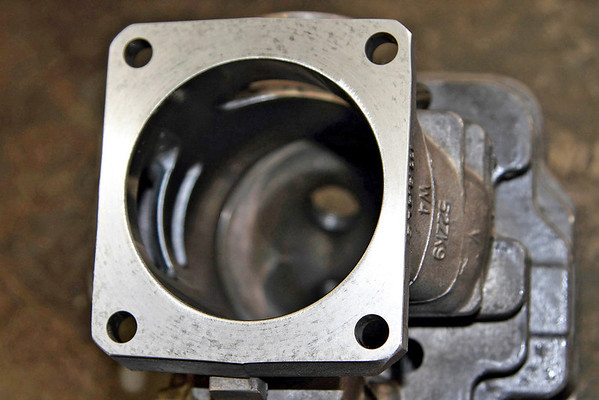
The finished product.
That's it for now. I've got some of the porting layout work done. Hopefully I'll be able to get to it next week. I can't wait to see how this baby turns out. Should be a real screamer for sure.
FATGUY
Addicted to ArboristSite
- Joined
- Jun 2, 2008
- Messages
- 6,535
- Reaction score
- 1,547
there you go gentlemen, now lets see some more tickets sold. BTW, great write up Brad
there you go gentlemen, now lets see some more tickets sold. BTW, great write up Brad
Great machine work Nik
 5 hours x how much per hour? Let's get some tickets bought now and pay for this free labor
FATGUY
Addicted to ArboristSite
- Joined
- Jun 2, 2008
- Messages
- 6,535
- Reaction score
- 1,547
through the office it would be a minimum of $500.
through the office it would be a minimum of $500.
That's only 50 more tickets. We will get there!
Here are some technical specs as it stands right now. No port work has been done at all, so these numbers are just where it ended up after the piston swap. It would be a good runner like it is, no doubt.
Exhaust 102°
Transfers 122°
Intake 76°
Squish .019"
The squish is final. All of the other numbers will be changing
Exhaust 102°
Transfers 122°
Intake 76°
Squish .019"
The squish is final. All of the other numbers will be changing
Nice work, guys. I need to figure out what saw I can sell to buy some more tickets.
FATGUY
Addicted to ArboristSite
- Joined
- Jun 2, 2008
- Messages
- 6,535
- Reaction score
- 1,547
That's only 50 more tickets. We will get there!
I'm confident the always generous AS community will step up like they always do. Remember guys, here's your chance to win an awesome saw but most importantly, help out some kids in the process. Children can't control their situations or circumstances. If this saw fills one little belly, think how good that'll make you feel. The more tickets, the more full bellies.
The more tickets, the more full bellies.
And that is something Nik and I both feel strongly about!
As always great pics, video and write up Brad. We always have a good time with these projects, I'll add Nik does most of the real work, as Brad said we just do what he tells us to.:msp_smile:
Can't wait to run the saw when it's ported!!!!!
Can't wait to run the saw when it's ported!!!!!