Old member, new sawyer. Quick question.

Arborist Forum

Help Support Arborist Forum:

This site may earn a commission from merchant affiliate links, including eBay, Amazon, and others.

Woodsrover

ArboristSite Operative
Joined
Nov 8, 2006
Messages
268
Reaction score
76
Location
Cornwall Ct
Hey all. Long time, no see.

I've been in the woods and cutting firewood forever and decided to get into making my own lumber. I've got a bunch of projects around the place lined up that I need lumber for and a whole bunch of standing softwood timber that I can't burn...Might as well get myself a sawmill. I've been cutting and stacking 11' white pine saw logs in anticipation.

Last week the truck backed in with my brand new Norwood ML26 and I've been slowly putting it together over the past few nights. I've got two tri-axle loads of gravel being delivered this week and I should have it spread out and the wooden bunk built, set and leveled by this weekend. With any luck I'll be milling wood next week.

Now the question...I'm worried about the dirt and such ground into the bark from skidding it out of the woods. I know the havoc this raises with the blades. Rumor has it the dirt on the bark is my biggest enemy. My plan is to pressure wash each log before I set it on the mill but then got to thinking about a Log Wizard. Does anyone use them to debark before they mill their wood? Is it worth the time, money and energy? I think the five minutes it will take to get rid of the bark at the saw cut would be well worth it. There's a sharpener in town that I can use but I'd really like to preserve the blades as much as I can.

Thanks for any advice.

And of course, look for photos of my first lumber in a week or two.

jim
 
Trying to preserve a 25 dollar blade for a few more cuts for personal use is a lot of work and time.Buy extra blades so you wont have a lot of down time.I have used woodmizer double hard with great success.I would power wash and cut.That log wizard is a pain and SLOW.The time you spend you could be cutting.My two cents.
 
i run a bandsaw mill that i built last year and i second the "just power wash and cut". i don't think the time/energy to debark would be worth it. congrats on the mill!
 
I was just going to debark the line where my cuts through the bark would be, not debark the whole tree. I've never run one of those log wizards but I'm getting the feeling they're not as fast and efficient as they look.

Thanks for the advice. A good power wash and run it. Sounds like a plan.
 
Woodsrover, in my opinion, you will soon find yourself just milling them regardless of dirt and debris in the bark. I have been milling for nearly 4 years now and have never washed a single log. I skid some of them myself and fill the bark with dirt in some places. Don't worry about it.. just mill em! I like to keep at least 30 or 40 blades around, and I keep them sharp (I have my own sharpener). This is just my opinion. You are going to love your new mill! I also have a Norwood.. mine is the Lumbermate2000. I love it!:rock::rock::rock:
 
I think you have just heard from some well experienced guys. If I were you, I would head and go forth and mill.

Ps pics are cool.

Old Blue
Taxed to the max for some other SOBs solar cells in...
Kali-bone-ya
 
I think it helps if you can sharpen and set your own blades too. Once you find out how easy it is, combined with the fact you don't have to pay someone to do it, you don't tend to worry about it as much. At least it's that way for me.

I just had a blade, no different from all the others I own, that lasted longer than any blade I've used. I dragged it through 5 logs with dirt all over them and it was STILL sharp. I wish I could have figured out what I did differently to this blade when I sharpened it to make it last so long tho. Unfortunately, like an idiot, I wasn't paying attention, and when I went to bring the saw head back to its' starting point after a cut, the blade was still moving and it caught the log which had bowed upward just a bit. Somehow that bent the blade enough so that when I put it back on the wheels and tensioned it, it snapped. :msp_mad: I'd like to have seen just how long it would've lasted.

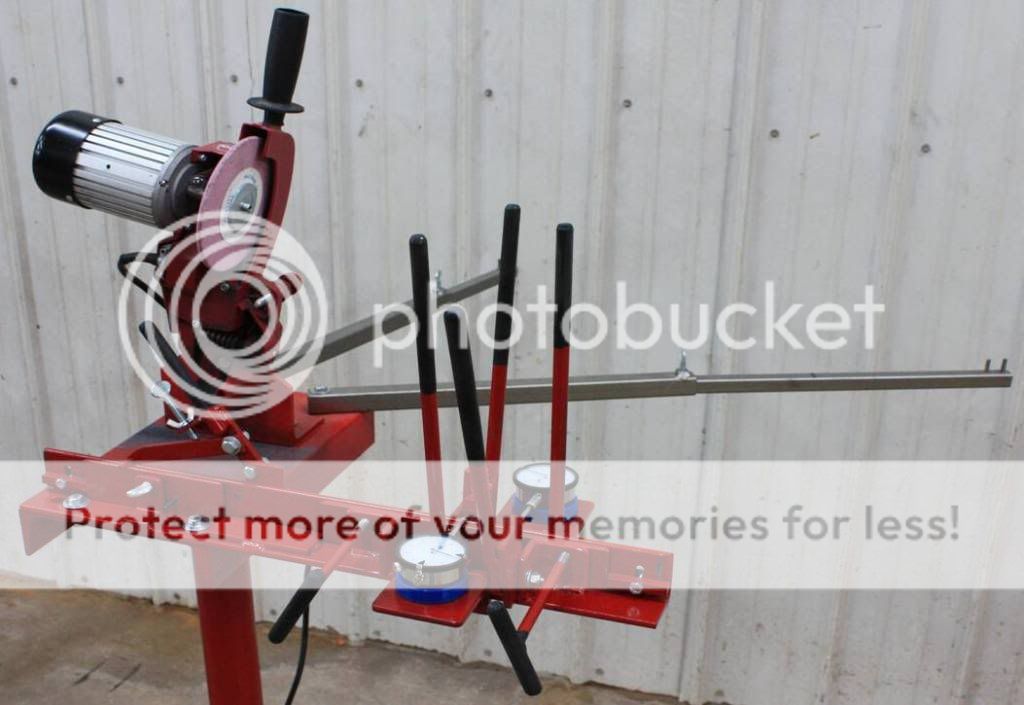
I built the sharpener I use. I wanted to set and sharpen at the same time, without taking the blade off the setter to set the other side of the teeth. I wanted a manual unit, not the automatic ones, mainly because of the expense. I put this together for a tad less than $600.

Setter-Sharpener.jpg
 
RE:get the mud off

Although I'm only on my 4th log for my Woodmizer LT10 I washed my logs with rainwater. The first two logs I pulled thru the mud and down the road were extremely dirty on 1 side. I just parked them under the eave of my shop where all the rain water would pour off. We got about 0.5" of rain overnight, the next day they were clean.
Obviously not a high production solution, requires frequent rain (but I'm in Mississippi, average over 0.2" of rain every day in March), but it was extremely simple and worked well.
 
I think it helps if you can sharpen and set your own blades too. Once you find out how easy it is, combined with the fact you don't have to pay someone to do it, you don't tend to worry about it as much. At least it's that way for me.

I built the sharpener I use. I wanted to set and sharpen at the same time, without taking the blade off the setter to set the other side of the teeth. I wanted a manual unit, not the automatic ones, mainly because of the expense. I put this together for a tad less than $600.

Setter-Sharpener.jpg

Any more pics of your sharpener/setter set up set-up?
 
Congrats on your ML26, they are alot fo fun and productive also. The issue of band tension is very vague with Norwood (x number of turns after band is taugh or omething like that) actually measure your band tension with a dial caliper or something and strive for the band tensin near middle of higher for its construction. As a new sawyer it will save alot of agravation.

They also have Log dog available for the LM26 now and you will realise you should have one, or make one yourself.

Operator thingys.....

-raise the mill head to the top of its travel to refuel the engine, saves cursing the nozzle isn't long enough
- from the start position at one end of the track have a firmly planted patio stone or something for your eyes will read the log scale differently on uneven ground
-add another inline shut off for the blade lubricator so you have one to set your flow rate and one to shut it off or on
-dont worry you will eventually cut into a log post or dog

-most importantly have a great time and enjoy yourself
 
Any more pics of your sharpener/setter set up set-up?
I don't. But the next time I'm sharpening I can take some. I'm busy teaching this week and early next, so it will be after that. Anything in particular you want to see?
 
Interesting grinder setup you have there.
What d the gauges in the ends of those levers measure?
They measure tooth set in the band, im curious as to why there are four levers/handles.
what is your cadence with the indexing arm and from what position?

I have built my own setter but cannot use it in conjunction with a powered sharpener........I think...need some play time.

Straight, left, right, tooth profile, setting skips no 1, sets 2 and 3, and repeats, so you position the indexing arm on the right tooth, index it, sharpen, set sharpen, index,sharpen.................................................dammit
Please tell me you do it as two separate operations!!
 
Thanks for the great replies. Nice sharpener, Chaikwa.
I'm going to wash and run them. Was talking to a local guy with the same mill and that's about all he does.
Got the wooden bunk just about finished last night. If my gravel ever gets delivered I can start to set this thing up and get to work!
 
As you can see from my avitar that I'm a big Norwood fan. You made a good choice!

If you turn the log so that the dirt is on the exit side of the cut the blade doesn't drag the grit through the cut. If I can't do that, I just chip the dirt away with a hatchet. Moving the log with log arch keeps it out of the dirt and also keeps from tearing up the ground. The gravel should provide a good foundation for the mill, but keep it out of the logs. If you can find someone to sharpen and set your blades, I recommend it. Take your time putting it together, follow the instructions, and enjoy it!
 
They measure tooth set in the band, im curious as to why there are four levers/handles.
what is your cadence with the indexing arm and from what position?

I have built my own setter but cannot use it in conjunction with a powered sharpener........I think...need some play time.

Straight, left, right, tooth profile, setting skips no 1, sets 2 and 3, and repeats, so you position the indexing arm on the right tooth, index it, sharpen, set sharpen, index,sharpen.................................................dammit
Please tell me you do it as two separate operations!!

There are 4 levers so you can squeeze two together when you set each side of teeth. The back lever on the far right in the pic is welded stationary to the back of the setter. The other one on the far left is welded solid to the pinch bar that keeps the blade as tight as possible when setting. You have to loosen the pinch bar slightly to advance the blade. The other 2 levers are the actualy setter bars that bend the teeth.

I *THINK* you have the operation down. Maybe. I grind three teeth, then set two, grind 3, set 2, and so on. The dial indicators are magnetically mounted to the flat plate you see in the pic so they can be moved for different tooth spacing. And they're adjustable vertically for different tooth heights.
 
I got to see this sharpener in person last week. It is an awesome set up and super sturdy. I don't have a mill yet but this is one accessory already added to my wish list! Well worth the $$$$.

Just getting the milling bug myself. I can only imagine how excited the OP is about getting his mill up and running. Best of luck with your new toy.


There are 4 levers so you can squeeze two together when you set each side of teeth. The back lever on the far right in the pic is welded stationary to the back of the setter. The other one on the far left is welded solid to the pinch bar that keeps the blade as tight as possible when setting. You have to loosen the pinch bar slightly to advance the blade. The other 2 levers are the actualy setter bars that bend the teeth.

I *THINK* you have the operation down. Maybe. I grind three teeth, then set two, grind 3, set 2, and so on. The dial indicators are magnetically mounted to the flat plate you see in the pic so they can be moved for different tooth spacing. And they're adjustable vertically for different tooth heights.
 
I can only imagine how excited the OP is about getting his mill up and running. Best of luck with your new toy.

We're getting close. Got 30-yards of gravel delivered on Saturday. Built myself a wooden bunk to set the log deck on and got that leveled. Built the log deck, mounted and leveled that Sunday. I've got the carriage about half-built and am working on it for an hour or so each night this week. My 18-month old son loves handing me the nuts and bolts and brackets. Sometimes he even grabs the right thing! With any luck and if the weather holds, we'll be milling this weekend.
 
I think Woodmizer had an electric debarker setup that swings in and barks a strip about 1/2" wide ahead of where the blade enters the log. Mabey you can come up with somthing similar. It will help band life. We have a similar setup at the circle mill I saw at it helps considerably even runnung carbides.
 
Back
Top