Crank pressure test?

Arborist Forum

Help Support Arborist Forum:

This site may earn a commission from merchant affiliate links, including eBay, Amazon, and others.

dgallow

ArboristSite Lurker
Joined
Jul 31, 2010
Messages
26
Reaction score
0
Location
NWAR
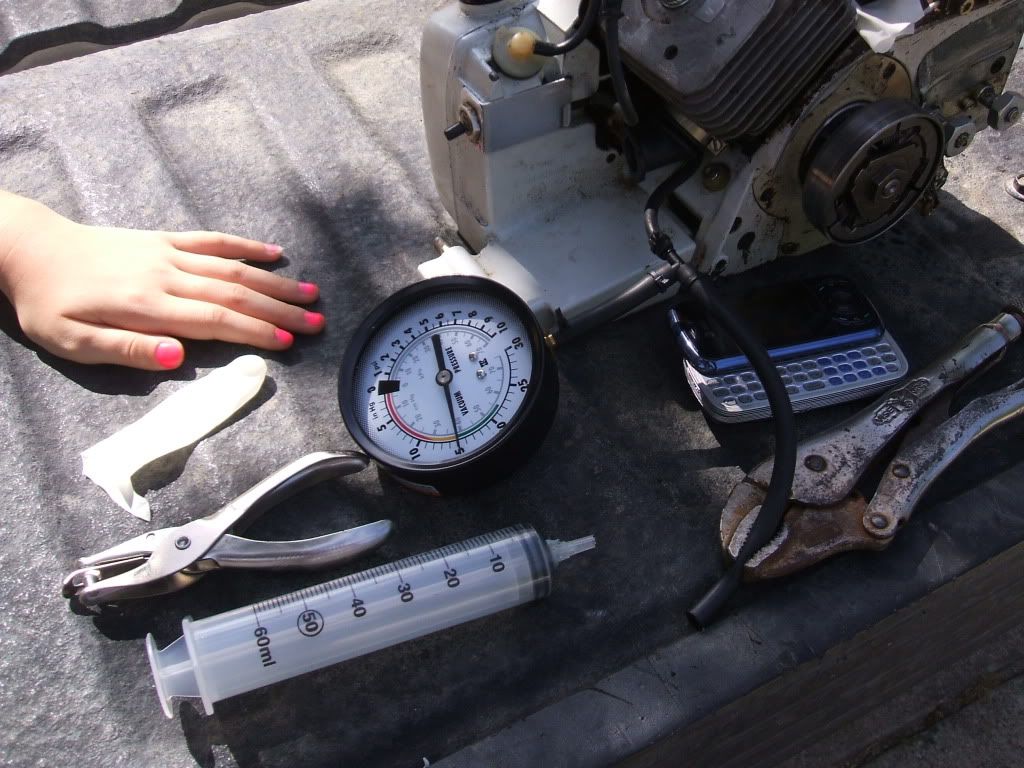
Ran the vac and pressure on an 032 tests through impulse port. No leaks at impulse ftiing. Sealed intake with rubber glove finger tips over intake and the intake boot/clamp over that....no leaks. Sealed exhaust port with a rubber/fiber gasket material from autp parts store. There were micro soap bubbles where air was diffusing into the gasket and out the cut edges during the test. So sealing wasn't 100% at exhaust, but close. May add some latex to the exhaust port seal and retest, if neded?

Not sure how long one should monitor pressure so I ran each test for 30 min.

Here are the results over time with piston at TDC.

Time, min............"Hg............PSI
0.......................8................7.5
5.......................7................6.5
10......................6................5
15......................5.5..............4
20......................4.5..............3.5
25......................4.................3
30......................3.5...............2.5

Results seem normal or abnormal? Any need to pull fly wheel and sprocket and check crank seals?

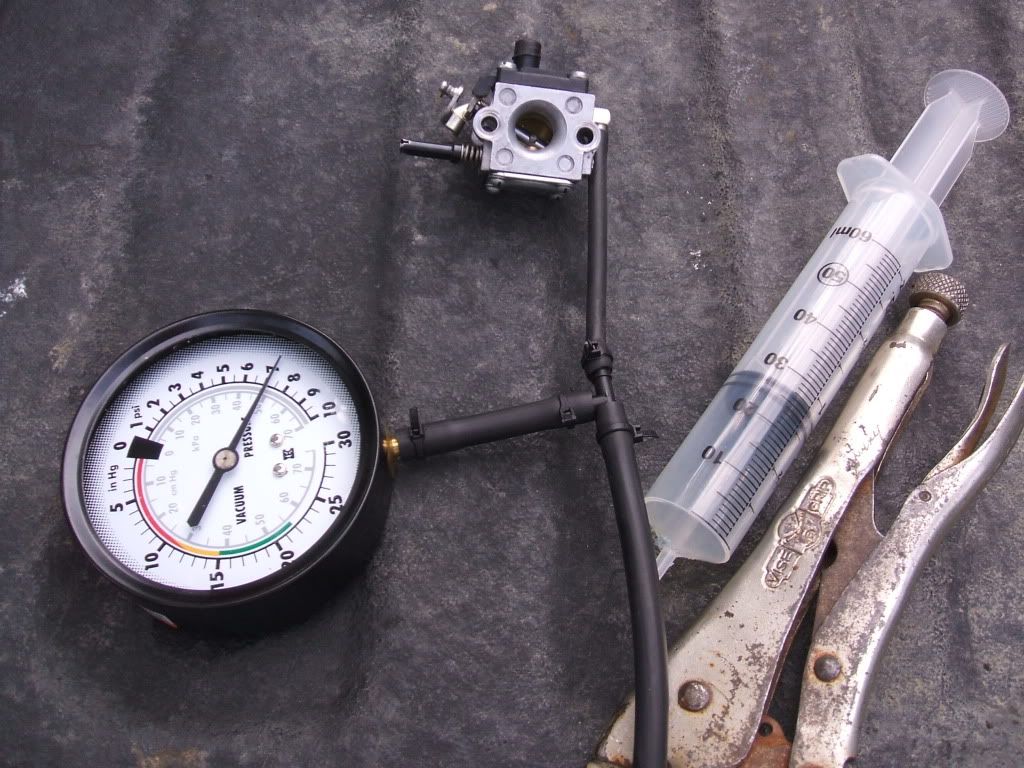
BTW....after cleaning and reassembling carb it held 7.5 psi for 10 min....should be good there.
 
Sure of the measurement units?

The pressure numbers are OK with your set-up, but the initial vacuum should be about 7.5 psig, not inches of mercury.

Stihl service manual states to start testing at 0.5 bars or 7.35 psi vacuum [roughly 15" Hg], then to not fall less than 0.2 bar or 3 psi, as it normally will decay some. I have seen a time factor of 20 minutes in some other manufacturer's manuals, though not in Stihls.

1"Hg equals about a half a psi.
 
Last edited:
Positive on the gauge...inch Hg and psi. Orielly's carries them (I paid $20) and it's a dual gauge air/vac low pressure and large dial for aging eyes. Used the T from the kit and their hose to connect to gauge and vac/air air source. Used a smaller id tube for impulse. Vice grip to clamp the tube and hold pressure. This gause read the same as mighty vac gauge, so would seem accurate. I don't think the mighty vac or an air compressor are needed for this low of pressure/vac. I have some 60 cc disposable syringes(Vet supply) which are much much cheaper. I'll try the syringe idea tonight and post if it works.

I will retest at 15 "Hg...thanks for pointing that out. I read 7 psi vac in the manual but didn't pay atention to gauge face.

http://www.oreillyauto.com/site/c/detail/EQU0/3620.oap?pt=N1745&ppt=C0103
 
Just finished retesting. I put the finger tip from a rubber glove over the exhaust gasket which was leaking before and redid the tests. Vac held 15 inch Hg for 20 min at TDC with no drop....turned the crank slowly for 4-5 revolutions and still 15 inch Hg. Air test at 7 psi proved the same....no leaks for 20 min at TDC and no leaks after 4-5 slow crank turns.

The 60cc Slip-tip syringe worked just fine for both vac and air. It took 3 pulls to get 15 inch Hg and 2 pushes to get 7 psi. Simple to just pinch tube and pull or push again until desired pressure is achieved. Here is a pic of the setup....complete with a 'helping hand'!
DSCF0437.jpg


Worked fine to test carb too
DSCF0447.jpg


I think when it's said and done, the leak was probably here where some wrench ape had difficulty reinstalling the boot and sleeve.
DSCF0448.jpg


At this point, we will replace intake boot, impluse, fuel pick-up/line, and clean the tank. Then redo vac test by installing a fitting/plate with rubber gasket at filter side of carb. If saw still isn't right, I'll look to the ignition sys.
 
Last edited:
Looks great!

You're spot on with the testing now, but that boot has seen better days. The 032AV will run like a new one when you get it buttoned back up.

Looks like someone is not afraid to get the polished chipped off their nails!
 
You're spot on with the testing now, but that boot has seen better days. The 032AV will run like a new one when you get it buttoned back up.

Looks like someone is not afraid to get the polished chipped off their nails!

Fingers are crossed on the boot being the problem! You have any tips on getting the lip of boot pulled back through the housing? That will be the challenge and I suspect someone got frustrated with the one in the pic and fried it!

Yep, the Lil Blonde doesn't mind gettin dirty or trying to fix something. But that will chnge in a few years when she hits 'the stage'! :deadhorse:
 
Fingers are crossed on the boot being the problem! You have any tips on getting the lip of boot pulled back through the housing? That will be the challenge and I suspect someone got frustrated with the one in the pic and fried it!:

Use a short piece of heavy twine as shown in the pics below. I couldn't believe how well it works.
attachment.php


attachment.php


Charlie
 
dgallow, you do know that metal "sleeve" is supposed to be removed before trying to get the intake boot through the housing, right? Looks like your case is in good shape!
 
Yes, the sleeve is added last for install or removed first for disassembly. Will also replace the plastic shim.

Not sure that whoever crunched that sleeve understood the concept....imagine what the fly on the wall listened too! :jawdrop:

Anyway, when I see things like this while going through small engines, it becomes highly suspect. It is a crying shame that several years ago I was offered scrap price ($25) for this saw because of a diagnosed crank leak. Even with authorized dealers, one doesn't always get what you pay for.

My fingers are crossed that the ignition system is okay!

Just want to thank all of you for being helpful! Very nice to find a site like this. I'll have more 'newbe' questions down the road so please be patient!
 
Last edited:

Latest posts

Back
Top