Anyone ever milled lap siding at home?

Arborist Forum

Help Support Arborist Forum:

This site may earn a commission from merchant affiliate links, including eBay, Amazon, and others.
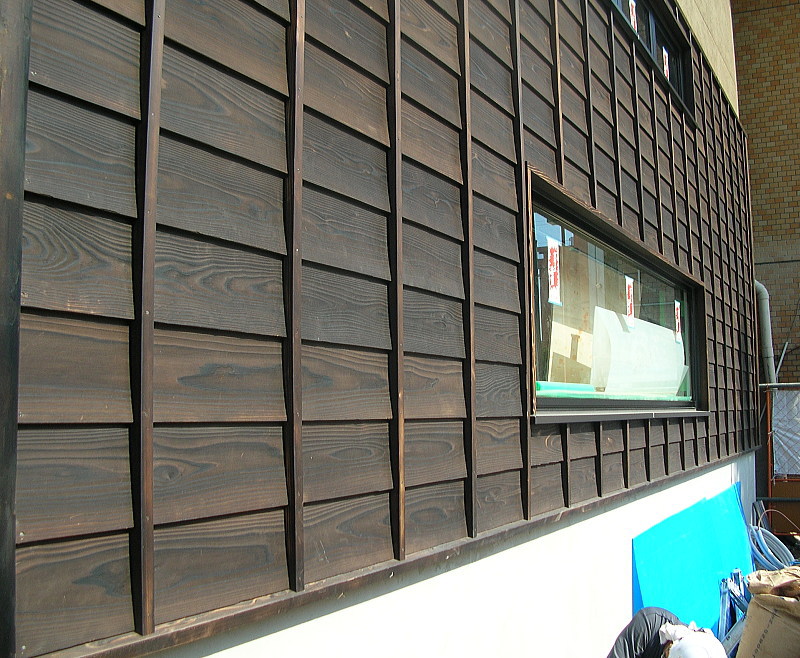
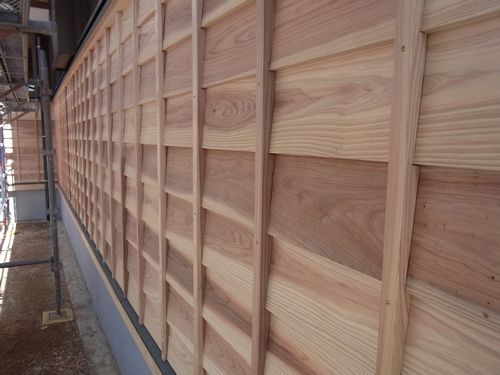
In Japan, lap siding is commonly done with no bevel. The boards are all equal thickness and a lap joint is cut into the top and bottom edge of each board. I think this is called shiplap. This allows for all the boards to lay flat on the wall with a tighter seal. The cuts can simply be done into the boards with a tablesaw.
images

Vertical runners are also put in to prevent warping.
images


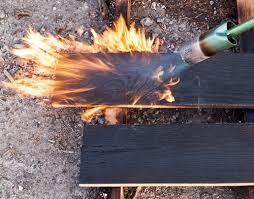
They also burn the boards instead of using stain/chemicals to prevent bugs and rot.
images


Then sanded or planed for nice results. Cedar works best for this. The process is called "yakisugi"
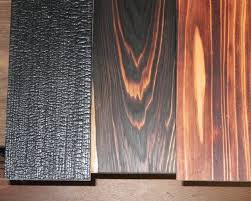
images
 
In Japan, lap siding is commonly done with no bevel. The boards are all equal thickness and a lap joint is cut into the top and bottom edge of each board. I think this is called shiplap. This allows for all the boards to lay flat on the wall with a tighter seal. The cuts can simply be done into the boards with a tablesaw.
images

Vertical runners are also put in to prevent warping.
images


They also burn the boards instead of using stain/chemicals to prevent bugs and rot.
images


Then sanded or planed for nice results. Cedar works best for this. The process is called "yakisugi"
images
You have completely read my mind! I've spent the day looking at different ways to do the shou sugi ban finish. And was thinking ship lap siding would save me a pass through the band saw, lower the total amount of logs needed to mill, and also look really nice. There is a thread on here started by "John neeman tool"s carpenter building his home from scratch. He uses this method, but with board and batton style siding. I've found a few companies here in the USA that sell shou sugi ban/yakisugi siding in a variety of species, cypress, cedar, Douglas fir, yellow pine etc. Which makes me think the species doesn't matter too much. I'd finish it with linseed oil as he did if I went this route. So many options!!

In the photo above about the vertical runners, that is underneath the siding correct? I was planning on doing that no matter which style was used, but just wanted to clarify. Never seen it on the outside before :) thanks for the info!
 
708638a6f96acfcf4bb00224d3022323.jpg


The extension on this mill in the background has the Woodmizer table that is made for doing what you are talking about.

Surely there is someone in your area that also has this set up.

The time it takes to do this would justify hiring someone else to do it for me: and there is a LT40 Hyd under the shed here.
 
In the photo above about the vertical runners, that is underneath the siding correct?

Sorry, not quite sure what you mean there. The vertical runners are on the exterior, exposed to the outside.

Actually though, I think the runner photo shows full overlapping bevel siding (also done in Japan) with the runners. But in that case, the runners are notched to allow for the bevel (nice look, but time consuming and tricky). For the full overlap bevel with notched runner, it might be better seen in these photos.
sugi6_img09.jpg


image.php


H23,4,27sekoumae.JPG


images


But again, this is pretty intricate and tough to do without full-scale machine production.

But I think you understood that I meant to do a non-bevel, and overlap with a shiplap on the edges, not a full overlap, therefore the runners don't need to be notched and the boards lay flat at the same thickness on the wall, like this:
53dbe6393f27ea70c808dc5fb61cd60c.jpg


siding2x12wfchannelvrs.jpg


As far as wood choice, for one thing, cedar is ridiculously plentiful in Japan which is probably the main reason they use it, but in my experience, it also allows for the burning much better than other forms of evergreen and pine (also, Japanese cedar is a bit different than US species). Cedar has less oil and the wide soft grain lets the scorching happen quick. I just use a small hand-held canister gas torch.
images

For some photos on the yakisugi (which translates as "burned cedar"), you can do an image search with this 焼き杉 or for the yakisugi siding, you can search with this 焼き杉 サイディング
 
Those notched runners are pretty sweet. Looks super time consuming though.


Sent from my iPhone using Tapatalk
 
If you want to do "yakisugi" (not sure if thats the correct terminology) to bevel siding that your making yourself as well as adding the vertical notched runners.....you will take a looooong, looong time.. No if ands or butts...
I have done some smaller yakisugi projects to red cedar and its really time consuming to get a nice finish... Boards need to be planed/ or finished just a tad better than a bandsaw. Torch away getting a even burn over board, sand with s.s.wool or similar, possible burn more, Sswool again , apply oil finish not once or twice but three times at least for a nice sheen (if thats what your after)...Now do this again for your other 415 -12' boards...
Dont even get me started about vertical notched runners.......lol
Have at it!

G Vavra
 
Sorry, not quite sure what you mean there. The vertical runners are on the exterior, exposed to the outside.

Actually though, I think the runner photo shows full overlapping bevel siding (also done in Japan) with the runners. But in that case, the runners are notched to allow for the bevel (nice look, but time consuming and tricky). For the full overlap bevel with notched runner, it might be better seen in these photos.
sugi6_img09.jpg


image.php


H23,4,27sekoumae.JPG


images


But again, this is pretty intricate and tough to do without full-scale machine production.

But I think you understood that I meant to do a non-bevel, and overlap with a shiplap on the edges, not a full overlap, therefore the runners don't need to be notched and the boards lay flat at the same thickness on the wall, like this:
53dbe6393f27ea70c808dc5fb61cd60c.jpg


siding2x12wfchannelvrs.jpg


As far as wood choice, for one thing, cedar is ridiculously plentiful in Japan which is probably the main reason they use it, but in my experience, it also allows for the burning much better than other forms of evergreen and pine (also, Japanese cedar is a bit different than US species). Cedar has less oil and the wide soft grain lets the scorching happen quick. I just use a small hand-held canister gas torch.
images

For some photos on the yakisugi (which translates as "burned cedar"), you can do an image search with this 焼き杉 or for the yakisugi siding, you can search with this 焼き杉 サイディング


Those notched straps really showcase some amazing craftsmanship, and you are also correct that I will probably not be doing that. Haha at least not on the bulk of the house, maybe on a special spot in the back patio area. You are very knowledgeable in this technique! I do have a question about it: is there a large difference in the protective value depending on HOW charred the wood is? Some do a heavy burning and then brush off most of the black carbon before coating with oil. While the classic japanese homes I've seen are completely charred and carbonized without any brushing or scraping. Are you aware of one being better than the other? I do like being able to see the wood grain, but if it takes away much of the protective value I may use stain instead of linseed oil to gain back some durability in the installation. Thanks again for your input:)
 
The protective value of charring probably depends on tree species and external conditions (rain, temp, humidity, bugs, etc). As mentioned, Japanese cedar is a bit different than US cedar, mainly in that its faster growing, absorbs more water, and is softer. But then again, Japan is generally wetter and more humid than the US. I've tried charring other woods, and while the results vary, they all don't have the same effect as cedar (though some do look nice, but in a different way). I prefer just hitting it with a torch for a couple seconds (while keeping it in constant motion), where the grain becomes immediately pronounced. It may take a few boards till you get the hang of it (variables include speed of movement, flame temp, distance of flame to wood, and tightness of grain).

But simply put, Japan cedar is actually a pretty crummy wood, and the inventiveness of charring it is to be able to utilize it, since its so common (and I mean mono-culture common. Its everywhere.). By charring it, it can resist bugs, rot, and moisture better. Mainly, when you char the wood, the softer white grains take more effect from the flame, while the red tannin parts take less. Since the tannin in a tree is what is most bug, fire, and rot resistant, the soft white non-tannin part would be the first to succumb to the elements, but charring offsets this. To thoroughly blacken helps more I suppose, but it's probably unnecessary in cedar unless it's getting heavy moisture exposure, like if it's in constant shade, on the windward side of a house in a rainy place, etc. But I'll admit that I don't know much about thorough blackening and its comparably protective effects. And again, Japan is quite wet, but if you're in the PNW, its probably similar.
 
@stikine it seems like a lot of those boards have nice quartersaw grain, which is most effective in being long lasting. Looks pretty nice!

Here's a video of a DIY quartersawn clapboard mill.
 
@stikine Whats up with the roof? Wood shingles? How are they cut and how do they last?
Those are hand split red cedar shakes. I split log rounds into 24" bolts and then split the shakes out with a froe. The shakes are all quarter grain so they last a long time.

There are a bunch of hemlock needles on the roof at the moment which gives it that red fuzzy look.
 
Those are hand split red cedar shakes. I split log rounds into 24" bolts and then split the shakes out with a froe.

Good on you! Looks sweet. Must have been a heck of a workout!

I have a friend here who did the same thing about 13 years ago on his garage, also with cedar. Took him weeks to split and went through three home-made froes. Most people thought he was nuts due to all the rain we get, but its still holding up.
 
I packed the shake bolts out of the woods and brought them home so I could split the shakes whenever I had some spare time in the evenings. It was fun splitting them and figuring out how to get the best yield. I didn't brake any froes and I found that old bowling pins make great froe mallets.
 
I packed the shake bolts out of the woods and brought them home so I could split the shakes whenever I had some spare time in the evenings. It was fun splitting them and figuring out how to get the best yield. I didn't brake any froes and I found that old bowling pins make great froe mallets.

I've been telling everyone that what you did is what I want to do and they all think I'm nuts! Haha the few and the proud I suppose. Question: how clear does red cedar need to be to split for shingles? Of course any retailer will say "only the finest old growth straight grain will do for our customers" but in reality, what height and diameter of tree will start to produce good shingle bolts?
 
LOT'S of shingles were made from white oak too... along with some other species...

SR
 
So after doing a lot more reading about the yakisugi method I may actually switch gears and mill board and batten siding! Almost all the old japanese buildings I've seen with that siding the boards are mounted vertically to some respect. Plus it would be a much simpler job cutting all square boards. I'll attach pictures of the house I'm buying and a house I think has a good look for reference. Screenshot_20160810-133423.png Screenshot_20160810-121853.png
 
I may actually switch gears and mill board and batten siding!

Yeah, I was thinking of suggesting that too. Could look pretty nice.

Though I'd be cautious about the roof shingles. Thats a lot of wood, and not necessarily wise to do a big roof on a primary residence for your first project. There may also be building code and insurance factors too, so look before you leap.

You may want to use a program like Sketch Up by Google to both make a visual model and to later make any building plans. Its a free program download and pretty easy to use once you figure out all that can be done. You can even put in your own photo and design right on top of it if you want to get an idea of how it'll look. http://www.sketchup.com/
 
I'm a bit late to this thread but I have found that milling tapered siding is very easy when using a chainsaw mill. I did some 7" wide tapered from about 11/16" to 5/16". Just square the log to put an edge on it, cut beams the thickness depending on what you want the width of siding to be. Put washers between the cross piece on your mill attachment, and experiment a little to get the right dimensions. Switch sides after each cut. Best if you have decent sized logs to work with. Fuel and bar oil are a relatively small expense. Once logs are milled down to beams then it's easy milling light duty work for your chainsaw + nice clean wood = less sharpening.
 

Attachments

  • 2016-02-07 15.27.32.jpg
    2016-02-07 15.27.32.jpg
    1.6 MB
  • 2015-08-09 10.55.45.jpg
    2015-08-09 10.55.45.jpg
    1 MB
  • 2015-08-08 11.35.24.jpg
    2015-08-08 11.35.24.jpg
    970.5 KB
  • 2015-11-21 14.00.32.jpg
    2015-11-21 14.00.32.jpg
    2 MB

Latest posts

Back
Top