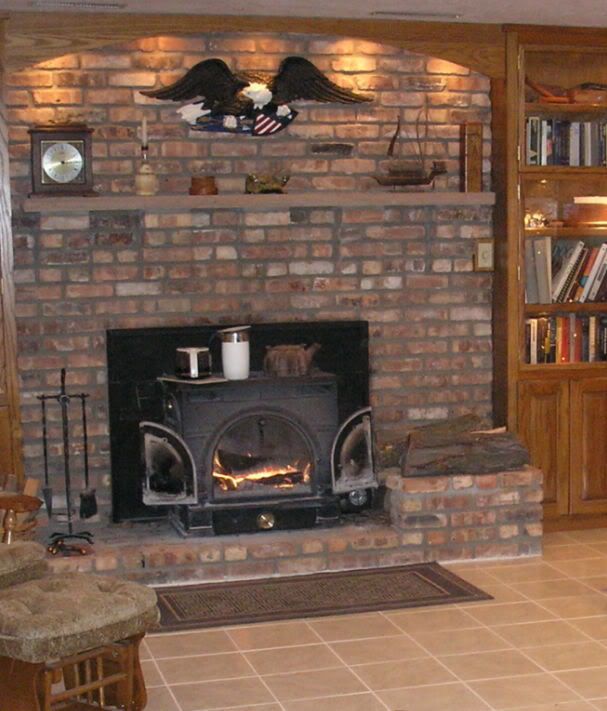
Federal Airtight 264CCL Questions

Arborist Forum

Help Support Arborist Forum:

This site may earn a commission from merchant affiliate links, including eBay, Amazon, and others.
federal airtight

federal airtight
Just picked up the same stove as you for free! I was doing some work at a customers house and she asked if I wanted it. I'm looking to set mine up as a free standing stove rather than a insert although it was used as a insert and has all the insert sides. Mine has a blower motor on the side that needs to be replaced I'm gonna try the sites you guys listed.Your conversations jabs been helpful,Thanks!


Free gives you a whole lot of wiggle room for redoing some of the stove. Not sure if you were referring to the original Federal stove, the 264 or the 288 but as I said a lot of the same principles apply. If you can have the blower repaired ( its over a hundred if you can find a new one ) the heat magnification is multiplied so much its hard to believe compared to no blower.
Good luck, the Federals got some bad press but if you can stand to redo the caulking and a few minor items they perform admirably. BTW, the 288's at least mine have the blower in the rear with a magnetic sensor that's placed higher up on the stove to maximize efficiency. If I recall they could be mounted either to the side or the rear. Lastly, these stoves perform better when run a bit hot. However when you start your fires remember they are cast iron and can crack if fired too quickly. The 264's supposedly ran at 78 % efficiency at 67,000 BTU's'. The 288's were rated at 85,000 BTU's. Weights respectively were 441 lbs for the 264 and 612 lbs for the 288's.. The 288's could burn coal or wood. If burning coal there was a cast iron strainer that was put in place of the cat converter. You also had to put optional inside sides when burning coal to protect the firebox. I never burned coal but bought the sides and the strainer anyway in case I decided to do so. I bought mine new to the tune of over $ 1,000. A lot of money in the mid 80's. :D
 
I've got this one, about 20 yrs. old, I resealed with stove cement and new ropes and it runs like it did when new. I replaced the original catalyst last year, we really like it and the only thing that I can think of that could be improved is a stronger blower.

http://www.arboristsite.com/attachm...ning-equipment/268872d1356096739-dscf3169-jpg

And here I thought I was the only one to spend the time doing the brick for a floor for the stove :laugh: Is that the 264 ? Nice brass along the top. You did a nice job with the brick. :msp_thumbup: And I'm still on my first cat.. We used it hard for about 12 years b-4 we switched to oil then barely used it. When we roast hot dogs in the middle of winter a few times a year we obviously open the twin doors and when we are done we close it up and stay down a few hours watching the flames thru the glass doors. Very soothing..
 
Try to Repair that Blower

A few years ago my blower quit working on my 288. I decided to see if I could repair it. Actually, it turns out that the repair is usually a piece of cake. The blower's motor bearings eventually make it impossible for the motor to crank the little squirrel cage at the start.

(1) Remove the blower housing from the stove by removing the machine screws and take it all to your workbench.
(2) Remove the motor from the housing and clean out all the dust buildup.
(3) Oil the bearings with ordinary 5w30 motor oil. You will likely note an immediate improvement in how easy the armature will turn.
(4) You can use a jumper wire to bypass the magnetic thermal switch to see if she spins. Reassemble the motor to the cage.
(4) Rebolt the housing to the stove.

Usually, the motor is not burned out. It's only the bearings that need a lube. I usually do this about every two or three years as a standard maintenance step.


Thanks for the tip.. I guess my 1986 is due for an oiling/cleaning ?? :msp_biggrin::msp_rolleyes:
 
And here I thought I was the only one to spend the time doing the brick for a floor for the stove :laugh: Is that the 264 ? Nice brass along the top. You did a nice job with the brick. :msp_thumbup:

This is the 2462, the extra large of the 246- series. I was on the road and a neighbor built the base raised on 2X6 and plywood platform, helps with loading the stove. I thought that the choice of brick that the wife picked out would be awful, shows what I know. I used to have an airtight stove that didn't have an ash pan and I said never again. This one has the pan and a grate so I can take them out even with a full fire going.
 
This is the 2462, the extra large of the 246- series. I was on the road and a neighbor built the base raised on 2X6 and plywood platform, helps with loading the stove. I thought that the choice of brick that the wife picked out would be awful, shows what I know. I used to have an airtight stove that didn't have an ash pan and I said never again. This one has the pan and a grate so I can take them out even with a full fire going.

Agree... the shaker grate and ash pan makes it so much easier to remove than moving the hot fire to one side of the stove and then try to carefully put hot ash in a bucket. Just shake the grate a couple of times then let the ashes cool off..then take the whole pan outside and dump it. The mess stays in the pan. Everyone knows what happens when you put hot ash in a bucket no matter how carefully... some of it goes up in the air and around the room. I made a corner raised platform as well. Laid the outer brick and then poured concrete level with the three course high brick. I then laid the pattern much like your top. Only downside is that its tough to keep the brick clean since its a cracked design. If I had to do it over I would put on a slate top. :msp_biggrin:
 
Hi guys I just got a
Dutchwest india 263476 I believe 25 1/2 wide at top

Cleaned it up some everything moves everything needs new seals and thr back wall plate got some rot it looks like

Can anyone look at the pics and tell me if I have everything or what I have and what I need
first wood stove I've ever owned
going to be burning wood no coal

I understand the ash rockers
I don't understand the air tubes? And the door behind the round piece going to the exhaust
also how critical is the rear panel its got a hole in it inside of stove
thanks guys any helps appreciated
got it at a estate sale for 100$
god is it heavy
 

Attachments

  • 1411344071968.jpg
    1411344071968.jpg
    88.7 KB
  • 1411344096960.jpg
    1411344096960.jpg
    57.1 KB
  • 1411344200148.jpg
    1411344200148.jpg
    51.3 KB
The rear panel should be replaced with 1/4" or better yet, 5/16" plate steel. You can buy the steel from a welding shop that fits perfectly and then drill your own holes for the two bolts that hang it. This stove looks to be different from mine because mine does not have the grate you show but simply two rotating ash rocker drops for the pan underneath. However, mine is the 288, so your design is a bit different.

I'd still replace that back panel. Yes, these stoves are heavy. Lots of cast iron went into them. Trace back this thread to look at other pics. Mine will actually accept a 25" log upon command. My first fire of the year may be tomorrow morning.
 
Thanks for the info I'll definitely make a new one I'm very mechanical and weld steel and even cast I'm going to be taking apart sand blasting and painting it put it back together redoing all the sealing gaskets and the sealing in the top
What should I be using to seal the edges at the top I can look in the vents and see that it's cracked also is there any good paint to use that I can get I don't want to use something cheap and then end up having to redo it please let me know what I should use or what is better and what I shouldn't use I know it has to be a high heat paint but I don't want to use just old Rustoleum high heat
My biggest questions about the air tubes? coming out under the cat do they connect to another part or I could run a pipe cleaner through it anyone know anywhere I could get a spark screen 2 I don't have that thanks a bunch guys I'm on page 7 and still reading
 
I found the post where u put up pics of yours but there broken links any chance I can take a look?

This one has a bit of surface rust the wife thinks it's ugly so I have to pretty it up and prove her wrong it's going to be right in the corner of our living room so it has to look good
 
Pretty nice now yours is the bigger one than mine and I saw a chart that says mine has more but output ?
I live outside north of Philadelphia and single home built in 1835 17 wide 60 some long brick walls with plaster coat no wood plaster on brick
Roughly 1100sq
ft and I plan on this heating the house I have plenty of seasoned wood available so that's no issue
From what I read it might be able to do it
Other source of heat is a oil boiler from the 60s and we spent 2200$ on oil from nov to march last year I put in a electric water heAter and havnt used oil since and don't want to one fact is that the oil tank is buried and takes on water
Problem for another day lol

Thanks a much man. How does much yours heat?
 
Mine heats about half the house. The bottom level is a walk-out basement and that's where it rests--all 600 lb. These stoves were built to last a lifetime. I bought mine in 1987 when I bought the house and I've never left it. I figure it saves me about $500 a year on my heating bill.

My modifications to the stove have been minimal. I abandoned the Cat combustor by building a shelf using angle iron and then choking the flue using a square plate with a bunch of holes in it to allow the gases to escape, similar to the coal-burning flue insert that came with the stove. It seems to work well and is easy to clean. See my Pics earlier.

The blower (if you have one) will need annual oiling of the bearings or it will freeze up. I just had the chimney scraped by a pro, and he does this annually also. It's worth it.

Buying parts for these stoves has become almost impossible due to their age. The special glass for the doors costs an arm and a leg. Glaziers don't like to fool with it so they price it sky high. Figure $130 per pane or more. Using small angle iron I also made glass pane holders when the originals burned out. Despite all of this repair, I still rate the stove highly because many stove owners have done more than I have to keep their stoves operating.

BTW, you can spin polish the brass valves and handles using a drill press and fine sand paper. Afterwards, they shine beautifully. That takes only about a half hour.
 
I'm currently trying to figure out my measurements and clearances for the installation in the corner it's a solid brick wall and have to 2" slate underneath
The manual I found says I can get 12" from corners with a heat shield? Walls are solid brick 22" thick should be fun to punch through I can't find something reasonably priced to go thru the wall I was thinking a piece of double wall to go through and then single the rest of the way up can't find anywhere local where I can just go look at exhaust pieces and say thats what I need

Also I need the oval to round adaptor for the stove anyone know where I can get one of those?
Here's a pic just pulled the wood paneling off I bottom of the wall and the furing strips gotta remove the wall paper and paint
Should I use high heat on the walls?

Thanks
49f181f07ccaad4b6313782e56e806fb.jpg
 
Thought I would update
b4f1e26d7dcbadc3a67aa33143826bbd.jpg


31d0ac2bd689d3cdfdbe375aedfb1a9d.jpg


Stove all cleaned up and pad finished
Just gotta get it inside and run a chimney now
Gettin cold quick
Lol
Thanks guys
 
Needless to say, a clean chimney with a good draft is very important. One of the really nice things about this stove is that it has all the controls that you need to control the fire. But, you need a good chimney to be able to do that.

That's a beautiful finish on this stove. Perhaps I need to work on mine and shape it up.
 
Rustoleum engine enamel says its good for 2k
Cleaned the glass with Rutland glass cleaner a nd it looks brand new
I blasted it first with coal slang
I am now looking for a oval to round adapter know where I can get a good quality one? Everything I find seems super cheap and no where local stocks them to see the quality the ones online look like super cheap thin sheet metal
Its hitting 35 here tonight and no heat so im rushing to install

Thanks again
 
Back
Top