How To Remove Aluminum Transfer Without Acid

Arborist Forum

Help Support Arborist Forum:

This site may earn a commission from merchant affiliate links, including eBay, Amazon, and others.
So reading through this whole post, if there is no raised transfer left and you don't go through the plating, the cylinder is good to go. Does anyone have a picture of a cylinder that has gone through the plating, just wondering what that looks like.
From my experience if you are through the plating it will start to look a little gray in color instead of shiny.
Kind of like this.
352c7077808f56e14d8ae66c21d43e53.jpg


Sent from my SPH-L720 using Tapatalk
 
From my experience if you are through the plating it will start to look a little gray in color instead of shiny.
Kind of like this.
352c7077808f56e14d8ae66c21d43e53.jpg


Sent from my SPH-L720 using Tapatalk

Thanks that is what I was looking for!

I'm not concerned about the one I just did, I just wanted a visual.
 
I use a hacksaw. Then you can squeeze it together tighter with pliers.

You mean to tell me that an evolved simian like yourself uses a hacksaw like a savage in a cave painting instead of a handy power tool for splitting your mandrel?
For shame good sir, for shame
DDave
 
So reading through this whole post, if there is no raised transfer left and you don't go through the plating, the cylinder is good to go. Does anyone have a picture of a cylinder that has gone through the plating, just wondering what that looks like.
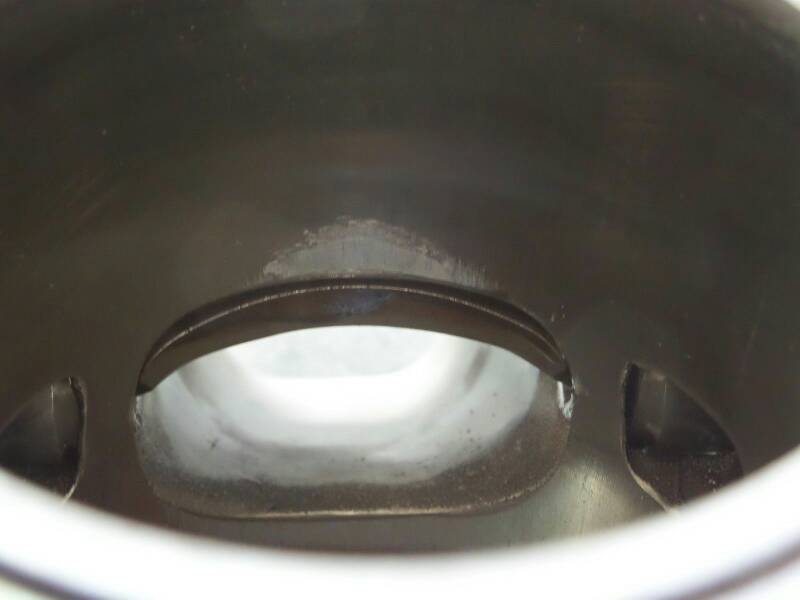

Let me see if I can get some pics that will show what it looks like......

I had a total junk Husqvarna 55 cylinder that I was playing with just to see if I could pull a miracle on it....

well, it was cleaning up great and then I guess the transfer was too heavy all around the port edges and I was on the edges too long.... and it went through to aluminum.


You will easily be able to discern the different color and shine of the raw aluminum vs. the plating if you go through.


On a major side-note, I wanted to say thanks to Mastermind for sharing the technique without using muriatic acid....


using this technique, I have salvaged 4 cylinders so far that all turned out very nice and saved me a bunch of $$$$$$$


I really do honestly enjoy saving something that most shops would have just thrown in the trash and ordered a brand new part as a replacement.
 
Great video, and to be honest it's a method I would have never considered.

I've only ever used acid to clean, then finish up the cylinder bore using an AO 320 grit flex hone.

I have a couple of old cylinders I may have a play about with using your method, but wondering what sort of RPM is the air tool operating at?

Thanks again for providing a very simple method

I don't use any air tools (I hate the sound of them). It's a Foredom flex shaft tool. 18,000 max RPM with a foot pedal control.
 
I use a hacksaw. Then you can squeeze it together tighter with pliers.

I learned from this excellent post and I've been off acid for a year (pun intended). When making my slotted mandrel, I selected a 6" x 1/4" aluminum nail with the hope that if it were to hit the cylinder wall, it would be less likely to have any effect. It is also easier to cut the slot with a hacksaw and to turn it down to the 3/16" diameter the Fordham can handle.
 
I used a steel nail and cut the slot a little shorter than the width of my Emory paper roll, I also roll up a lot of emery cloth so there is a big margin of safety and separation between my mandrel and the cylinder.

I roll off about 1 foot of cloth and use it until it is loaded up, then I cut off the loaded portion and go again.
 
Back
Top