how to remove muffler on stihl

Arborist Forum

Help Support Arborist Forum:

This site may earn a commission from merchant affiliate links, including eBay, Amazon, and others.

smf834

ArboristSite Lurker
Joined
May 30, 2019
Messages
15
Reaction score
8
Location
washington
I've been looking for a video to show how to disassemble and remove the muffler on my 029S, but to no avail. The muffler is very loose, and one of the screw on the outside on the muffler broke off as i tried to unscrew the outer grill. Any help is much appreciated.
 
I think somehow when i unscrew the hex nut, it broke off part of the screw. It looks pretty rusty from the outside, so I gather might as well replace the muffler altogether. Where is the 3 screws going in from?
 
There is notches on the cylinder where the head of the bolt slides in. The threaded part is sticking out of the muffler. After removing the three nuts, you should be able to pull the muffler off. There should be a gasket and heat shield behind it. Spray some wd40 on the nuts and let it sit for a day. That should keep the bolts from breaking. Sounds like the bolts should be replaced. Torqued properly and use a thread locker on the new ones.
 
As Jasonrkba stated, the bolts slide into slots on the side of the cylinder. They have square heads on them so they won't spin. It takes a little wiggling to get them out but they will come out with some finesse. You can get a new set of bolts on-line for about $5. Or....you can purchase an entire new aftermarket muffler kit with muffler, bolts, nuts, alignment gasket, and exhaust outlet flange for just over $14 with free shipping. Available for sale on a popular internet auction site.;)
 
Maybe this will help. If all 3-nuts are off or broken off the muffler should pull straight out. the bolts can be replaced easy as long as the slots in the head aren't damaged. Just slide them out of the grooves and slide the replacements back in.


a7e8e258-edfc-4d78-b6b1-cebaf8608a6f.gif


Skip to about 4:00min

 
Thanks for the links and instructions. What is another model that share parts with my 029 super?

While i put in a new assembly, Is it worth doing the mod? Any adverse issues that can cause to the saw? Is the whole idea putting more holes into the muffler to increase exhaust?
 
Chassis for the 1127 series are 029, 039, MS290, 310 and 390 are all the same.
If you ever need to rebuild, just swap up to the biggest 039 or 390 block and you've now got 64cc of fun. $50~$60
Holes in muffler, AKA muffler mod increase flow and improve power but not exactly EPA friendly.
If you modify the muffler you MUST have an adjustable carb with H/L screws. The high jet must be retuned.
If you modify the muffler, know that the spark screen is there for a reason. Only you can prevent forest fires.....
Too many holes can decrease performance and increase noise. In the wrong place, toast the frame or cook your hand.
 
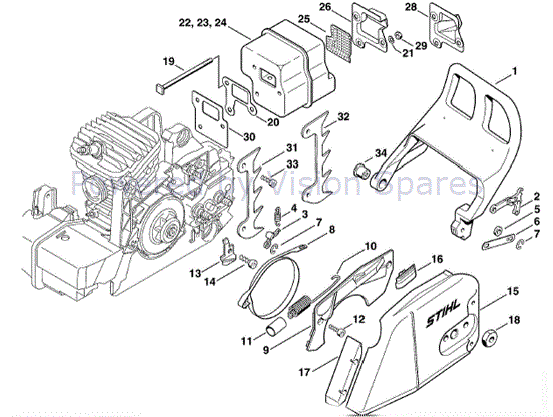
The far right, upper muffler bolt might be a bear to remove if you have to take it off (part 19 in above Pic). The housing interferes and makes it a PITA. It's a design error. I'm currently upgrading a burned out 290 top end to a 390. Always a challenge with a clam shell engine, the whole saw is now in pieces all over my bench top.

BTW, I sprayed the nuts on the bolts with Liquid Wrench before removing them. Note that there is a compression washer underneath each nut.
How do you get that Top Right muffler square head Bolt out? the plastic housing is blocking it from coming out.
 
How do you get that Top Right muffler square head Bolt out? the plastic housing is blocking it from coming out.
As I recall, I used a small file on the plastic to provide sufficient clearance. Not much filing is needed. A sharp knife might also help. You have to figure that Stihl dropped that cylinder in with the muffler already attached. I also remember leaving that bolt in one time until I pulled the jug. If you are rebuilding the whole top end, that's another simpler alternative.
 
Thanks, i'm just replacing the muffler. But that bolt has a fused rust lip on the threads. Not sure if the new muffler will be able to slide thru that? will see when it gets here. The old muffler bored bolt hole shaft basically disintegrated. Thanks
 
Thanks, i'm just replacing the muffler. But that bolt has a fused rust lip on the threads. Not sure if the new muffler will be able to slide thru that? will see when it gets here. The old muffler bored bolt hole shaft basically disintegrated. Thanks
I doubt if the muffler will have a problem with that rust build up. The problem is the inabillty to remove the muffler bolt from the cylinder because of no clearance. Once you get that bolt out, you can then clean off the rust on the bolt with some vinegar. I doubt seriously that the bolt shaft disintegrated. Perhaps I do not understand what you mean by "muffler bored hole shaft." If possible, post a Pic of this beast.
 
Yes you are correct. The bolt shaft was not rusted but it was welded to a baffle piece that broke off. I was able to slide it over the rusted lip. It was jamming the muffler when I pulled it off and the muffler fell to pieces inside.
 

Attachments

  • 086DE994-F9E3-4F9E-8E34-C03C81A3EC53.jpeg
    086DE994-F9E3-4F9E-8E34-C03C81A3EC53.jpeg
    1 MB
  • 043D37F6-5D4B-421D-9299-0AF73A6266A1.jpeg
    043D37F6-5D4B-421D-9299-0AF73A6266A1.jpeg
    1.8 MB
  • D2592FA3-0BB0-41A9-8F12-A64C6FD74CCA.jpeg
    D2592FA3-0BB0-41A9-8F12-A64C6FD74CCA.jpeg
    3 MB
  • 8AA5AB31-3D6C-493A-AE2C-6AC231D7DBE8.jpeg
    8AA5AB31-3D6C-493A-AE2C-6AC231D7DBE8.jpeg
    3 MB
  • 562E64D8-A09C-46D2-BE06-2BDCD44EBD33.jpeg
    562E64D8-A09C-46D2-BE06-2BDCD44EBD33.jpeg
    2 MB
You can see the flange/gasket in the last pic and it won't pass the small rusted ring. But looks to be in good shape so i'll just reuse it. Also you can see how the square head bolt is blocked in the top right bolt in pic 4.
 
Also this saw did not have the #30 gasket/flange shown in the schematic posted above. You can seen in my 3rd picture that it's missing. Will this be a problem? My 029 super is pretty old, maybe an 80's or 90's saw? perhaps it did not use it back then, or at some point long ago the muffler was replaced without it? i've had this saw for 20 years but got it used.
 
Pics 3 and 4 show that blockage to the upper right square-head bolt very well. It's a nemesis that we all have dealt with when trying to change the muffler or the whole top end for that matter. I think you can also see that if only 1/16" of the plastic is machined away that the square head bolt would then clear it.

That missing gasket/flange was likely a mechanic's omission error when replacing the muffler. It can be replaced with a new part. I have an 029 in my boneyard box that still has the exhaust gasket part #30 in the IPL. Very good Pics, Bigealta. :)
 
Thanks for your help, Hopefully the new muffler kit comes with gasket #30. It does not show it in the pics, nor do any of the others i found, but they do list 2 gaskets as included so we will see.
 
The new muffler did not come with #30, but seems to not need it. I was able to get that upper bolt off after getting the old metal gasket off the other 2 bolts and then spin it as the rusted lip would not let it past the threads. After i spun it there was enough play to push the bolt sideways enough to cock the square head enough to release from the blocked position. I saw that the new replacement bolts heads were a bit smaller than the originals and that made it easy to slip it in past the housing blockage. New muffler is on and it sounds like it's running a bit smoother but also perhaps a slight bit bogged down? I only ran it for a minute though. Need to get it cutting to see how the new muffler affects the saw. Thanks for your help Wood Doc.
 
Back
Top