Huztl FarmerTec 070 Build Thread with upgrade info and completed saw

Arborist Forum

Help Support Arborist Forum:

This site may earn a commission from merchant affiliate links, including eBay, Amazon, and others.
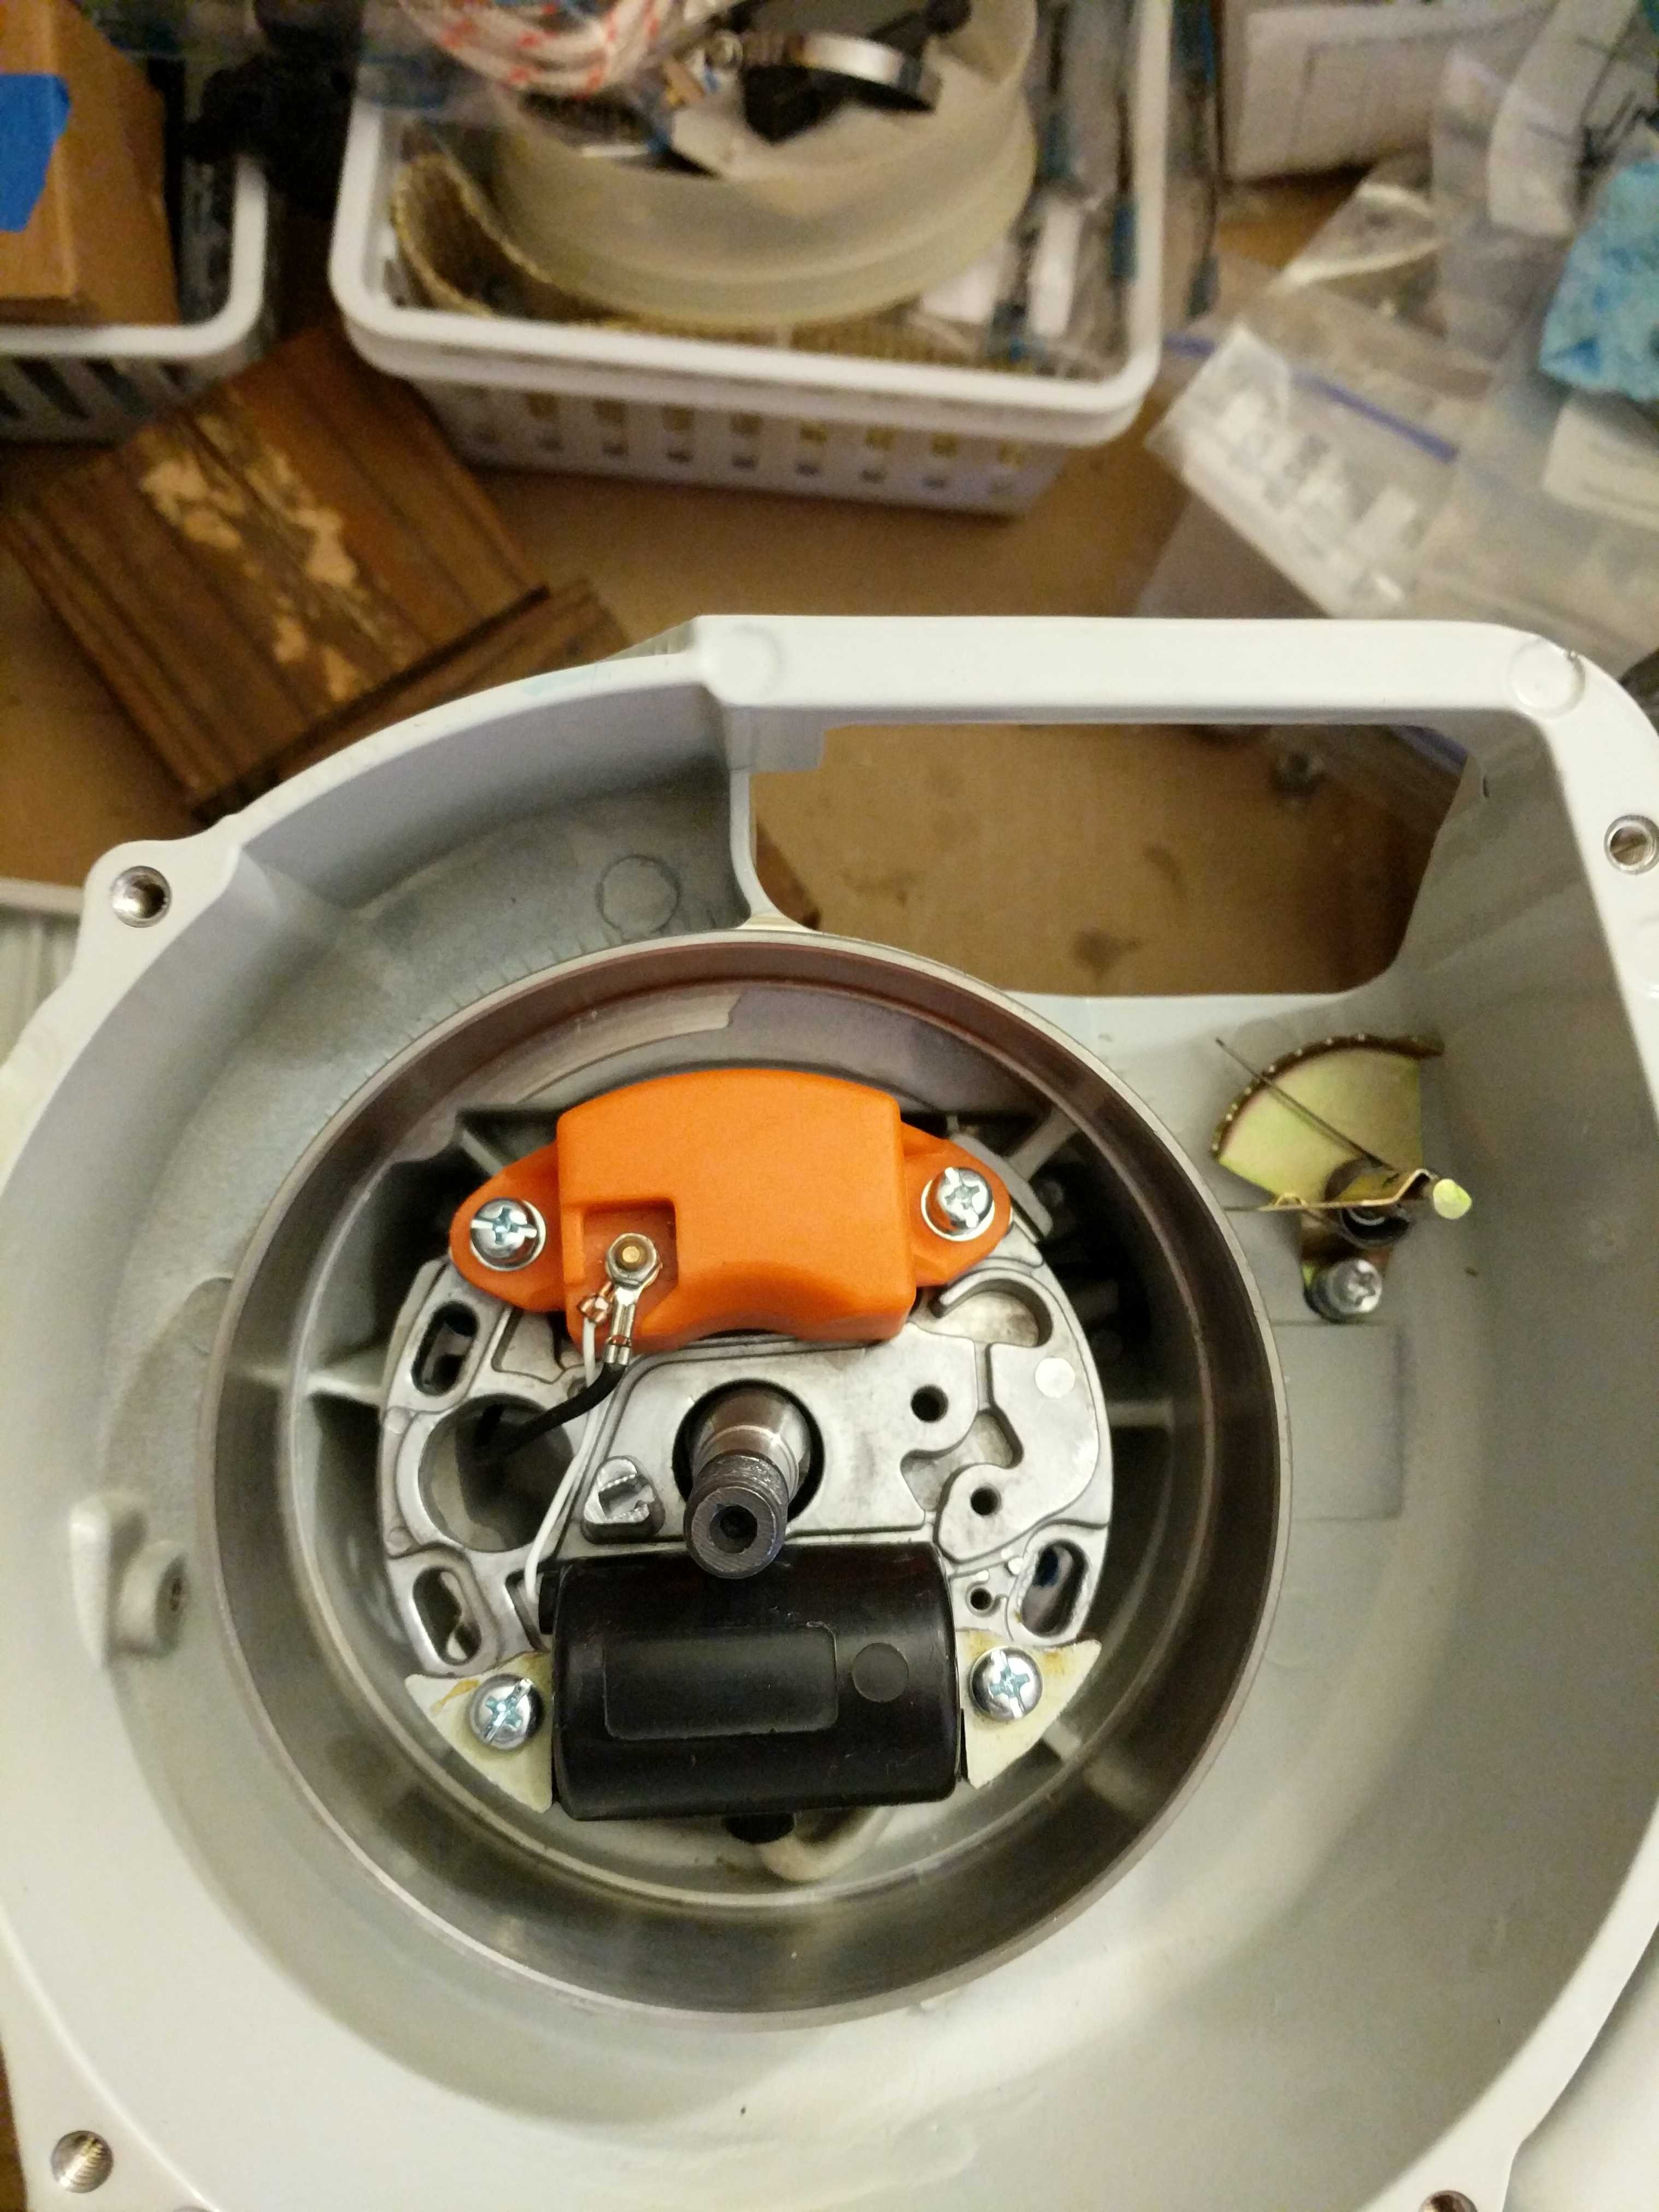
I would say that adjusts the coil gap. Back and forth movement.
If it's rotated then one leg would get farther away than the other. Not good. What you think?
 
571000ffb9c74a01eb9985c7ad07bb49.jpg
 
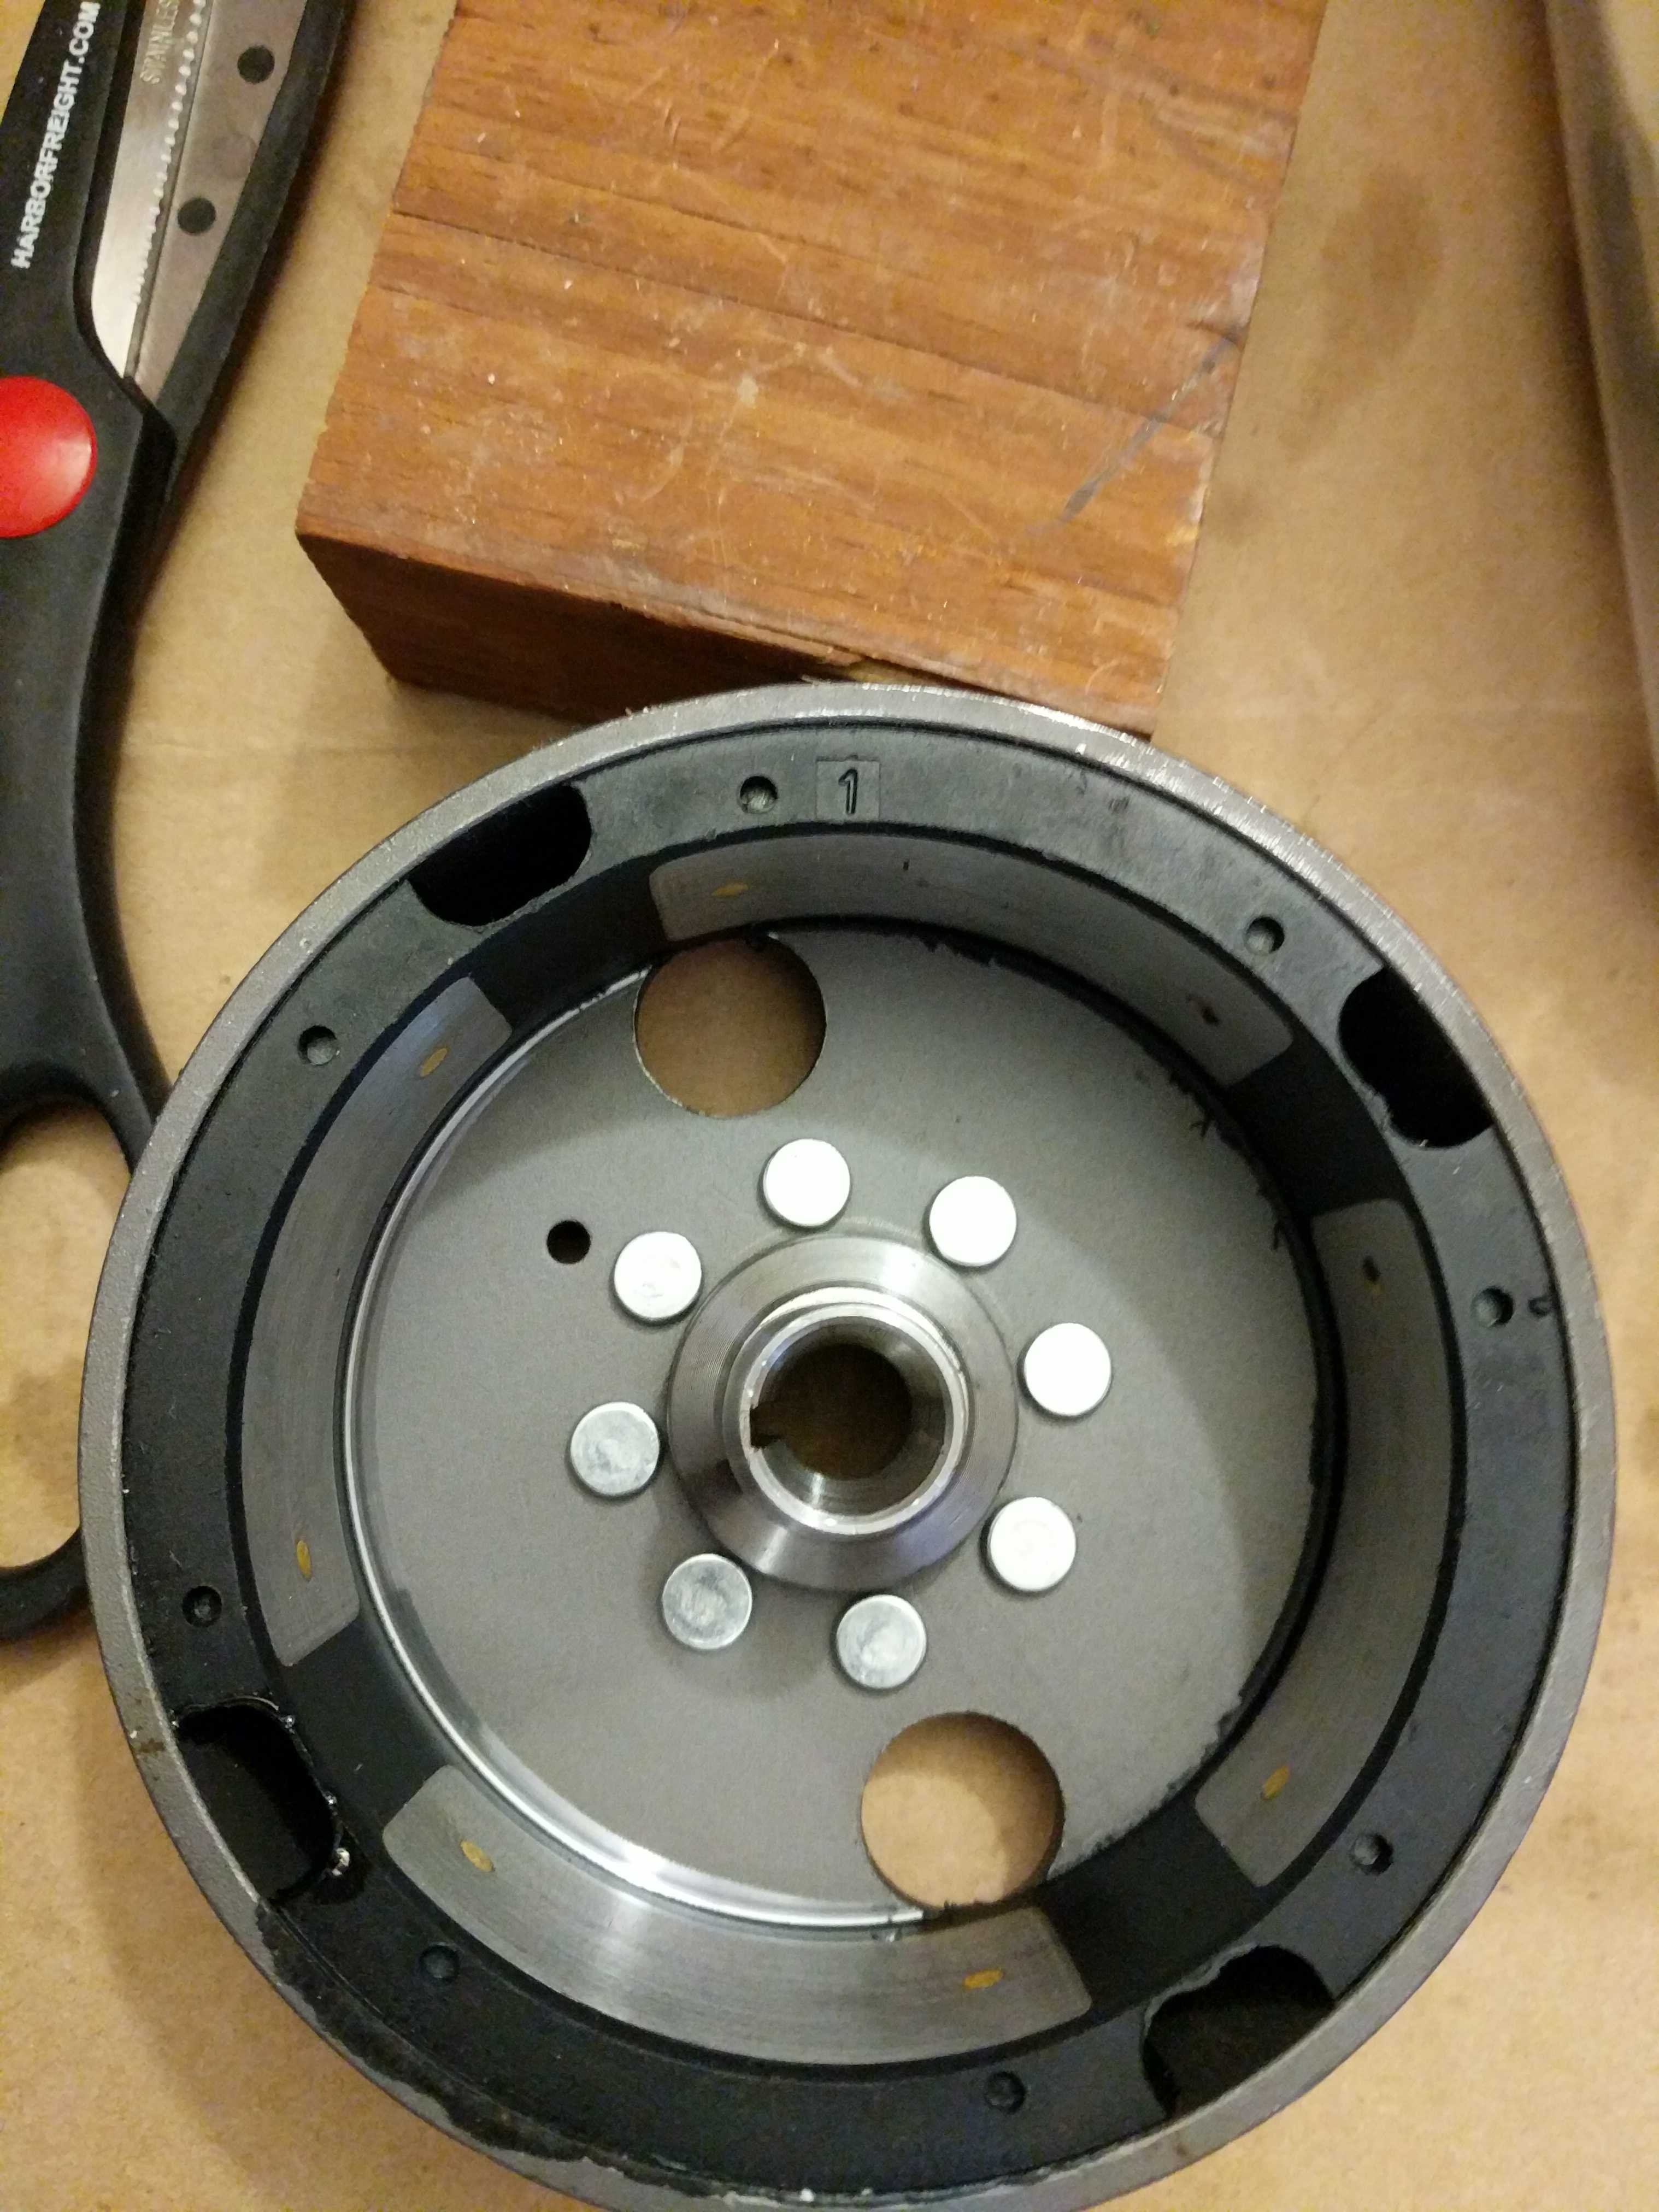
I defer to your expertise. I will say those documents are for the points set up. Page 43 shows the setup in relationship to the points contact. The position of the #1 printed on flywheel looks like it corresponds to the double arrows.
 
Here is a view. Two screw holes along out edge with about 10mm movement. There is a #1 on the black edge of one of the magnets
2deb380b5d729e9ebc5b4e51d81eea0a.jpg
66baaf84138c333fa92cc4a300933011.jpg

I'm no expert on these and rarely see a saw with points anymore. Just looking at it it looks like gap adjustment.
If you move it all the way down in the slot will the flywheel drag on the coil?
 
Or that adjustment was for the points and isn't relevant anymore.
The timing use to be advanced and retarded by dwell time of the points.
 
It's still a shame that they did not document those changes. Remember my contention is not based on experience. I could not set the points if I had to, well maybe after much trying.

So a lack of experience and a lack of documentation has me guessing that is correct.
 
Rotating the ignition module sure looks like it would give you a few degrees of timing adjustment. Rotating it clockwise would have to advance the timing. I set mine in the middle of the adjustment and it runs good. Maybe when I get a chance in wood I will see what adjusting it will do. The timing can be adjusted by removing the cooling fin to access the slots in the flywheel. I am a little afraid of advancing it too much and have it fire too early during a slow rotation startup.
 
I built a second 070 kit and had fuel difficulties when trying to start it. It thought I had a leak somewhere but after checking it several times I eliminated that as a consideration. I finally decided to take off the cylinder and look at the impulse line. The impulse hole is located on the base of the cylinder and I found it was almost completely covered by the cylinder gasket. It would idle just fine but would die out at higher speed after a second or two. It also had a delay in returning to idle - just like an air leak. I could keep it running by pulling the choke at higher speed.

It looks like the impulse hole was not drilled in the correct location. I used a Dremel to elongate the hole and I notched the gasket a little. It runs great now. If you built this kit you should put the base gasket of the cylinder to see if the impulse hole is blocked.
 
I ordered awhile back or maybe 10 or 11 months ago and they gave me free shipping. I really like the saw and have had few problems, but they were worked out. So I thought they might not be available next year here goes. It looks like shipping will be $300 to $400. It has happened a few times from Huztle that the shipping was way more than the item. Has anybody bought lately? Thanks
 
I ordered awhile back or maybe 10 or 11 months ago and they gave me free shipping. I really like the saw and have had few problems, but they were worked out. So I thought they might not be available next year here goes. It looks like shipping will be $300 to $400. It has happened a few times from Huztle that the shipping was way more than the item. Has anybody bought lately? Thanks
What were the problems ? !!!!
 
What were the problems ? !!!!

The compression release was loose, the pumper part of the carburetor had a wrinkled gasket, the oil tank leaked when sitting, the clutch kept coming loose. They did not keep me from operating just slowed me down for awhile. As I was going through the thing I assumed that everything was in order, but needed a little TLC. Thanks
 
It looks like the impulse hole was not drilled in the correct location. I used a Dremel to elongate the hole and I notched the gasket a little. It runs great now. If you built this kit you should put the base gasket of the cylinder to see if the impulse hole is blocked.

Good find, I have been busy finishing a build on the ms660 and posting videos while I was waiting on my felt gasket. I looked at my cylinder and noticed that the hole was covered more with one side of the gasket than the other. So by flipping the gasket the hole was larger. But to be safe I think dirko should be used to anchor the gasket in place on the cylinder. Now you likely still should drill the hole out on the cylinder hole ever so little, towards the neck, just in case. Dremels are an important tool.
 
outside.JPG inside.JPG husky felt.jpg stator plate.jpg Incorrectly named old IPL.JPG I got access to the ipls that stihl uses currently and am attaching two that I submitted to Farmertec. They kept wanting to get the leather sealing rings mixed up with the felt gasket because of a naming problem and then they wanted proof which i think thrilled them when i quickly provided it and again wanted to think leather until i provided the second screenshot and that kinda sewed it up. So I might be on their sh*tlist now.

So to sum this up if you try and buy one you will get it, but there is a wait right now, guess they are cutting new ones. But, I did find one that husky had some and snapped it up. Its brown not white like a stihl was. I wanted my saw complete for piece of mind.
 
Bummer for me, I asked them how to buy more rings.

ring (1).jpg


Using what Tbohn shared and have my cylinder ready for a future install. fix.jpg
 
I am not waiting on rings, i have some coming should ship out monday and be here by weeks end. that ring just pulled apart like white bread, the second ring allowed me to pull on it and it got installed.

I just noticed something they have very little showing on the website for the 070. They need to get the parts posted so we don't have to ask and hope. I got worried when i could not find the 10x1 left hand threaded nut that you put on the clutch side crank stem. I just could not find it. So I drove to the areas largest old timey hardware store its like two stories and 4 city blocks in hopes of finding one and they had one but it was coarse threads, not what is needed. I took the case in with me and the stihl tech questioned me on how my saw was so clean. Thats code for fake, lol . i let it lie and he came back at me and i told him it was aftermarket and he so Oh! He wanted to touch it, i know he did, he never had touched one. They called ever dealer in a 70 mile radius for me (told you old timey, actual customer service) and of course no one had it. so i am telling you this charming story to let you know that you need to be on top of it.

I got back home and looked one more time and it was standing up on the blind side of the small box i put everything in. it comes packaged by itself and its silver not black like the ones we often use. so i decided to get some rings right now and move on to ensure i can get the kit completed.

i wish i would have made a packing list for each saw and then have done build the videos. we buy the kits and the day we get them we check off whats there and whatever is not, we get to having it sent right away rather than later finding something missing and having them, then they tell you they don't understand send them a drawing of where it goes or send them a picture and then they can't see it. lol. if you run into something like that you can take a screenshot of an ipl and sent it off.
 
I noticed I made a mistake and went back and fixed the clutch video...not on the clutch but the bar studs. so I edited the video only to remove the bar studs, the video is the same otherwise. The issue was on the 070/090 the inter-plate goes under the bar studs. After the panic set in trying to figure out a way to remove them, they were tight and I used loctite, I remembered my trusty heat gun and warmed up one at a time and they removed easily. So I will repost that step next. which will be placing the chain adjuster and the inter-plate and then the studs.

I was reading the manual and that jumped off the page and gave me notice.

 
Back
Top