McCulloch Chain Saws

Arborist Forum

Help Support Arborist Forum:

This site may earn a commission from merchant affiliate links, including eBay, Amazon, and others.
I haven't had much luck removing transfer. Most of the ones I've tried ended up having a big scratch or two on them. But yours may clean up fine. I've had a couple turn out fine.


Sent from my iPhone using Tapatalk
There is minimal transfer. I am fairly certain it will clean up fine.
I've had some that cleaned up good, and others that were to far gone.
 
Hey guys. Just comparing tails of 096 pattern bars to 176. The 176 has a slightly narrower tail but dimensions otherwise seem identical, stud slot to adjuster holes line up, and the 096 bar also allows the bar to be oiled through the adjuster holes.

Am I missing something or is there any reason I can't run the 096 pattern on my 10 series saws?
 
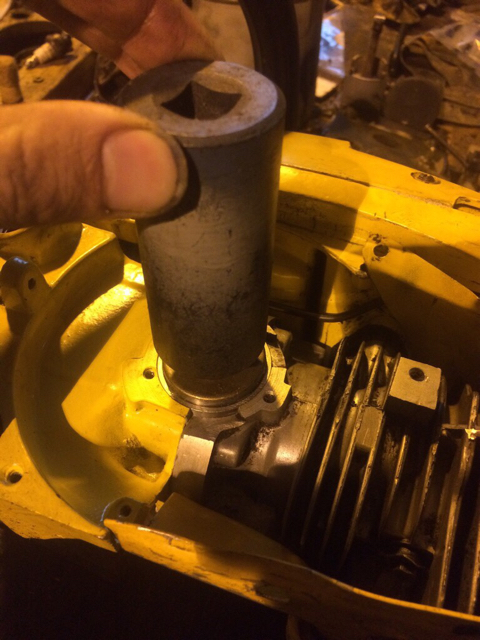
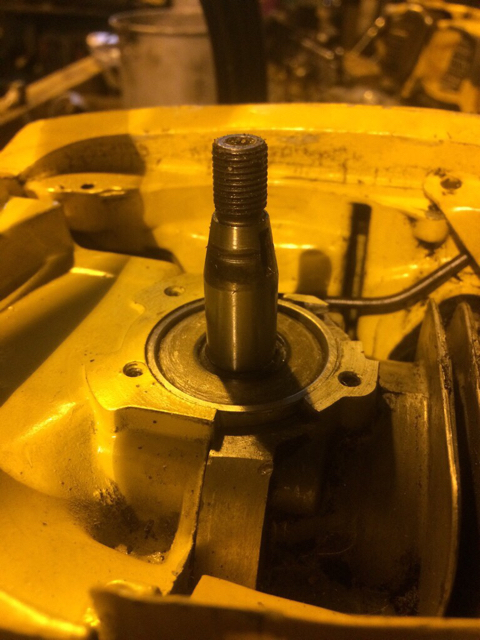
Wondering how concerned I should be about this before I start putting my SP81 back together. I used some 1200 emery cloth (lightly) to smooth the surfaces a little but didn't want to get carried away. The bearing shown is from a newer crank assembly and has what appears to be some minor pitting and seems to have spun slightly somewhere along the line. I'm guessing the bearing c-clip and corresponding groove in the housing is where I would apply a bit of sealant as some was remaining from a previous application. Should I consider a thin layer of Dirko for those housing surfaces too? Or are the machining tolerances tight enough to not be concerned about sealant around the bearings? Both the bearing and the housing surfaces look worse in the pics than they feel to the touch if that makes any sense.

As usual, any/all input gratefully appreciated.

0116171829_resized.jpg

0116171830_resized.jpg

0116171832a_resized.jpg
 
Wondering how concerned I should be about this before I start putting my SP81 back together. I used some 1200 emery cloth (lightly) to smooth the surfaces a little but didn't want to get carried away. The bearing shown is from a newer crank assembly and has what appears to be some minor pitting and seems to have spun slightly somewhere along the line. I'm guessing the bearing c-clip and corresponding groove in the housing is where I would apply a bit of sealant as some was remaining from a previous application. Should I consider a thin layer of Dirko for those housing surfaces too? Or are the machining tolerances tight enough to not be concerned about sealant around the bearings? Both the bearing and the housing surfaces look worse in the pics than they feel to the touch if that makes any sense.

As usual, any/all input gratefully appreciated.

View attachment 551367

View attachment 551368

View attachment 551369

My 10 series saws have sealer on the crankcase mating surfaces and around the seals as well. If the bearing spun at some point I would replace the bearing. I don't know what the aftermarket replacement would be if there is one. If the bearing is loose in the housing Loctite makes some great bearing retaining compound. It's green. We used that to secure some sloppy bearings in a 1600 ton stamping press drive shaft so it's pretty good stuff. It releases easily with heat if you (or your grandchildren) should ever have to replace the bearing again.
Mark or one of the other Mac gurus would give you a definitive answer.
 
I've used the green Loctite for that purpose before and it worked great. Ultra low viscosity that gets into very tight spaces (like between an installed bearing and a crankcase housing) to do its job. Highly recommended.
Also looking for an alternate for the 61618 f/w side seal if anyone has a cross-ref handy. I saw the PTO alternatives in one of Mark's earlier posts.
 
I've used the green Loctite for the that purpose before and it worked great. Ultra low viscosity that gets into very tight spaces (like between an installed bearing and a crankcase housing) to do its job. Highly recommended.
Also looking for an alternate for the 61618 f/w side seal if anyone has a cross-ref handy. I saw the PTO alternatives in one of Mark's earlier posts.

61618 crosses to Timken (National) 471551
 
While you guys are on the subject. I rebuilt a pro Mac 700. I replaced, the bearings, crank seals, piston rings, carburetor(NOS), fuel line, fuel filter and air filter. I didn't put any around sealant around the bearings. The saw idles too fast and I have the idle screw almost all the way out and the low mixture screw about 3 turns out. Does this point to an air leak? I didn't vacuum test the saw as I have no way to vacuum test.


Sent from my iPhone using Tapatalk
 
Scored a 2.1 Mac (1985-1984 model) the other day for free. Me and the neighbor were talking chainsaws and he brought up how he could not get this saw to not bog while cutting wood. Said other than that, it idled fine and he was tired of trying to tune it. He said he just replaced the fuel lines. I think a little adjustment on the hi carb needle ought to do it. What do ya'll think?
 

Attachments

  • IMG_2224.JPG
    IMG_2224.JPG
    1.8 MB
Poge - I always put a thin layer of Threebond on both halve of the crankcase including the bearing/seal surfaces. In this application I think the gasket/sealer is better than green Loctite to make sure the bearing stays put. I also put a little Threebond on each of the four 12-24 screws that hold the crankcase halves together including a good measure under the flange head of each screw. I used to put an o-ring on the to take place of the factory rubber sealing washer but most of the time they would just extrude out anyway so I stick with the Threebond only. You may have trouble finding an industry standard bearing for the crankshaft, another 10 Series donor saw or Perry Blair would be good options. Perry normally has both bearings and seals for $40 + shipping. If the bearing spins freely and you don't see any damage with a close visual inspection I would use it again. I think I have only found one failed bearing on the FW side ever on a 10 Series and that was more a product of setting with water in the crankcase, not really a bearing issue.

Tim - Did you take into account that 61618 is the McCulloch part number and not an SKF or CR part number? I started to keep track of seals and bearings once but my notes seem to have drifted off before I ever got far on compiling the data.

Brandon - It does sound like an air leak, I would take it down again and repeat the rebuild with a good gasket/sealer around the bearings as well. Did you replace the PTO side seal? Those were pretty notorious for getting grass, string, etc. wrapped in there and taking out the seal. SKF 6119 is the answer; 5/8" shaft and 7/8" O.D.

95 - May be a simple adjustment or it may require a more thorough examination of the fuel system and carburetor. If he replaced the fuel lines but not the filter it could be an easy fix...I never seem to have that experience. I have a few of the 300 Series saws around but have not worked on any yet so I don't know what you might expect.

Mark

I replaced both seals with NOS seals. If I tear it down again, should I replace both seals again? Do you happen to have the number for the flywheel side seal too? I used motoseal on the case halves which has been recommended here before. The only thing I didn't seal was the bearing pockets. I re-used my old intake block gasket and made a new carb gasket.
Thanks


Sent from my iPhone using Tapatalk
 
Unless you know or fear you damaged the seals there is no reason to replace them, but you do need to pressure and/or vacuum test to know the block is sealed. You can pressure or vacuum test without buying a lot of additional kit, just pick up a large syringe from your local Farm/Fleet store and you have an adequate vacuum pump for test purposes. Use you air compressor regulated to 3-5 PSI for pressure testing. If you are going to be in this business much, get a simple vacuum pump and pressure pump to make bench top testing easier. I have a very simple vacuum pump that does not do pressure but I understand there are MityVac kits that do both. I will add that I have a lot more stuff in that drawer today...

Vacuum pressure drawer.JPG

For pressure testing I have a simple pump like a blood pressure cuff, again there are lots of other options.

DSC00859.JPG

The one problem area that I have run into is a poor seal around the PTO side seal. I find the easiest way to attack it is to split the case again and start over. On the last few I put them together with the PTO side seal in the bore but not in the final position and finished pressing them square in the bore with the case assembled. Good quality 6119 seals have a bevel on the inside edge that makes it easy enough to press the in with the case assembled but some cheaper one have a sharp edge and it is impossible to press them in with the case assembled.

Mark
 
Unless you know or fear you damaged the seals there is no reason to replace them, but you do need to pressure and/or vacuum test to know the block is sealed. You can pressure or vacuum test without buying a lot of additional kit, just pick up a large syringe from your local Farm/Fleet store and you have an adequate vacuum pump for test purposes. Use you air compressor regulated to 3-5 PSI for pressure testing. If you are going to be in this business much, get a simple vacuum pump and pressure pump to make bench top testing easier. I have a very simple vacuum pump that does not do pressure but I understand there are MityVac kits that do both. I will add that I have a lot more stuff in that drawer today...

View attachment 551544

For pressure testing I have a simple pump like a blood pressure cuff, again there are lots of other options.

View attachment 551545

The one problem area that I have run into is a poor seal around the PTO side seal. I find the easiest way to attack it is to split the case again and start over. On the last few I put them together with the PTO side seal in the bore but not in the final position and finished pressing them square in the bore with the case assembled. Good quality 6119 seals have a bevel on the inside edge that makes it easy enough to press the in with the case assembled but some cheaper one have a sharp edge and it is impossible to press them in with the case assembled.

Mark

I have a vacuum gauge and tubing. I can rig up a way to test vacuum. I have an electric vacuum pump that I could use to test vacuum. I will block off the ports and test vacuum. I am going to start looking for a vacuum tester like a mityvac. I do have two questions tho. One it looks like you are testing from the compression release port, right?
Also, does it matter if the piston is above the ports or not when testing vacuum?

I installed the seals with the two case halves together. Like this.
22e632d71ab34733960a3b3d49d14f61.jpg

1f21d2a31e207fcde66165869b359e53.jpg


I will do the vacuum test like you have shown above. And then possibly use the pressure test with soapy water to maybe find the leak.

Thanks for the help. I really appreciate it.


Sent from my iPhone using Tapatalk
 
I made an adapter that threads into the spark plug hole, knock the porcelain out and thread or epoxy a barb fitting in place. If the saw has a compression release I find it best to remove it and install a plug, 3/8-24 for most American saws and 10 mm for imports and later U.S. made stuff.

DSC00858.JPG

As long as you have the intake and exhaust ports sealed off it makes no difference where the piston is, the rings don't make a perfect seal in any case.

Mark
 
Back
Top