Bailey's Chain Breaker and Spinner

Arborist Forum

Help Support Arborist Forum:

This site may earn a commission from merchant affiliate links, including eBay, Amazon, and others.
Well heck! Here are the dimensions for the HF ones (all given in inches)
and how they mount in the tool.
Maybe they would be a replacement fit for yours or someone else.

The hex is mounted in the spinner/crank handle side.
The hex one is .770" long, including the "prongs" of the slotted end.
The thickness is approx .301" ~.305" across the flats.

The round one is .310" diameter and .702" long.
The round one is mounted in the threaded handle side.
 

Attachments

  • spinner anvils t 1.jpg
    spinner anvils t 1.jpg
    75.9 KB
  • spinner anvils t 2.jpg
    spinner anvils t 2.jpg
    88.2 KB
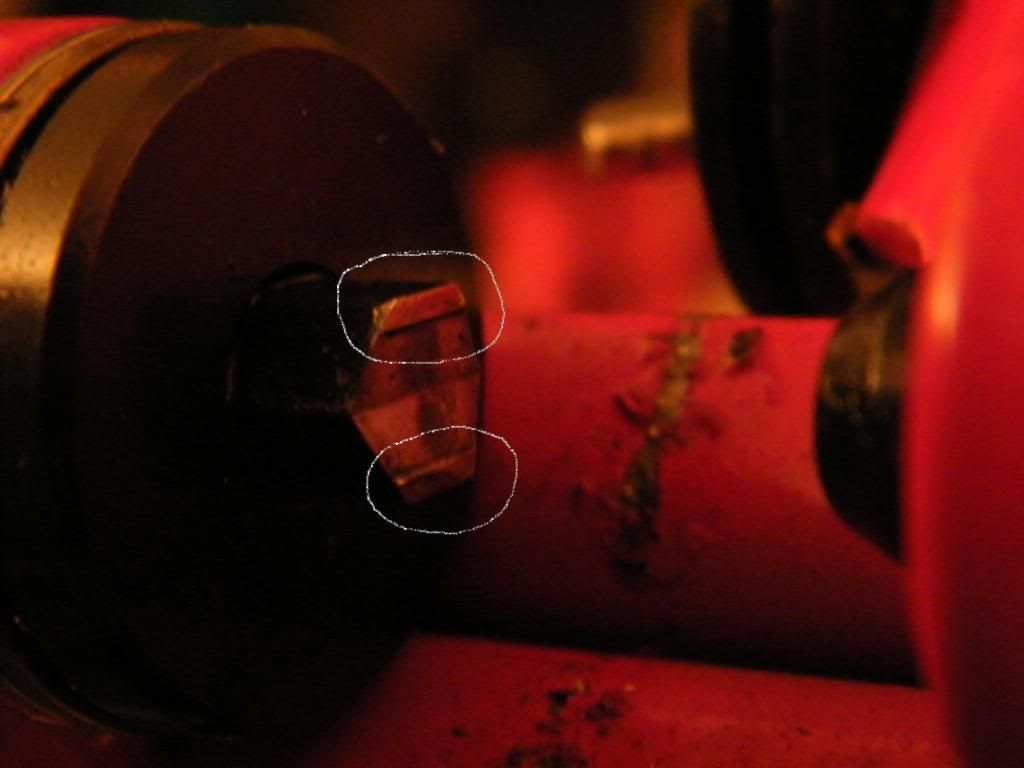
I've circled the tabs I'm talking about mate. Another mod I did was to polish the face of the spinner which also helped with a nicer rivet head finish but also allowed the use of less lube. Without any lube you will nearly always gall up or mark the rivet heads unless some oil has remained on the head - a fair amount of pressure is applied to form rivet heads. It's also very easy to over do it if you get too heavy handed :cheers:

Both very easy mods and made the world of difference to this particular unit and the finished chains...

DSCF1145.jpg


I'll have to do this to mine, as i can see it scratching the links before I have finished,

Also what if I swap out the handle for a bolt/rod and attach it to a drill as i'm finding the head splits when I turn and to avoid forcing it down I seem to be "spiiiinniiinngg and Tuurrnniinnggg"
72x72x1f3b6-microsoft-windows.png.pagespeed.ic.s1cNSoBPuF.png
for a while.
 
Also what if I swap out the handle for a bolt/rod and attach it to a drill . . .

Posted this a few times, somewhere (?) here on A.S. Treemonkey's Dad's shop He had a few of these using low speed drills. Lubricating the rivet ends is also important to reduce cracks in the spun heads. I use a tiny dab of grease -stays on better than oil.

Spinner with Drill.jpg

Philbert
 
Posted this a few times, somewhere (?) here on A.S. Treemonkey's Dad's shop He had a few of these using low speed drills.

View attachment 434271

Philbert
That's exactly what I was thinking of. I did try a search with a few different keywords, thanks for finding this(again)
guessing I just take the handle off and take it to a shop to get another bolt matched
how low is low speed, can be battery or 240v

Lubricating the rivet ends is also important to reduce cracks in the spun heads. I use a tiny dab of grease -stays on better than oil.
will have to try that I have been using a bit of left over stihl bar oil
 
Time for a 'Bump'.

Just shared this link with someone, and always looking for additional input.

I think that some people only think of spinner / breaker sets for making loops off of 100 foot rolls to save some money. Actually, if you watch for sales, you can often buy pre-made loops of many types of chain for about the same price.

To me, the real value of these sets is the ability to repair damaged loops, by replacing links; re-sizing loops to fit different saws / bars; being able to 'scrounge' used chains, or to take advantage of deals on partial rolls, oversized loops; etc. It also builds a better awareness and understanding of how chains wear, how they get damaged, all of the subtle differences between models, etc.

Make sure that replacement parts (anvils, punches, etc.) are available for whatever brand / model you buy, per the comments in earlier posts.

Thanks.

Philbert
 
Anvils

I posted these before (somewhere) but am trying to replace lost photos in some threads. Might as well add them back here.

Philbert

The standard, slotted anvil that came with the Bailey's set worked fine. Heimannm pointed out that it works better if you eyeball it's position under the punch instead of trying to use the locating key that comes with the set, to reduce the risk of breaking punches.

View attachment 343006

This adjustable anvil comes with the Oregon punch, or can be purchased separately. It gives a more secure grip, especially with worn tie straps.

View attachment 343007

An attempt to improvise an adjustable anvil with some square nuts, next to the commercially available one. It worked OK - best if you can find nuts that are hardened more than standard hardware grade. Good improvised solution, if needed.

View attachment 343008

'Inside story' on the adjustable anvil.

View attachment 343009

Newer model breaker anvil out from Tecomec: spring loaded.
Squeeze it; place the tie strap in place; jaws self-adjust.
So simple that I can't believe it has not been thought of before!

Screen shot 2017-12-27 at 11.33.16 PM.png

Anybody tried one of these?


Philbert
 
Howdy All,
If your having issues with the the link binding before the rivet is set, 90+% of the time it's because the drive link was damaged when breaking the chain. The smaller the chain, the easier it is to bend or burr the drive link. The smaller the chain the easier it breaks, so the tendency is to push the rivet out with 1 stroke. No matter what size the chain is, it's better to break it in a couple steps. Push the first rivet about 1/2 way out, and then do the same on the second rivet, then push the first rivet the rest of the way out, and then the same for the second. The more the breaker anvil gets worn the easier it is to damage the drive link. The burrs are the worse because even if you have a good eye, they're very hard to see. The center shoulders on the rivets are very accurate in thickness, so even very small burrs can cause the link to bind before the rivet is completely set. It also doesn't take much of a bend to end up in the same boat.
The little wings on the spinner anvil help keep the tie straps pushed in while the rivet gets spun. When the rivet is spun sufficiently, the wings will actually bind on the tie strap and start trying to spin the chain instead of just the rivet. If the tie strap binds on the rivet while your spinning, it's because your applying more pressure than the spinning action can relieve. This causes the rivet to crush and swell before the tie strap has seated against the center rivet shoulder. This happens alot with someone who cranks the take up handle a half turn, then spins, then cranks another half turn, and spins some more. The idea is to keep the spinner anvil moving as pressure is applied by the take up handle. Another visual that you might be applying pressure to quickly is that rivet will have little cracks on the radial edge of mushroomed part of the rivet.
Regards
Gregg
like the idea of 2 step chain breaking,the tie strap always flares out and deforms
on me
 
The Bailey's units are the same ones that Carlton used to sell. They are made in Taiwan. The Oregon units have always been made by Tecomec. Tecomec buys parts from China and assembles units in Italy.
 
Newer model breaker anvil out from Tecomec: spring loaded.View attachment 621283
Anybody tried one of these?

I really wanted to like this. So simple in concept! To be effective, a breaker anvil needs to securely support the chain drive links as close to the tie straps as possible.

Screen shot 2018-02-27 at 1.38.01 PM.png

The slotted anvils (center) are simple, with fixed openings that may fit some chains better than others, and cannot compensate for wear on the tie straps. The threaded anvils (right) are infinitely adjustable, but take a little time to adjust each time they are used. The spring loaded model (left) should have been ideal!

IMG_1628.JPG

IMG_1630.JPG

IMG_1631.JPG

The 2 halves did not slide as smoothly as I would have liked, due to the rough castings. And the pressed pin assembly looked hard to take apart without damage, so I could not easily file the mating surfaces for smoother movement. I tried it on a few different pitches of chain:

IMG_1627.JPG

The jaws did not close tight enough for the 1/4" pitch chain I tried, and did not open wide enough for the 3/4" pitch. While it held the 3/8 low profile, .325", 3/8" and .404" chains, it did not like the thinner tie straps on the smaller pitch chains, and slipped off very easily.

IMG_1629.JPG

Looking closer at the edges, you can see that the ones on the spring loaded anvil are more rounded, allowing them to slip off easily under pressure. Might almost need a 3rd hand to hold everything in place! The fixed / fixed-when-set openings on the others don't move or slip.

I still like the idea. Could work if you mostly use full sized 3/8 and .404 pitch chains. And one that was machined with smoother surfaces and sharper edged jaws might work better with all pitches. I would also like the option to adjust the spring tension. Otherwise, it is back to the basics.

Philbert
 
Yeah, first pic from overhead shot, you can see how rounded the castings are. Some waviness in the sides also.
I'd start with flat sanding the bottom and once it sat squarely and repeatably , then I'd go after the jaws, etc & so forth.

Looks like the multi-slot block and the screw-adjustable ones
are a good deal less trouble.

One of the other big things that help with breaking, is to be sure of having the entire chain supported and level with the link under the press.
Saves a lot of grief, bent side plates and wallowed, rounded anvils.
Rounded anvils make more grief!

As for the two step pressing out of pins?
You may need to switch pin positions a few times.
Got to keep a close eye on the plates, I may shift 'em three~four times. Just all depends on if they're trying to bind or staying close to parallel.
Kinda like driving in a new seal. Gotta watch close and put the force where it's needed and be cautious of not pushing too much in one place which cocks up the seal.

Dressing/grinding off the flare of the rivets, before pressing, does wonders for helping to press out.
Just be gentle and don't grind into the side plates.
It's ok to Stop a little shy of trying to get 100 percent of the flare
60~90 percent off, is a good improvement over not grinding.
Takes a shorter stroke/travel of the rivet shaft to clear the plate hole when you grind the heads off.
Less stroke travel in the plate hole means less opportunity for dragging the plates out of parallel and bending them!

Oh and Thank You Philbert, for your chain work and keeping these threads going.
 
I WANT THIS!!!

I can't afford it, but if I had a full time shop I would put it right next to my automated chain grinder, my Silvey raker grinder, my Franzen drive link de-burring device, and my BarShop!

Posted price varies between eBay listing and YouTube video.

Double punch Chainsaw Chain Breaker Make Chains FAST!! * NEW on the Market*
https://www.ebay.com/itm/282879000023?ViewItem=&item=282879000023


T & O chain breaker. We are so confident that you will love your new chain breaker we are offering a 30 day no questions asked guarantee.
This chain breaker will come with the rail as seen in the picture and video to run the chain down in order to count the links. The punch is designed to do low pro chain, 3/8 chain and .325 chain. All you have to do is turn the punch over! All parts are available for replacement!

Screen shot 2018-04-06 at 9.58.52 AM.png
Screen shot 2018-04-06 at 9.59.10 AM.png


Philbert
 
Back
Top