Found a decent deal on an 044

Arborist Forum

Help Support Arborist Forum:

This site may earn a commission from merchant affiliate links, including eBay, Amazon, and others.
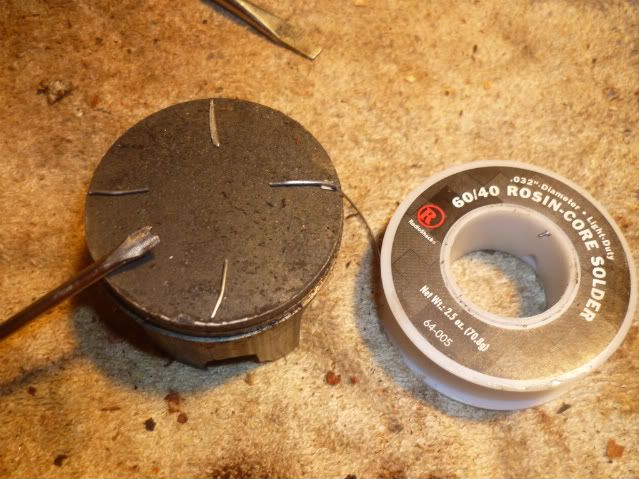
Sorry but I got mine back together already. Built an 044 with a 460 top on it and with the gasketless squish at .018 and plugged de-comp it was tough to pull. Built it for another climber and I had to go back in and add a soda can gasket to raise the squish. Thought it would be a little rough to start in a tree running gasketless. For the cir-clips get a carb tuning screwdriver and file a slight v-shaped notch in the blade. Slightly off center works well. I will get a pic of the set-up for checking squish later this afternoon for ya.

Thanks, I'll look for it later. I'm hoping to get this one back together within the next 2 weeks. I won't be able to touch it again until Monday after work, and I have an overnight trip to Pittsburgh for work next week, too.
 
Here is a pic of the basic set-up for squish and the notched file I use for circlip install. I hold the solder on with a dap of grease. Not the best pic but you get the idea.

MiscPics003.jpg
 
Just bumpin for a progress report.

Been busy. Gone Thursday through Sunday, had training conferences two days this week, one was 4 hours away in Pittsburgh and I have 20 trees to cut before Oct 15th.

I picked up grease and a grease gun yesterday and I'll grab some solder to test the squish, maybe tomorrow.

I still need to get the oil seals installed. I need to do a search here to find tips on doing that without the Stihl tools. I really would like to make some progress on this, just other things have had priority.
 
Sonds like you have got your hands full. Keep us posted with your progress. :givebeer:
 
Been busy. Gone Thursday through Sunday, had training conferences two days this week, one was 4 hours away in Pittsburgh and I have 20 trees to cut before Oct 15th.

I picked up grease and a grease gun yesterday and I'll grab some solder to test the squish, maybe tomorrow.

I still need to get the oil seals installed. I need to do a search here to find tips on doing that without the Stihl tools. I really would like to make some progress on this, just other things have had priority.

The proper way to install the seals is a press. You can get a press cheap, but if you are not going to get one there is another way. But this way has the highest probability of error. You can take a socket that is the same diameter of the seal and carefully tap the socket until the seal is in place. You will need to be very careful getting it started because it is easy to get it started crooked. But with care seal can be installed. I have installed all my seals this way with no problem. Just go slow, NO RUSHING, and use firm but gentle taps with at hammer. I generally use a brass or deadblow hammer. I dont know if it helps or not but I also put a little bit of oil around race before installing. Good luck!
 
The proper way to install the seals is a press. You can get a press cheap, but if you are not going to get one there is another way. But this way has the highest probability of error. You can take a socket that is the same diameter of the seal and carefully tap the socket until the seal is in place. You will need to be very careful getting it started because it is easy to get it started crooked. But with care seal can be installed. I have installed all my seals this way with no problem. Just go slow, NO RUSHING, and use firm but gentle taps with at hammer. I generally use a brass or deadblow hammer. I dont know if it helps or not but I also put a little bit of oil around race before installing. Good luck!

I was planning on using a socket to tap them in and lube them up with a smidge of bar oil. I have a small ball peen and a finishing hammer. One of those is probably a better bet than my 20 something ounce framing hammer. I'm going to grab the seals and my socket set and see what size I need to get in deep socket.
 
I like to use a hammer that will cover the whole socket so that the pressure is applied evenly assuming I hit it square. As long as you take your time you shouldnt have any problems at all.
 
Which wrist pin? Left is OEM, right is the pin that came with the NWP kit. I'm assuming the OEM pin as it should be lighter. Thoughts?

DSCN4301.jpg
 
I would use the wrist pin that came with the kit. The oem might work fine, I dont know if there is any reason not to use the oem pin. I have just always used what came with the piston.
 
Oil seals are in, wrist pin (one from the kit) slid right in after a few days in the freezer and some lube on it and the needle cage.

These snap rings are a PITA. Any suggestions other than the screwdriver with a groove filed into it? I forgot to grab an extra screw driver that size while I was out today.


EDIT: got them installed.

Ready to measure squish minus the caliper.
 
Last edited:
I use small needle nose pliers, and try to keep a finger over the clip. For me the that is the biggest PIA of the whole thing.
 
Flywheel side:
DSCN4309.jpg


Clutch side:
DSCN4310.jpg


New piston:
DSCN4312.jpg


Two pics of the piston at BDC without a gasket. I assume the piston should clear the exhaust port, right?
DSCN4313.jpg


DSCN4314.jpg


Looking much better than the old slug:
DSCN4314.jpg


And one through the spark plug hole that probably doesn't tell anything. Piston is at TDC:
DSCN4317.jpg
 
Wheres the bushing?

maybe I`m wrong, but it looks like you forgot to put the rubber o-ring and bushing that slides over the clutch side crank.The seal actually seals agianst the bushing.On the few I did, the oldest 044 had the rubber ring, the bushing, and the seal actually seals over that.maybe I`m wrong, I just did one a couple weeks ago, but think thats how I did it.That clutch side is gonna leake the way it is.It also looks like the seal is seated too far.Did the crank spin hard.I think the seal is installed too far in on that side.I`ve only done 6 or 7, so I`m not sure unless I`ve got hands on, but think you have a problem on that clutch side.
 
Last edited:
maybe I`m wrong, but it looks like you forgot to put the rubber o-ring and bushing that slides over the clutch side crank.The seal actually seals agianst the bushing.On the few I did, the oldest 044 had the rubber ring, the bushing, and the seal actually seals over that.maybe I`m wrong, I just did one a couple weeks ago, but think thats how I did it.That clutch side is gonna leake the way it is.It also looks like the seal is seated too far.Did the crank spin hard.I think the seal is installed too far in on that side.I`ve only done 6 or 7, so I`m not sure unless I`ve got hands on, but think you have a problem on that clutch side.

There wasn't an o-ring or bushing under the seal when I took it off. I don't remember how far it was seated in there before I removed it, but the crank was just a bit stiff, but it feels alright.

When I removed the seal the first time, there was just the plastic guide to keep the bearings spaced properly. The seal/gasket kit I bought from Bailey's didn't have anything other than the seals.

Nothing on the IPL between the bearing and the seal. Am I missing something?
 
Lookin' good. Now what does a vac/pres leakdown check say about the effort?

Poge

I guess now would be a good time do that. I need to make sure I'm getting a good seal on the intake. I think that's been the toughest spot to seal. I tried doing it before taking the tank handle off and using the carb studs and I tried using a hose clamp and rubber after removing the intake boot.


Thoughts on the slug at BDC and it still showing above the exhaust port when the cylinder is mounted without a gasket?
 
Back
Top