Did some checking and found the part # for the valve assembly. taco 562 - 015rp They want anywhere between $150 - $170. Head is 555 - 050RP and is $35 - $125 on Ebay. The whole valve new Taco 562 - 5 is $195 - $250. The sure do like to make money on the pieces. Better off to by the whole and part it out at this rate. Wow!
You are using an out of date browser. It may not display this or other websites correctly.
You should upgrade or use an alternative browser.
You should upgrade or use an alternative browser.
Got a heat EXchanger problem?
- Thread starter Kevin in Ohio
- Start date

Help Support Arborist Forum:
This site may earn a commission from merchant affiliate
links, including eBay, Amazon, and others.
Henry Fuller
ArboristSite Lurker
Thanks guys. I will be installing a strainer after the main pump. To answer your questions: Top of boiler to pump in basement is maybe 20 ft. Second story baseboard is roughly the same height. I don't have an IR gun. Our weather was indeed in the high 60's when I shut it down. It made 74 afterward and then turned cold. Warming up again and I just turned the oil furnace circulator off as it's 74 in the house now. I'm leary about taking it apart while the heating season is still ongoing. It's working and keeping stuff warm, it's just not as handy having to control manually with turning on/off pumps and closing valves. I don't want to get caught if you know what I mean. My Dad just had 2 full knee replacements so we are both out for a while. I really appreciate your comments/suggestions and will report back. I never would have believed Henry that convection can work that well. Pushing through an idle pump and snaking it's way around a house floor level, up and around and back down. Amazing.
Kevin,
So in the ballpark of 20' in elevation that you had there, as per 10' elevation of water is 4.3 P.S.I. (X 2)=8.6 P.S.I.,this would sure be overflowing when having 15 P.S.I. being applied coming from inside your oil boiler close system. Sorry about hearing that both you and your Dad are layup for the time being, you two both take it easy and heal soon. I'll be looking forward to see what you find out later after you both are heal well enough. It just a flute that I came across a service called similar like what you had going on with your rooms over heating issue.
I'll keep in touch, Henry
Henry Fuller
ArboristSite Lurker
Kevin,
You might not needed any parts, all you need IIRC just a phillips screwdriver and C-clamp to compress the plunger just a little before unscrewing the retainer plate, then back off the C-clamp after all 4 screws are removed, then the brass plunger, round cover/cly. like upper valve seat assemble (underneath the retainer), and the spring will all come out. I know you have C-clamp somewhere that'll work (I saw your wood splitter built and your shop setup, very nice write up that you have done about your wood splitter built project).
Henry
I just need to have a spare anyway. I have spare cartridges for all the pumps and want to have it ready just in case so it's not a big deal. I can'r really tell from the drawings, Are the seat parts metal on metal or is a poly? Screws strip off and such, you know the drill.Kevin,
You might not needed any parts, all you need IIRC just a phillips screwdriver and C-clamp to compress the plunger just a little before unscrewing the retainer plate, then back off the C-clamp after all 4 screws are removed, then the brass plunger, round cover (underneath the retainer), and the spring will all come out. I know you have C-clamp somewhere that'll work (I saw your wood splitter built and your shop setup, very nice write up that you have done about your wood splitter built project).
Henry
Henry Fuller
ArboristSite Lurker
I just need to have a spare anyway. I have spare cartridges for all the pumps and want to have it ready just in case so it's not a big deal. I can'r really tell from the drawings, Are the seat parts metal on metal or is a poly? Screws strip off and such, you know the drill.
Kevin,
I went out to my truck and took apart the valve I kept on my truck for service call. I popped off the power head and took an closer look this time, as long as your valve hasn't leak and not corroded around it, they will come apart easily. When you backed off the C-clamp the retainer were the 4 screws goes and the valve gut which is the upper round brass cly. valve seat/plunger assemble will come up out of housing case and the spring will be sitting in the bottom of the housing. This valve I have was a little tight to come apart, I use my heat gun and warm it up a little then it came apart finally, and I apply clear silicone paste on the O-ring (was dry) and put it back together no problem with the C-clamp and installed all 4 screws and be done. On my taco 2-ways valve should be similar to the 3-ways valve (just an added open port on the bottom of the housing, bottom valve seated closed the bypass when the heater warm up and the wax expanded and push the valve/plunger overcome the spring tension and close off the lower seat bypass on the bottom port. The valve and seat I got here are brass seat and metal valve (disc) and there is no plastic to break. I hope this give you an better idea what it look like internally. NOTE: make sure that the power head is completely cool down before you twitching the head off the valve body (will cause the expansion wax element to leak out and not to operate correctly the next time).
Henry
Thanks again for the Info Henry.

$37.99 ($0.38 / Foot)
$40.99 ($0.41 / Foot)
Arborist Rope Climbing Rope Swing for Tree(1/2in x 100ft) Logging Rope 48 Strands for Pull, Swing, Knot (Orange)
SDFJKLDI

$23.98
$28.99
ESTWING Sure Split Wedge - 5-Pound Wood Splitting Tool with Forged Steel Construction & 1-7/8" Cutting Edge - E-5
Amazon.com

$19.99 ($3.33 / Count)
Firewood Log Splitter 45mm+32mm + 4 Handles (Square + Round + Hex Shank + Small Hex) Wood Log Splitter Easy Splitter Detachable Drill Bit Heavy Duty Electric Drills Screw Cone Driver Removable
JianShiMoQinDianZiShangWuYouXianGongSi

$79.99
ZELARMAN Chainsaw Chaps 8-layer Protective Apron Wrap Adjustable Chainsaw Pants/Chap for Loggers Forest Workers Class A
QUALITY GARDEN & HAND TOOLS

$337.83
$369.99
WEN Electric Log Splitter, 6.5-Ton Capacity with Portable Stand (56208)
Amazon.com

$59.99 ($0.40 / Foot)
$69.79 ($0.47 / Foot)
Arborist Rigging Rope 1/2 in x 150 Ft Blue Bull Rope Polyester Braided Arborist Rope 1/2 inch 48 Strands 150 Feet for Various Outdoor Applications Construction Climbing Swing Sailing
Glfcai store

$37.99
$39.99
Wood Kindling Splitter - The Firewood Kindling Tool for Wood Stove Fireplace and Fire Pit
UniExtra

$225.16
OREGON 295397 Type C (All Round Yukon Chainsaw Protective Trouser, Black, Small
Express Shipping ⭐⭐⭐⭐⭐

$17.99
$19.99
Extendable Pole Saw Branch Trimmer Pruner Head for Tree Trimming Pruning
FENGLICNSAOMV
Okay, after a LONG delay I am delving into it now to get to the bottom of the problem.Kevin,
I went out to my truck and took apart the valve I kept on my truck for service call. I popped off the power head and took an closer look this time, as long as your valve hasn't leak and not corroded around it, they will come apart easily. When you backed off the C-clamp the retainer were the 4 screws goes and the valve gut which is the upper round brass cly. valve seat/plunger assemble will come up out of housing case and the spring will be sitting in the bottom of the housing. This valve I have was a little tight to come apart, I use my heat gun and warm it up a little then it came apart finally, and I apply clear silicone paste on the O-ring (was dry) and put it back together no problem with the C-clamp and installed all 4 screws and be done. On my taco 2-ways valve should be similar to the 3-ways valve (just an added open port on the bottom of the housing, bottom valve seated closed the bypass when the heater warm up and the wax expanded and push the valve/plunger overcome the spring tension and close off the lower seat bypass on the bottom port. The valve and seat I got here are brass seat and metal valve (disc) and there is no plastic to break. I hope this give you an better idea what it look like internally. NOTE: make sure that the power head is completely cool down before you twitching the head off the valve body (will cause the expansion wax element to leak out and not to operate correctly the next time).
Henry
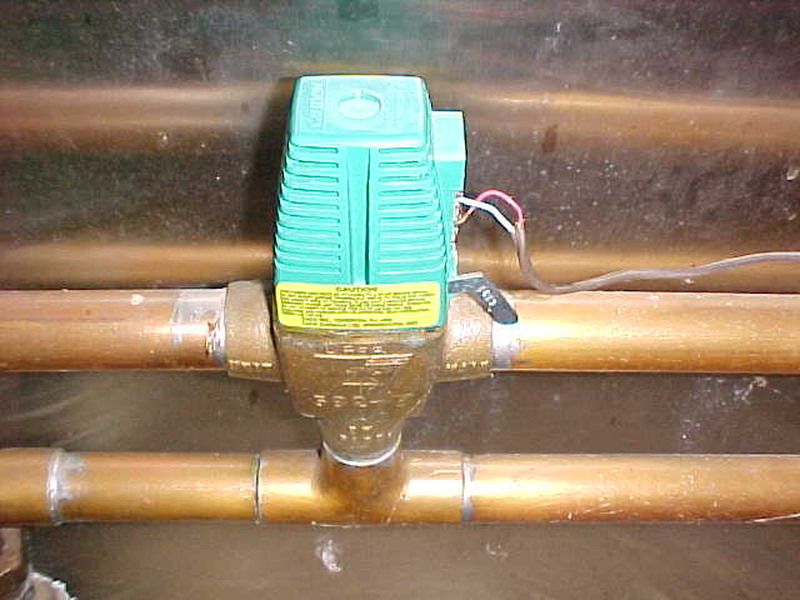
This is the zone valve in question.
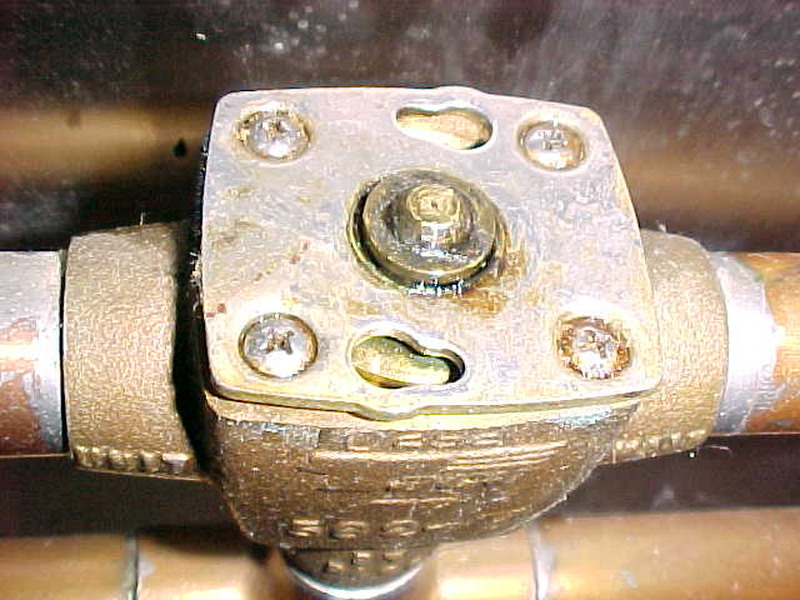
It has never leaked and I put a few drops of oil on the top before every heating season. It the original and has never been worked on. Had a lightning strike and power surge so the head has been replaced twice. I tried the 4 phillips screws with a good phillip[s and some valve grinding compound and much to my surprise they broke free easily. I did oil them with Kroil a day before but I think the body metal had more to do with it.
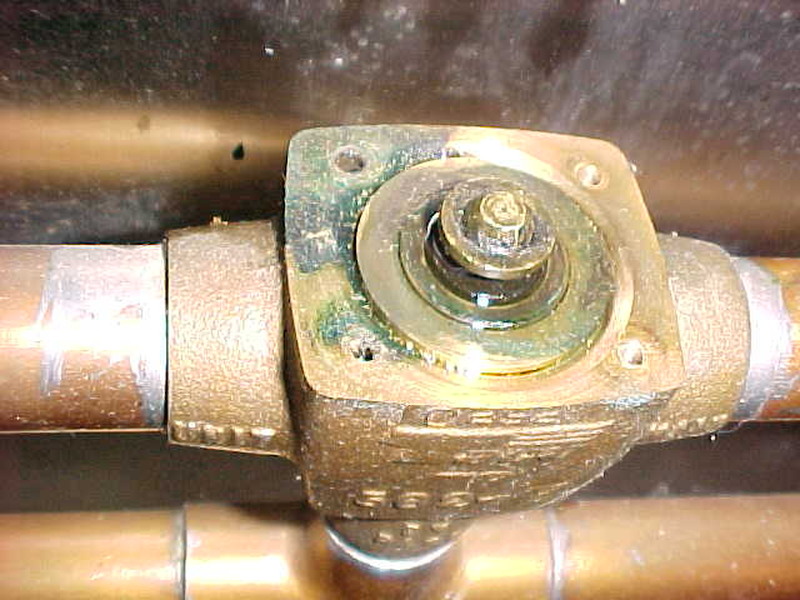
I turned the screws loose and there was no pressure from the internal spring. The body was stuck but kept a mindful eye that it could fly at any moment as I've never worked on one of these.
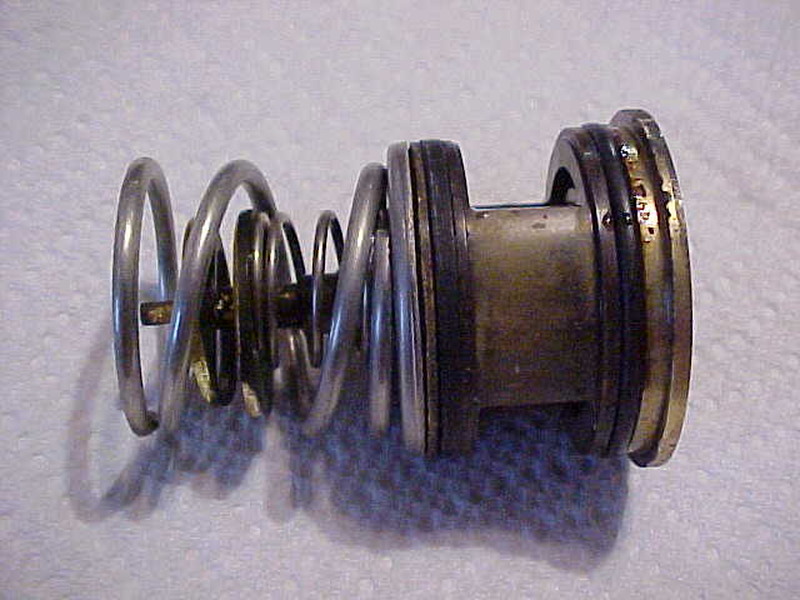
I got a paint stick and layed it on the top and tapped lightly with a very small hammer. Didn't want to mar or distort anything. Just want to break the lock if you will. It still did not come loose. I was going to get a heat gun as suggested but took a screw driver and pushed the top. I could see it move some. I worked it side to side and it came up just enough that I could get under the lip. I didn't jump out but came out slow and smooth.

Here is where I need some expert advice now. This bottom ring is chewed with obvious wear. Not distorted but lots of slop.
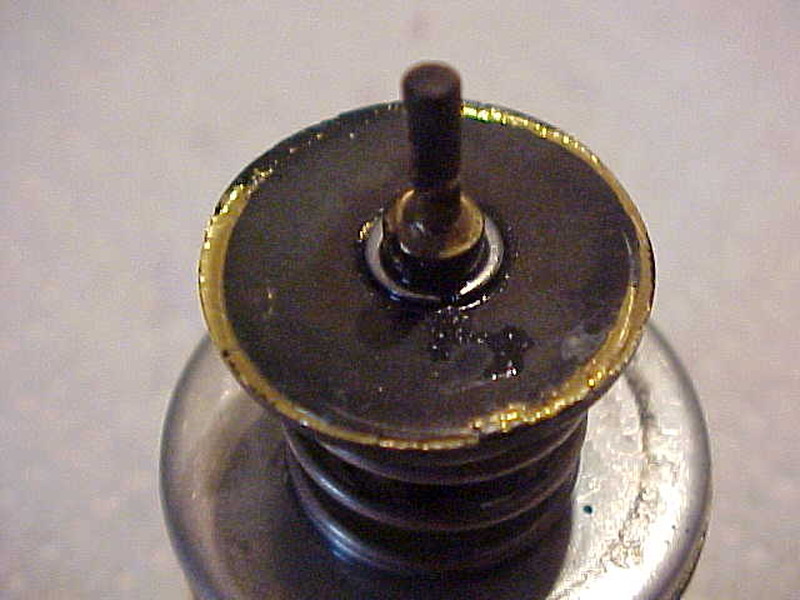
This disc is a lot worse.
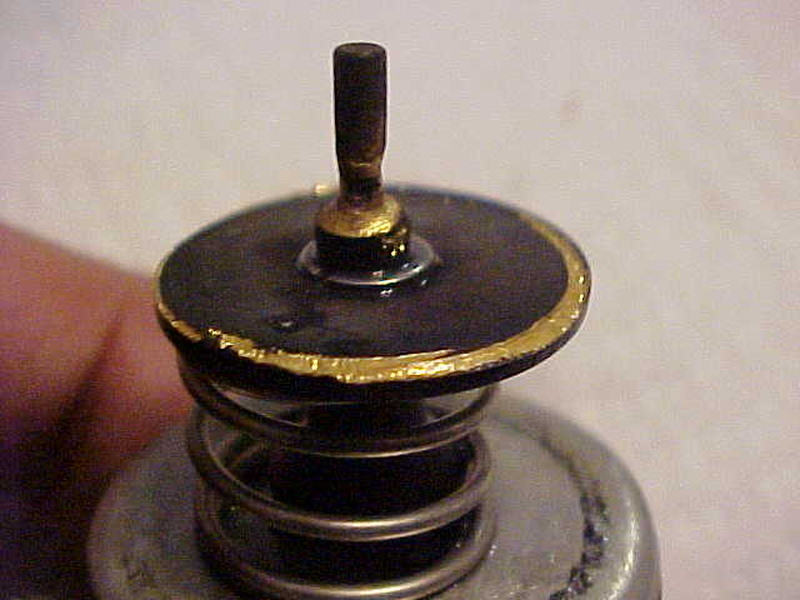
Here is a better view and you can see how the center shaft is really worn as well. It's allowing it to move all over the place and hit the sides.
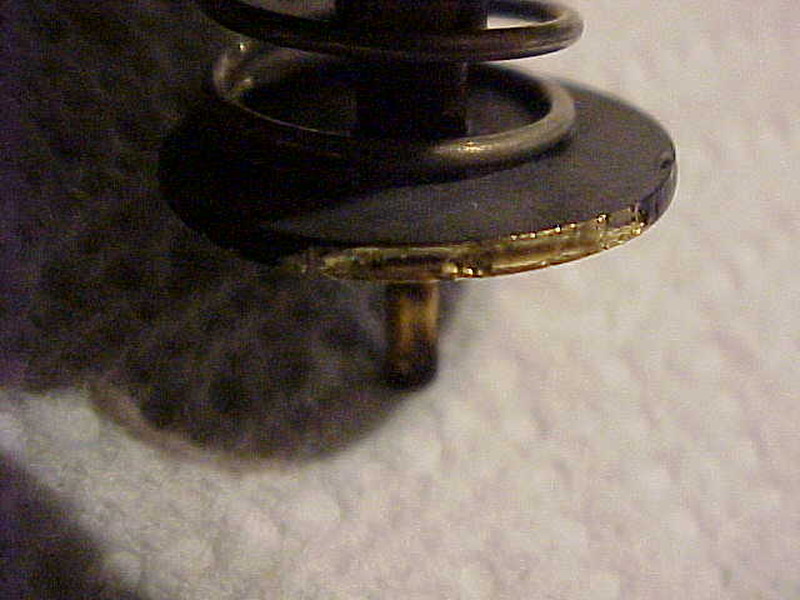
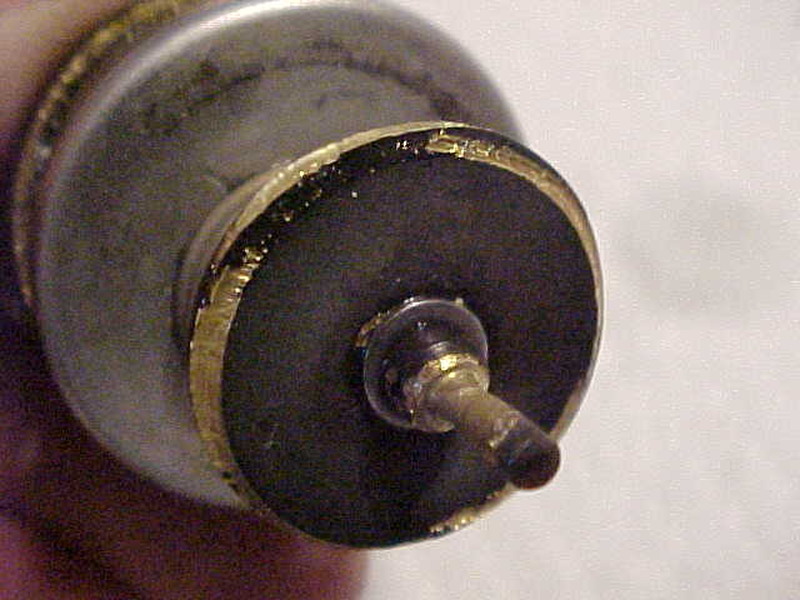
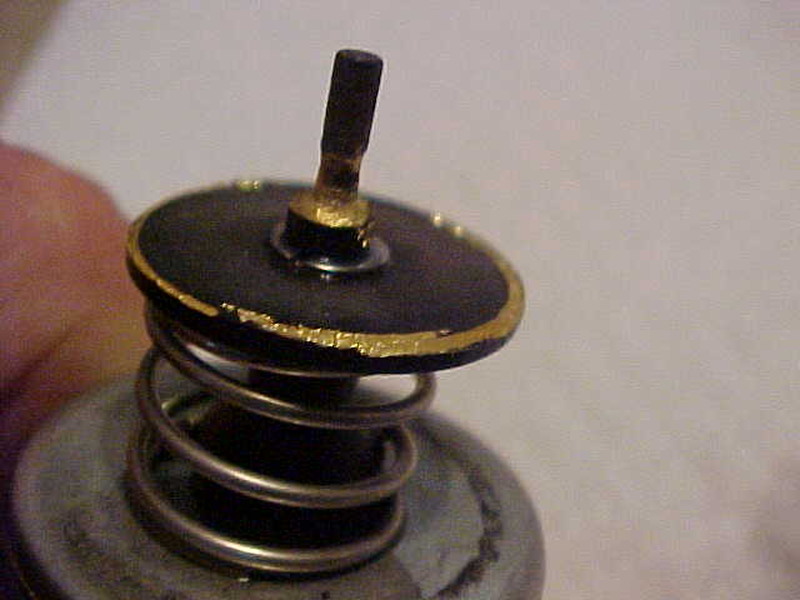
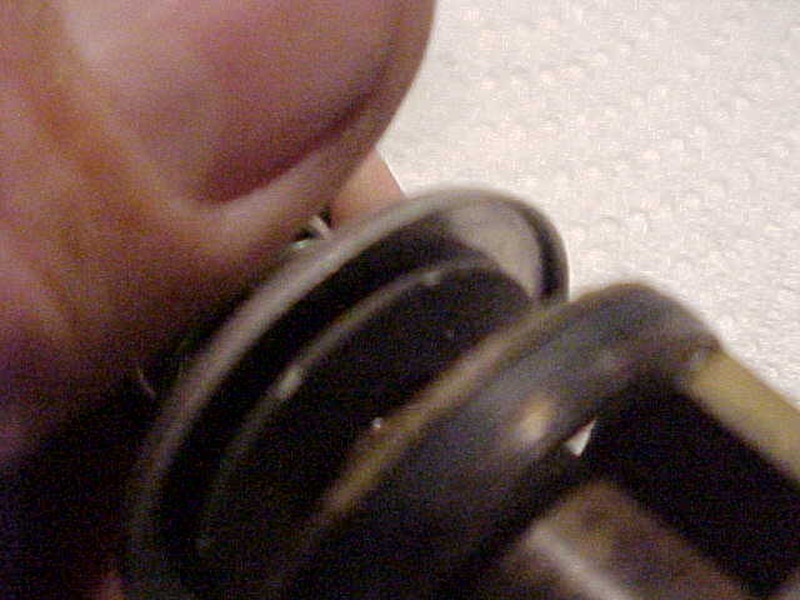

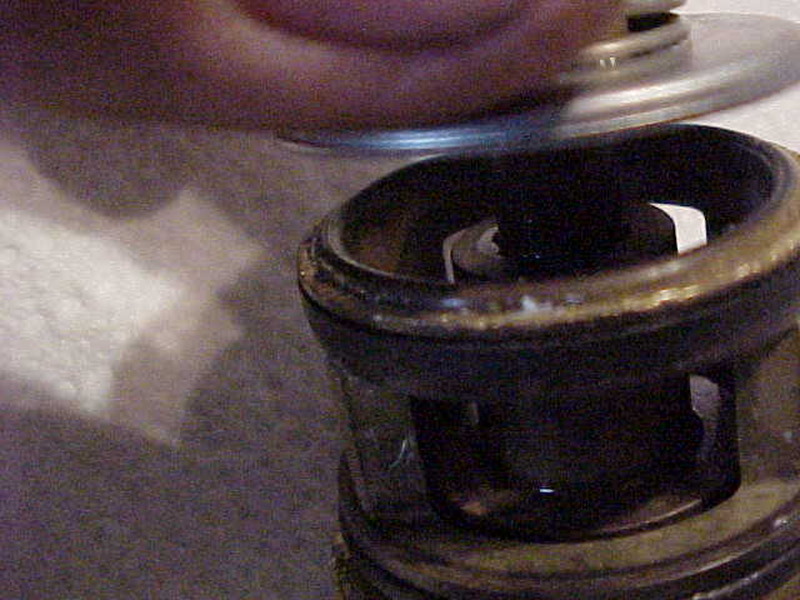
This surface look okay buy it's metal on metal when turned. Can't tell if there is an O ring in there or not.
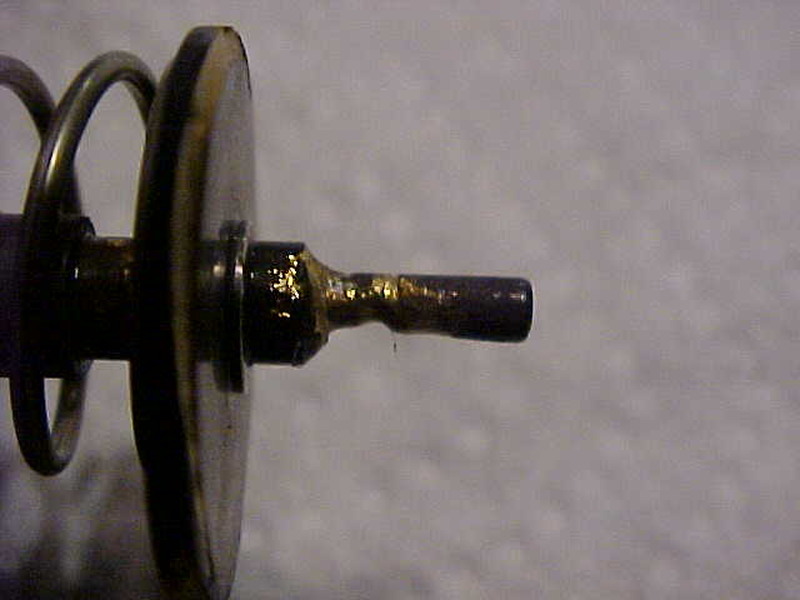
Another view of the worn center shaft.
My question is can I just replace the center with a rebuild or when it gets this bad is it best to replace the whole thing? Not much difference money wise but the pain of resoldiering it all is the kicker. If you're still on here, What do you think Henry? I did not see any debris in there at all so I'm still wondering if this is all the problem and what the cause is.
Subscribed. Had similar problem last spring. Could not get the hot water to heat exchanger. Valve not opening. Still using temp fix of no bypass valve.
Sent from my SM-N950U using Tapatalk
Sent from my SM-N950U using Tapatalk
brenndatomu
Hey you woodchucks, quit chucking my wood!
Added a tag to Henry...that way when he checks in next he will get a direct summons here...
Here is a better view and you can see how the center shaft is really worn as well. It's allowing it to move all over the place and hit the sides.


This surface look okay buy it's metal on metal when turned. Can't tell if there is an O ring in there or not.

Another view of the worn center shaft.
My question is can I just replace the center with a rebuild or when it gets this bad is it best to replace the whole thing? Not much difference money wise but the pain of resoldiering it all is the kicker. If you're still on here, What do you think @Henry Fuller? I did not see any debris in there at all so I'm still wondering if this is all the problem and what the cause is.
Well, I got my new valve assembly as it was just about the same price as a rebuild kit. Decided to unsoldier it and just start fresh.
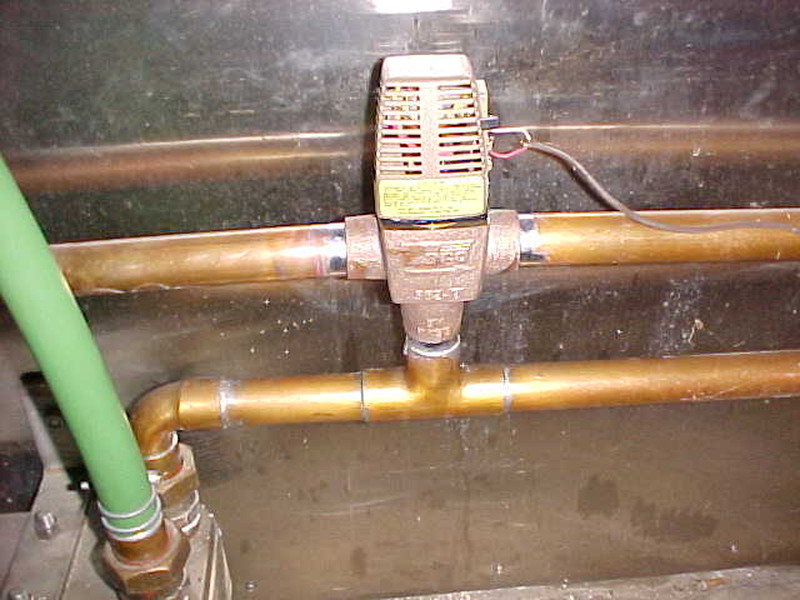
Not sure still what exactly was wrong but this will eliminate a lot.
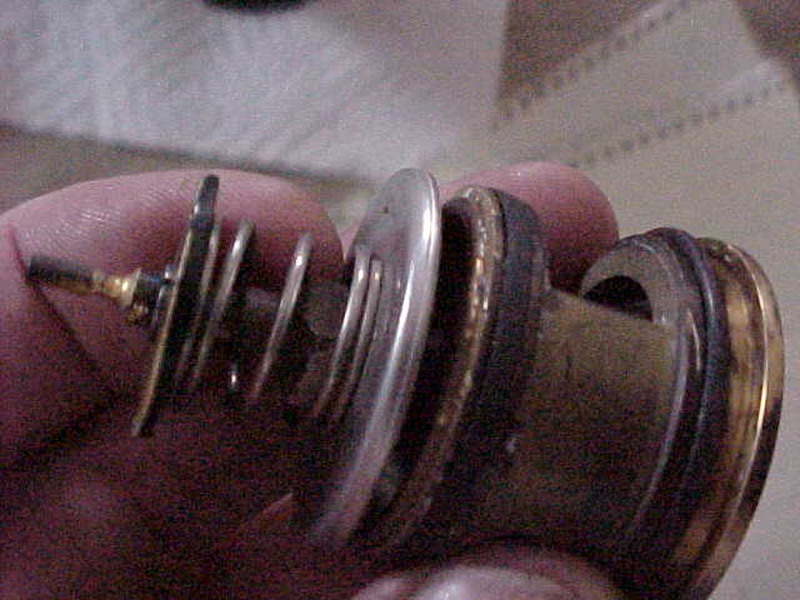
The shaft was so wore that it was about to break off. The hole was oversized as well. When I spin stainless washer when closed, open here. It is metal on metal and there looks to be an oring in there. That may be a possible bypass.
I also bought a strainer.
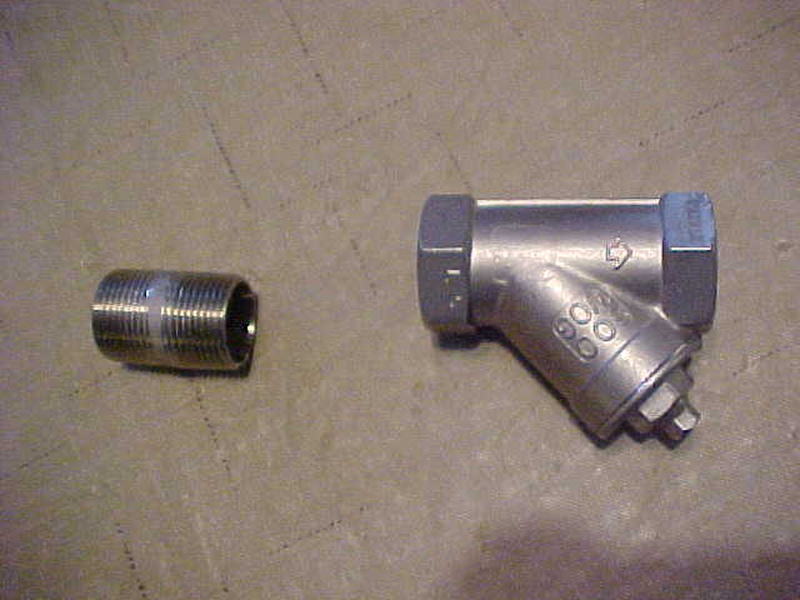
I never thought about it and my dealer never suggested it. I'd recommend that people do in hindsight as the pumps have plastic impellors and when they die, the pieces go through the system. I put it between the valves for the main pump so clean out will be easy to do with little mess.
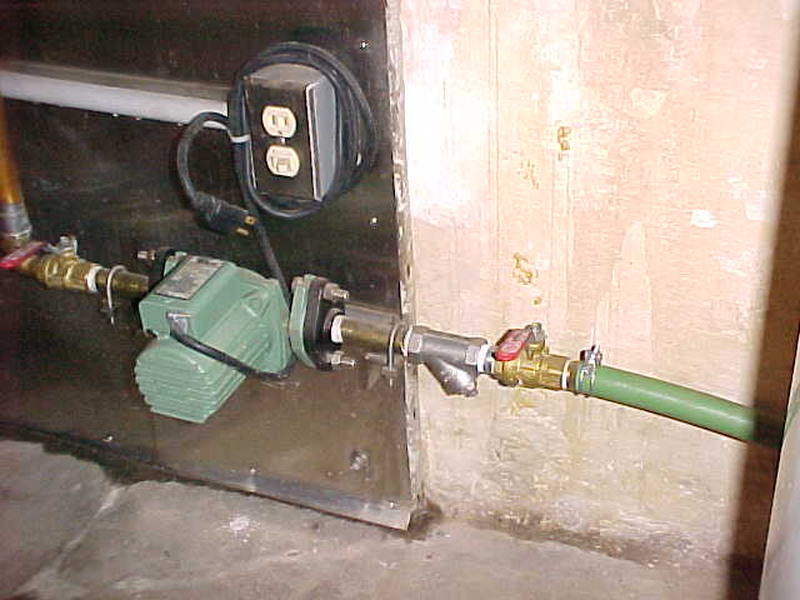
I have not fired my boiler up yet for the heating season but will report back on what happens. Thanks to all for the input.

Not sure still what exactly was wrong but this will eliminate a lot.

The shaft was so wore that it was about to break off. The hole was oversized as well. When I spin stainless washer when closed, open here. It is metal on metal and there looks to be an oring in there. That may be a possible bypass.
I also bought a strainer.

I never thought about it and my dealer never suggested it. I'd recommend that people do in hindsight as the pumps have plastic impellors and when they die, the pieces go through the system. I put it between the valves for the main pump so clean out will be easy to do with little mess.

I have not fired my boiler up yet for the heating season but will report back on what happens. Thanks to all for the input.
Oxford
ArboristSite Operative
I still say that this is some of the best work I've ever seen on AS and the gold standard for "How to Install an OWB." That said, I wonder if you aren't seeing one of the problems associated with an open system, namely that things boil really, really easily at low pressures, and boiling causes cavitation. That valve is throttling constantly in operation, and as a restriction in the line on the suction (low pressure) side of the pump, I will bet the water is cavitating like mad at that valve and every time the bubbles expand and collapse, they erode that disc, seat, and stem. As a test, when you get it back in service and the boiler is hot, listen to it with a stethoscope or a screwdriver and I will bet it sounds like the proverbial cement mixer full of gravel.
I still say that this is some of the best work I've ever seen on AS and the gold standard for "How to Install an OWB." That said, I wonder if you aren't seeing one of the problems associated with an open system, namely that things boil really, really easily at low pressures, and boiling causes cavitation. That valve is throttling constantly in operation, and as a restriction in the line on the suction (low pressure) side of the pump, I will bet the water is cavitating like mad at that valve and every time the bubbles expand and collapse, they erode that disc, seat, and stem. As a test, when you get it back in service and the boiler is hot, listen to it with a stethoscope or a screwdriver and I will bet it sounds like the proverbial cement mixer full of gravel.
It has worked basically flawlessly for 14 years and have never noticed any noise. The circulator on the oil furnace(oil not used, just use the existing pipe runs) is louder by a long shot. It's a pressurized, closed loop that goes on the other side of the heat exchanger. The valve is on the pressure side of the main pump. It's a 10 -15ft drop from the boiler to the main pump in the basement so there is no cavitation that I can see with that much head pressure. I'll probably start it up within a month so I'll see what happens.
Oxford
ArboristSite Operative
It has worked basically flawlessly for 14 years and have never noticed any noise. The circulator on the oil furnace(oil not used, just use the existing pipe runs) is louder by a long shot. It's a pressurized, closed loop that goes on the other side of the heat exchanger. The valve is on the pressure side of the main pump. It's a 10 -15ft drop from the boiler to the main pump in the basement so there is no cavitation that I can see with that much head pressure. I'll probably start it up within a month so I'll see what happens.
I have absolutely no doubt that it has worked flawlessly, and I don't think it's cavitating at the pump, although you might be surprised just how little it would take to cavitate that pump at the temperatures you're running. Cavitation can happen anywhere there's an opportunity for the pressure drop across the surface to be sufficient to cause air to come out of solution or for the boiling point to drop enough for vapor bubbles to form, like across the minimally open surface of the disc and seat in a three-way valve. That wear, with its pebbled appearance, looks like cavitation damage to me. Remember, one side of the valve is high pressure from the pump, but on the other side it's suction to the pump.
I also wouldn't expect it to be audible like pump noise. I think you will hear it with a stethoscope or screwdriver, though.
I am by NO means an expert on this stuff and am eager to learn. I think the pump was about 7PSI(Taco 009). It's an open system as the boiler has a loose cap on it to add water if needed. The pump feeds from the above boiler and pushes/pumps water to the zone valve. It either goes to the heat exchanger or bypasses it. It doesn't draw from the valve the way I see it, it pushes it through, back top the boiler if you will. I agree it has opened and closed thousands of times but I was doing it manually towards the end of last years heating season until I realized even that was having no effect. Something was spin or saw into itself to cause the wear. I can't see spinning as it's under spring tension. the springs were not broke but the new one was maybe .075 taller. Old one may have sagged some from age.
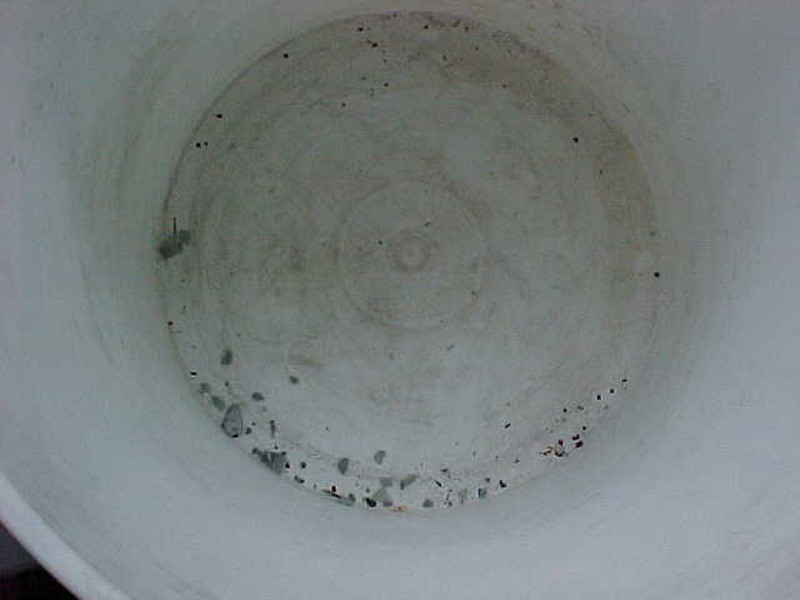
I took off the heat exchanger and flushed it the best I could. I probably should have had it boiled out but It's easy to take off so if this doesn't correct all of the problem I will do that. Last year when extremely cold the house was cooler and it acted like it couldn't keep up. Never had that issue before but I'm thinking the valve was partially open, not allowing it to exchange at full capacity. The other 2 zones that have their own zones and pumps were perfect as before. I flushed into a bucket and when done drained the water off. This is all that was in there, that I got out. I was surprised that no plastic remnants were anywhere to be found. Whether the pump chewed them up or that they are in the boiler remains to be seen. The impeller had to go somewhere. I was very particular about having no mild steel or cast in the system. Boiler is stainless and all the fitting, valves and such were either brass, stainless or poly. Pumps have some mild but couldn't avoid that at the time. What looks like chunks in the bucket is like calcium buildup. As soon as you touch it, it's like fine sand. it's either mineral buildup from the water or ground up plastic. I have only added water to the boiler once in 15 years and it was just at the low spot of the normal level.

I took off the heat exchanger and flushed it the best I could. I probably should have had it boiled out but It's easy to take off so if this doesn't correct all of the problem I will do that. Last year when extremely cold the house was cooler and it acted like it couldn't keep up. Never had that issue before but I'm thinking the valve was partially open, not allowing it to exchange at full capacity. The other 2 zones that have their own zones and pumps were perfect as before. I flushed into a bucket and when done drained the water off. This is all that was in there, that I got out. I was surprised that no plastic remnants were anywhere to be found. Whether the pump chewed them up or that they are in the boiler remains to be seen. The impeller had to go somewhere. I was very particular about having no mild steel or cast in the system. Boiler is stainless and all the fitting, valves and such were either brass, stainless or poly. Pumps have some mild but couldn't avoid that at the time. What looks like chunks in the bucket is like calcium buildup. As soon as you touch it, it's like fine sand. it's either mineral buildup from the water or ground up plastic. I have only added water to the boiler once in 15 years and it was just at the low spot of the normal level.
Okay, I hope(fingers crossed) I have it all back working the way it should. I had 3 things that went bad and that is what made it so hard to wrap my head around.
Problem 1 - The three way zone was wore out and was allowing the hot water to slightly bypass into the heat exchanger for the house 24/7. Dealer said looked like electrolysis to him when I showed him. I replaced this first.
Problem 2 - The thermostat that controls the heat to go into the heat exchanger went bad. I was manually opening and closing the 3 way zone valve for more heat when it got real cold so that made it full bore instead of partially open. I first thought the head on the three way zone valve was dead.(normally lightning strikes kill them) I checked for power at the head and I had none. Then moved up to the thermostat and found it when in, but switch wouldn't send it on. Put a new on in and it now functions.
Problem 3 - My heat exchanger has slowly been loosing efficiency due to becoming plugged. This is why the house was staying colder in the extremes even though the heat was coming through. My dealer informed me that I have my exchanger mounted incorrectly. He never said which way when gave me a map on the layout and I didn't have a clue. I'm surprised no one has grilled me on that over the years. He said the way I have it sediment/debris will collect in the bottom but with it mounted vertical it will self flush and push it on to the boiler. He asked if it would be easy to remount and the more I thought about it I decided to keep it that way. As long as it lasted it was okay.
I decided to by a new exchanger as he said they used the same supplier so it would be the same size. I figured for $313.00 it would be nice to have a spare. I can try to flush it out with heat, CLR or something. He showed me the exchanger there and I was concerned as the nut were bigger/thicker like metrics are. I held them up to each other and the 4 stud pattern looked the same so I though I was golden. When I got home I found they are indeed metric but with a slight enlarging they fit in my bracket. Though I was in the clear....NOT. They changed the 1" outlets by .700 on each end so the hard copper unions don't line up with the old. End up unsoldiering the lines and added/subtracting so it will work. No easy switch out with the old I guess.
Any way, with it all back together it all seems to be working. Granted it is mild so I will update when it gets real cold. Fingers crossed. It all makes sense now but that is normally how it always is once you gets the problems figured out.
Dealer said to bring a water sample up so I did. He said it looked really good and PH was fine and I was borderline for inhibitor. I had tested last fall but not before starting up. I've only added water once to the boiler and in 14 years I've only had to add a 1/2 gallon of inhibitor. Pretty amazing to me.
If I had to guess I'd say the house side of the heat exchanger is the problem as far plugging goes. It is self filling and pressurized.
Hopefully this thread will help someone with things to look at and check. It had me scratching my head when it was going on.
Jakers
Owner - Arbor Jake's Tree Service, LLC
Glad you got it figured out. It really sucks chasing multiple faults with only one symptom. And yes, hind sight is really 20/20
You Da Man Kevin, I knew if anyone could figure it out, you would.
If I was that smart it wouldn't have taken that long! LOL Hope all is well with you.
c5rulz
Addicted to ArboristSite
If I was that smart it wouldn't have taken that long! LOL Hope all is well with you.
Not bad, sold almost all 25 cord of firewood, have 7 face left. Started cutting for next year and have about 7 cord done so far. Waiting for a call of my logger buddies to use the new 18' trailer again.


Similar threads
- Replies
- 61
- Views
- 2K
- Replies
- 2
- Views
- 502
- Replies
- 53
- Views
- 3K


