Need help with a muff mod! Can't get a Husqvarna muffler uncrimped.

Arborist Forum

Help Support Arborist Forum:

This site may earn a commission from merchant affiliate links, including eBay, Amazon, and others.
On that one I used some stainless steel square drive sheet metal screws we use at work. The cover is a sheet of low grade stainless steel from the cover of an old microwave oven. The sealant is Permatex Ultra Copper. I've used Ultra black too.

Thanks for the info!

Looks like your getting good info, I'm not familiar with that model. Yes map gas is kinda the next step in torches/heat. I found it when having trouble soldering a leaking water pipe with a dibble running through which drew all the heat. A plumber friend suggested the change to map and I've used it ever since. The extra heat makes most work faster and smoother. Higher cost is offset by less gas used for the same job. Good addition to your tool box. Ken

I haven't had any experience soldering or brazing. Not that has ever stopped me before. Can you suggest a good torch to use with map gas? Most of the torches I have seen for map gas cost about $50 which isn't really a problem but that I am seeing reports of the starter/striker going out and bricking the torch.

On my 125B and 327ldx, I took a bench grinder to the outside edge of the seam, pulled it apart, cleaned up the sharp edges, opened up the outlets within the limits of the deflectors, reassembled (minus the cat), and brazed it all back together. It's not the prettiest, as I am a bit out of practice with brazing, but the mufflers on both are covered and not readily visible. Be careful when brazing or welding these mufflers as they are galvanized. The 125B has wonderful throttle response now, and restarts much easier. The 327ldx would get hot when working it hard with the edger attachment. It would not stay running unless it was at full throttle, and would not restart easily unless it cooled off for several minutes. With the cat gone, it runs flawlessly and restarts easily.

Both are much louder as well, but sound great.

Bold my emphasis: What affect does galvanization have on brazing or welding? Does it make it harder or much more dangerous? Also, I have been planning to really open the outlet on the 125B. Do you still use the stock deflector on the 125B? Thanks!

Remember all muffler mods require more fuel, open the H jet.

I knew that, what about the L screw? Thanks for the warning!

I am not familiar with the 125 but you may consider a fish gill opening. Simply cut a portion of the muffler and open it up with a screwdriver. I use a die grinder with a cutoff wheel to cut my opening, then pry it open with a flathead screwdriver. The best thing about this style of opening is that you can fine tune the backpressure by closing the fish gill back down a bit or by opening it up a little more

I could do the fish gill on my 435 but I am focusing on the 125B right now. I guess I could fish gill the 125B too. That will be a little later though. Food for thought.
 
Looks like on the 125b muffler that what is holding your muffler together after the incrimp would be the flares on the tubes for the mounting holes.pretty much the same as a bg86.
 
Bold my emphasis: What affect does galvanization have on brazing or welding? Does it make it harder or much more dangerous? Also, I have been planning to really open the outlet on the 125B. Do you still use the stock deflector on the 125B? Thanks![/QUOTE

The zinc used to galvanize steel has a low vaporization temperature. Hit up google for Metal Fume Fever. You will be okay so long as you are in a well-ventilated area, and place a fan to blow air across the piece being welded/brazed so that it blows the fumes away from you. It is also a good idea to keep your head as far away from the piece as possible and still do the work.

I do not remember exactly how I did the muffler on mine in terms of the deflector, but if memory serves, I just opened up the area under the deflector. Because of the plastics surrounding the muffler, I wanted to keep the exhaust taking the same path out as stock so as to avoid melting the plastics. The plastics are also why I did not do the fish gills. I know I kept the screen intact, mainly because mud wasps love to build nests in mufflers.
 
Yup, vomiting, fever, and feels like someone through a handful of sand in your eyes.

The thing to remember on the 125B, is that it is a small motor - 28cc - and operates at a relatively low speed. A little goes a long way. Getting rid of the cat is the biggest benefit. Opening the outlet may not even be necessary, I only did it while the muffler was apart because I prefer not to grind/drill on an assembled muffler when I can avoid it, though it is unavoidable at times.
 
The L circuit handles 80% of the engines fuel needs. The H needs to be opened because your moving more air through the cylinder. Otherwise the engine will lean out at high speed. Ideally you want a significant burble (4 stroke miss) under no load high speed, that disappears when the chain starts to cut (load).
 
Wow, my memory is horrible, but in my defense, it has been 2 years. This is my 125b. It certainly does not need to be opened up this much.

IMG_20150327_175328.jpg
 
For those that are confused, the 125B is a handheld leaf blower, not a chansaw.

From what I have read, there aren't a lot of performance gains by opening the exhaust on that model of leaf blower. But as someone mentioned, throttle response is sluggish on that model stock, so opening a little should help there.
 
Looks like on the 125b muffler that what is holding your muffler together after the incrimp would be the flares on the tubes for the mounting holes.pretty much the same as a bg86.

Well, I used an angle grinder to seperate the muffler. The crimp on the mounting tube DOES NOT hold the muffler together, atleast on my muffler. I was worried for a minute, though.


The zinc used to galvanize steel has a low vaporization temperature. Hit up google for Metal Fume Fever. You will be okay so long as you are in a well-ventilated area, and place a fan to blow air across the piece being welded/brazed so that it blows the fumes away from you. It is also a good idea to keep your head as far away from the piece as possible and still do the work.

I do not remember exactly how I did the muffler on mine in terms of the deflector, but if memory serves, I just opened up the area under the deflector. Because of the plastics surrounding the muffler, I wanted to keep the exhaust taking the same path out as stock so as to avoid melting the plastics. The plastics are also why I did not do the fish gills. I know I kept the screen intact, mainly because mud wasps love to build nests in mufflers.

I talked to a man I know who is a blacksmith. He thought that he might be able to braze the muffler for me. Gonna take the muffler to him tommorrow and see what he says. Maybe I can convince him to teach me to braze.

I have been planning to completely remove the area behind the deflector. I may just leave the deflector alone for now. BTW, thanks for the photo of your muffler.

The L circuit handles 80% of the engines fuel needs. The H needs to be opened because your moving more air through the cylinder. Otherwise the engine will lean out at high speed. Ideally you want a significant burble (4 stroke miss) under no load high speed, that disappears when the chain starts to cut (load).

Cool. I did not know that the L screw provided the majority of the fuel. I am still new to tuning but learning fast. How does tuning differ between saws, blowers and trimmers?
 
I did not know that the L screw provided the majority of the fuel.
Well, it doesn't. The L fuel outlet does continue to flow when the throttle is wide open, but once the edge of the throttle plate moves away from the L ports the signal is greatly reduced.

In something like a car (in the old days with carbs), the low speed circuit was what you ran on most of the time, but even blowers and trimmers are running pretty hard most of the time.
 
With a blower, it is pretty much running at full load at all times when wide open. I just tune mine to max rpm, and back it down 200 rpm or so just to be on the safe side.
 
Well, it doesn't. The L fuel outlet does continue to flow when the throttle is wide open, but once the edge of the throttle plate moves away from the L ports the signal is greatly reduced.

In something like a car (in the old days with carbs), the low speed circuit was what you ran on most of the time, but even blowers and trimmers are running pretty hard most of the time.
Woops, misundrstood the post I quoted. My bad.

With a blower, it is pretty much running at full load at all times when wide open. I just tune mine to max rpm, and back it down 200 rpm or so just to be on the safe side.

I tune by ear but that is basically how I do it. Turn in until I hear the engine gong lean then back in a couple of touches. Better on the safe side. Oh, I need to post pics of the muffler. Off to get my camera!
 
Ok, well, I ain't worried about it.

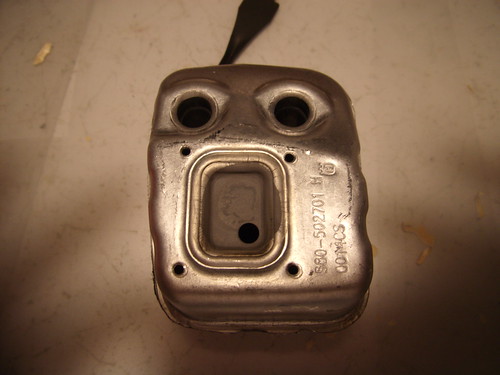
Muffler pics! Some of the grinding wasn't the best but not bad for a first time grinding with a hand held angle grinder.

Front so you can see where the deflector goes.


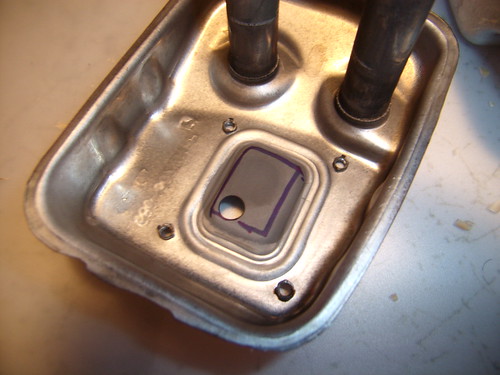
Split.


The metal in the box is going away. Deflector screws into the front of the muffler over this port.
 
Good morning. A couple of thoughts I would like to post. It was mentioned that the muffler might be spot welder shut at the seems. I did not find this to be the case.

Well, I had another thought but it is too early in the morning to remember what it is. :laugh:

EDIT: I remember! I think that if you used map gas instead of propane, which I was using, you could uncrimp the muffler. YMMV.
 
Timed cuts

Now that's real world. I like that.

So you open, retune, test; open tune test and so on until the speed of the cuts begins to slow and then you close it back down? Sounds simple.

Do you begin with the 80% of inlet area? About how much would you open the gills as an increment? 25% more open each time or is that too much? And how many tweaks does it usually take to get it just right?

This sounds way easier than experimenting with welded tubes.
 
Back
Top