Pioneer chainsaws

Arborist Forum

Help Support Arborist Forum:

This site may earn a commission from merchant affiliate links, including eBay, Amazon, and others.
put my 1200A together today after its cosmetic overhaul The saw was sandblasted first It came out ok the paint was just matched from a chip and was unshure how painted when new, But Im happy only owes me about 20$ all up

Really nice looking saw,paint looks great, the color does not show well on my screen but it matters not. They always look much better with a new coat of paint as most Pioneers lost their paint easily from normal useage and weathering.
Pioneerguy600
 
1200a

put my 1200A together today after its cosmetic overhaul The saw was sandblasted first It came out ok the paint was just matched from a chip and was unshure how painted when new, But Im happy only owes me about 20$ all up

Nice looking 1200A you have there Dropped P51! I have a 1200 and a 1200A,mine seems to be a little greener than yours.It's on this thread somewhere.
Lawrence
 
put my 1200A together today after its cosmetic overhaul The saw was sandblasted first It came out ok the paint was just matched from a chip and was unshure how painted when new, But Im happy only owes me about 20$ all up

agreed, it looks great...did you split the case to do that?
 
Next question

How do i go about setting carb on a P41 It dosnt seem to run nice and crisp It starts good @ sort of feels quarter choked
but dosnt howl like my P51
 
Last edited:
agreed, it looks great...did you split the case to do that?
Didnt split case just removed covers masked blasted primed and painted lol The paint seemd very bright i added a bit of white to it It was just enamel mixed at colourplus Home hardware shop

got the better of me today and went and trimmed branches in the garden with it
 
Dropped, nice work on the 1200.
As far as setting the carb up on your P41, it's a standard procedure for most of the two-screw carbs. There are a lot of threads on ASsite regarding how-to. I start with both screws a turn out and go from there. For the idle adjustment (the left screw) it's best to play it by ear. Counter-clockwise is more rich but you don't want it so rich that it will load up and sputter under accelleration or drownout at idle. Too lean and it'll die at idle too.
For the high screw on the right I simply run the saw a full throttle with a screwdriver in the screw slot and turn it out (richer) until it just starts to run poorly, then maybe another 1/8 turn out. It won't scream without a load on but you'll ensure that there is plenty of fuel when you are hard in a cut. Too lean and you'll get lots of RPM's but no torque, and you'll fry your saw.
lastly, go back to the idle and adjust it so that it will idle well and accelerate with a blip on the throttle.
It's an art form, not a science. There are many videos on Youtube for this procedure. When you get it right, you'll know.
 
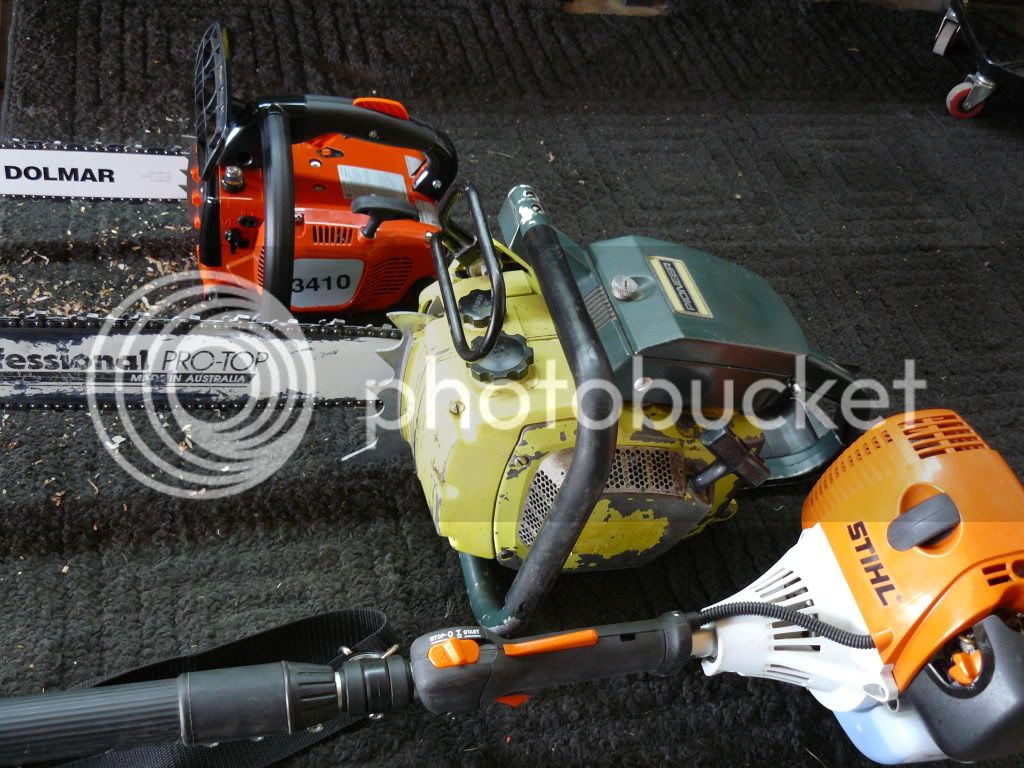
trimming trio

I thought I'd post a photo of my trio that I use for arborist work now. There's a new dealer in town here so seeing as how the Stihl guys won't give a guy the time of day around here I thought I'd go over and have a chat. I walked away with a new Dolmar 3410TH. It's a climbing saw that has 34cc's and weighs only 7.1 lbs. It starts easily and runs really nice. Along with that I use my Stihl polesaw and my always trusty P50. Not shown is my 1074 that always tags along too.

trio002.jpg


I currently have my Frontier (comes with 3 bars) and my aforementioned new 1074 for sale if anyone is interested.
Brendon.
 
How do i go about setting carb on a P41 It dosnt seem to run nice and crisp It starts good @ sort of feels quarter choked but dosnt howl like my P51

Not sure about yours, but my P41 has one of those garbage Tillotson carbs with the big brass governor circuit screw on the side. The screw has a little ball-bearing & spring valve inside that opens up at a certain RPM and dumps fuel straight into the venturi of the carb to richen the mixture. Sort of the early (and cheaper) equivalent of today's rev-limited ignition coils (which I hate even more). It's a great feature to prevent n00b homeowners from cooking a saw by playing with settings they know nothing about, but it creates problems for those of us who know what we're doing. At any rate if yours does have a governed carb, you can fix it by punching a small 1/4" disc from some very thin sheet aluminum (like a beer can or pie plate) and inserting it behind the brass screw, effectively blocking the entire governor circuit. After that it should tune like a normal carb. Fellow AS user "ModifiedMark" just started a thread about these carbs a few days ago after encountering some odd tuning issues. It shouldn't be too far down in the stack of threads.

I should note that if these governors are operating properly, they should have no effect on how a stock saw runs in the cut since the saw will likely be far below the RPM needed to open the gov. circuit. However, the little springs in the governor can get weak over time, at which point the valve can open prematurely and limit the engine at a much lower RPM than it ought to be. On the other hand, trying to tune a modified saw, even if only mildly modified, can be a nightmare with one of these carbs, especially if you aren't aware of it.

I should also note that all three governed Tillotsons that I've worked on had the governor screw secured with Blue Loctite and were a bit of a pain to remove - one small slip the wrong way and you can mangle the brass screw's slot pretty good.

EDIT: Decided to take a couple pics of the carb on my P41 for reference for you:

attachment.php


The governor screw is the one visible in the lower-right-center of the picture, just to the right of the choke butterfly. It's nice and handy on the P41, since it can be accessed with a screwdriver from under the top handle/filter frame section of the saw. On my Huskies that have 'em the carb has to be removed to work on the governor.

attachment.php


Just a closer look at the governor screw itself when removed from the carb body. You can see the little inlet hole in the side and the outlet hole in the bottom (containing the ball-bearing). When the saw's RPMs reach a certain level, the spring compresses and the ball bearing can move above the inlet hole, allowing fuel to pass.


I actually haven't blocked the one on my P41 yet, since I haven't actually used (or worked on) that saw since my collection started growing a couple years back. It used to be my first and only, now it's just one of 30 or so. Still runs fine though! But my Husky 50 will outcut it by a mile in smaller firewood while weighing at least a third less, so the P41 doesn't see too much action anymore.
 
Last edited:
$50 p60

I just bought this P60 for $50. I think I got a good deal! It looks to be low hours. I did not have time to completely go through it, it is missing the clutch and comp. release.

arrowheadpioneer

arrowheadpioneer

arrowheadpioneer

arrowheadpioneer
 
I was getting ready for bed, and decided I could not wait till morning to do a test run of the P60. I installed a comp release and squirted a little mix in the carb. She fired right off with a TON of compression. Now I can go to sleep.
 
Ed, how can you sleep knowing you stole that saw? :)
Looks like a nice one, a little bit of work and she'll be tip-top. What an amazing deal!
 
Dropped, nice work on the 1200.
As far as setting the carb up on your P41, it's a standard procedure for most of the two-screw carbs. There are a lot of threads on ASsite regarding how-to. I start with both screws a turn out and go from there. For the idle adjustment (the left screw) it's best to play it by ear. Counter-clockwise is more rich but you don't want it so rich that it will load up and sputter under accelleration or drownout at idle. Too lean and it'll die at idle too.
For the high screw on the right I simply run the saw a full throttle with a screwdriver in the screw slot and turn it out (richer) until it just starts to run poorly, then maybe another 1/8 turn out. It won't scream without a load on but you'll ensure that there is plenty of fuel when you are hard in a cut. Too lean and you'll get lots of RPM's but no torque, and you'll fry your saw.
lastly, go back to the idle and adjust it so that it will idle well and accelerate with a blip on the throttle.
It's an art form, not a science. There are many videos on Youtube for this procedure. When you get it right, you'll know.
HI thanks had a bit of a look tonite the right hand screw was out about 8 turns Have had it running Looks to run and sound heaps better Will run a few tanks through it on the weekend And see how it goes
 
P60

Arrowhead
That is a hell of a find on the P60 I paid way above that for the new to me
P41 Western.Congratulations!

Propliner(Brendon) and Brad Morgan what a right up on the carbs! That's what makes this thread so great is that you take the time to explain things for us that need to know.
Lawrence
 
P41

I know you have seen it before but not with the bar on so here goes.
Then I will post a couple more of the bar ,I have questions with it.
Lawrence
PioneerP41006.jpg

PioneerP41001.jpg

PioneerP41008.jpg
 
P41 chain bar

Okay Pioneer gurus,here are two pictures of the bar and chain that came with the saw.I pulled the chain up out of the slot so you could hopefully see the little dip in the bar.What could have caused this ?Can I run the chain on that bar?It seems to turn allright by hand but there is one of the links that catches sometimes.
Thanks
Lawrence
PioneerP41005.jpg

PioneerP41004.jpg
 
I'd run that bar Lawrence, especially with the gouge on the top side. If you have a drive tooth catching, just file it a bit thinner until it doesn't catch. What may have caused that was the chain being far too loose for far too long... which caused the teeth to return to the bar at a sharp angle at that very point... and gouging it out. It more commonly happens where the roller tip meets the bar.
Great looking P41, by the way. They are all around the most balanced-looking of the P-series saws.
 
The saw looks good with the bar on. Is that a 24"? I agree with everybody, the bar is fine, run it. I will try to post some pics of my P41 and P51 in the next few days, they don't look as good as your Lawrence. Ive been busy gettin ready for archery deer season. It opens up Oct. 1 :clap:
 
P61

Here's a few pics of the P61 before and after a new clutch cover and muffler. I chose to install the non-basket style cover, I like them better. All I need for it now is the button for the manual oiler.

arrowheadpioneer

arrowheadpioneer

arrowheadpioneer

arrowheadpioneer

arrowheadpioneer
 
Back
Top