Rebuilding a rare Poulan gear drive

Arborist Forum

Help Support Arborist Forum:

This site may earn a commission from merchant affiliate links, including eBay, Amazon, and others.
Joined
Dec 2, 2007
Messages
19,338
Reaction score
9,585
Location
NW Indiana
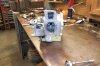
Picked up one of the ones I have been after for sometime, a Poulan 744 gear drive saw. These are pretty rare. There the last of the mid sized gear drives Poulan made and were only made for two years. They followed the 252, and the 252A that were each only made one year apiece. They were actually what they called lightweight gear drives and were 4.5CI displacement and were a combination of sand cast aluminum and die cast magnesium construction.

This saw will never be a looker and it had led a full life before I got it and you can tell it was used a lot. It had a broken handlebar bracket and someone had adapted what looks to me to be a David Bradley exhaust stack on it. It exited to the upper rear of the saw and had to be deafening to us in that configuration blowing back at the operator like that. :laugh:

I wanted to bring it back to original condition and back to excellent running condition. I had to fight the urge to repaint and cosmetically restore it as well but wanted to leave it with all its scars as well.

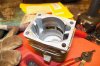
Upon tear down I was happy to see the P/C were in more then excellent condition and only found the main bearings to be in a little rough shape, so the plan was to clean it all up and replace anything not up to snuff with new to make it a dependable runner.

I'll try to post all the photos of the rebuild.

Here it is in as received condition.

attachment.php
 

Attachments

  • 100_3081 (Custom).JPG
    100_3081 (Custom).JPG
    72.8 KB
Last edited:
OK, skipping the tear down, on to reassembly..

RH view of crankcase and gearbox

attachment.php


LH view of crankcase

attachment.php


Flywheel side crankcase bearing support..

attachment.php


Detail of the FW side new bearing, the retaining groove in the bearing and the locking ring on the crankshaft groove.

attachment.php


Here is the crankshaft and bearing installed in the FW side bearing carrier. Not the retaining screws that secure the crank bearing to the carrier. It is a press fit bearing so they went above and beyond securing that bearing.

attachment.php
 

Attachments

  • 100_3177 (Custom).JPG
    100_3177 (Custom).JPG
    83.6 KB
  • 100_3180 (Custom).JPG
    100_3180 (Custom).JPG
    74 KB
  • 100_3188 (Custom).JPG
    100_3188 (Custom).JPG
    82.4 KB
  • 100_3193 (Custom).JPG
    100_3193 (Custom).JPG
    56.3 KB
  • 100_3197 (Custom).JPG
    100_3197 (Custom).JPG
    79.1 KB
After the new caged needle bearing was pressed into the case, the crank and bearing carrier were installed in the crank case.

attachment.php


attachment.php


The rod was then installed on the crank. The large zip tie was used to hold the cap and bearings in place on the crank journal while installing the rod..

attachment.php


The piston and new rings were then installed.

attachment.php


The cylinder was in great shape.

attachment.php
 

Attachments

  • 100_3199 (Custom).JPG
    100_3199 (Custom).JPG
    90.8 KB
  • 100_3200 (Custom).JPG
    100_3200 (Custom).JPG
    79.4 KB
  • 100_3202 (Custom).JPG
    100_3202 (Custom).JPG
    67.5 KB
  • 100_3204 (Custom).JPG
    100_3204 (Custom).JPG
    74 KB
  • 100_3206 (Custom).JPG
    100_3206 (Custom).JPG
    71.6 KB
The oil pump installed in the gear box then the cylinder installed.

attachment.php


The clutch was installed, then a new foam seal was fitted between the tank/handle assembly and the tank secured in place.

attachment.php


A new oiler line from the case to the bar pad was installed as well as the gear case cover.

attachment.php


The reed valve/carb adapter was secured then the NOS stack muffler.

attachment.php


attachment.php
 

Attachments

  • 100_3209 (Custom).JPG
    100_3209 (Custom).JPG
    82 KB
  • 100_3216 (Custom).JPG
    100_3216 (Custom).JPG
    87.2 KB
  • 100_3218 (Custom).JPG
    100_3218 (Custom).JPG
    83.6 KB
  • 100_3225 (Custom).JPG
    100_3225 (Custom).JPG
    77.7 KB
  • 100_3229 (Custom).JPG
    100_3229 (Custom).JPG
    64.8 KB
Last edited:
The rebuilt carb was then installed along with new fuel lines and filter.

attachment.php


A new OEM cork gasket was then used to seal the upper tank half to the saw. A new duckbill valve and o ring was fitted to the fuel cap as well.

http://www.arboristsite.com/attachment.php?attachmentid=316363&d=1380507293

The ignition was then fitted in place.

attachment.php


The rebuilt recoil assembly came next.

attachment.php


Here is the tank cover installed as well as the NOS air filter.

attachment.php
 

Attachments

  • 100_3234 (Custom).JPG
    100_3234 (Custom).JPG
    80.3 KB
  • 100_3236 (Custom).JPG
    100_3236 (Custom).JPG
    86.5 KB
  • 100_3238 (Custom).JPG
    100_3238 (Custom).JPG
    84.8 KB
  • 100_3239 (Custom).JPG
    100_3239 (Custom).JPG
    87.1 KB
  • 100_3242 (Custom).JPG
    100_3242 (Custom).JPG
    85.1 KB
The last assembly picture. I thought I had more but probably got into the beer about then and forgot about the camera... :laugh:

attachment.php


Here it is all back together, up and running like a new one.

attachment.php


attachment.php


attachment.php


Notice the NOS handle bracket to replace the broken original. I was lucky to find that part!

attachment.php
 

Attachments

  • 100_3244 (Custom).JPG
    100_3244 (Custom).JPG
    80.2 KB
  • 100_3316 (Custom).JPG
    100_3316 (Custom).JPG
    64.3 KB
  • 100_3322 (Custom).JPG
    100_3322 (Custom).JPG
    67.6 KB
  • 100_3324 (Custom).JPG
    100_3324 (Custom).JPG
    56.8 KB
  • 100_3328 (Custom).JPG
    100_3328 (Custom).JPG
    70.4 KB
While I'm at it, here is the 252 and 744 setting together! Probably the only pair of these together in one place you will find..

I have to say that I learned quite a bit comparing the two of them, I thought they were more the same then what they are. The 252 is based on the 68-69 200 series saws while the 744 got the newer 245 style parts. It is also interesting to note that the 252 and 252A saws were auto and manual oiler equipped while the later model 744 was a manual oiler. How's that for progress.. LOL

attachment.php
 

Attachments

  • 100_3331 (Custom).JPG
    100_3331 (Custom).JPG
    72.8 KB
Last edited:
awesome job as always.:rock: sometimes a preservation is more important that a full restoration. Love it.

is it just me or does that tank gasket shape and the manual oil pump look very similar to a mac 10 series:laugh:
 
awesome job as always.:rock: sometimes a preservation is more important that a full restoration. Love it.

is it just me or does that tank gasket shape and the manual oil pump look very similar to a mac 10 series:laugh:

Thanks, but as for the Mac parts? I don't know, could be I never cared enough to notice on those yellow ones. :laugh:
 
this is to cool mark. makes me feel like I should try get my hands on a gear drive to fix up. I actually have never seen one around here. :cheers:
 
Nice job rebuilding the saw Mark.:msp_thumbsup:

If I was doing it, it would of been real hard to not paint it.:laugh:
 

Latest posts

Back
Top