What are you building with your milled wood? merged

Arborist Forum

Help Support Arborist Forum:

This site may earn a commission from merchant affiliate links, including eBay, Amazon, and others.
attachment.php

After getting all the loist in place I was able to get the floor down today with the help of the kids. Most of the floor is 1"x 12" 16' doug fir with minimal sap. there are a few 1"x10" in the mix as well.
attachment.php

Very good work, looks like you could park a tank on that thing.
 
Well that hole in the floor is a bit smaller now that i finished framing in the door to the root cellar.
"Sherman tank" ok, but an 88 may be a bit much.
 
My buddy down near Vancouver is getting married this Sunday, so I'm heading down there tomorrow morning. Last night at about 7 PM he calls me and says, "Yeah, we were wondering if you could maybe cut us a big Douglas Fir cookie to set the cake on?"... Umm... Ok... Since I had to work a 10-hr shift today that didn't leave me much to work with, so I hauled a$$ out the trails on the quad as soon as I got home from work tonight. There are a couple big Fir logs down in the bush not too far away - the problem is that they've BEEN down for at least a couple years now. Both had significant sapwood rot near the butts, and were otherwise fairly checked up. Well, beggars can't be choosers with notice like this, so they'll have to live with some checking. The cake should hide most anyway. Here's what I ended up with after a little over an hour's work in the shop:

attachment.php

Sure, it looks pretty decent NOW, but I just hope it doesn't self-destruct before Sunday afternoon - it's not exactly dry despite the huge check, and will shrink quite a bit more I'm sure. So far I've given it two really good coats of water-based Polyurethane to try to seal it up as best I can without altering the color too much. I'll give it a third before I go to bed and let it sit overnight too. The other issue is whether it'll stay flat or not. It's a little over 3" thick, so it should be fairly stable. To flatten it, I first used the electric 3" handplane, followed by my big Stanley #6 handplane. Which was NOT designed for shooting tight Douglas Fir end grain! It gave a really nice, perfectly flat surface though after a lot of work. Then I used a Zirconium flap disc on the angle grinder to round the corner over and remove the cambium and punky outer couple layers of wood around the edge. Man can those discs remove material FAST! They don't last a long time with the resinous Fir wood though - they get all gummed up pretty quickly. After this I put the 220 grit on the 1/4 sheet sander to really smooth it down.

Not bad for two hours from being cut from the log. It's too bad they hadn't given me more notice, as I could have been a lot pickier about the piece of wood I chose, but oh well.
 
Remember when I was doing the speed tests on a pine cant, and I said I might use the boards for closet shelves ?

Finally made those closet shelves. Some of them are straight sided boards from the test cant, others are live edge slabs.

Gave them a single coat of polyurethane, without any stain. I'm not sure if there is a stain to enhance blue stained pine ? Anyway, here are a couple of representative boards.

Top board is blue/grey stained. It also has some brown water stains, because I left the log sitting out in the rain for a couple of years. Not sure if the pink streak is natural or from a chalk line that I sometimes use to snap a cut line ?

Bottom board has lots of bug holes. If this were a paying job, I'd have to charge extra for the added character. You can't buy boards like these at the lumber yard. :dizzy:
attachment.php


I tried to expose a live edge, whenever possible. Nothing fancy, just rustic and functional.
attachment.php
 
It's beautiful Brad...
:clap::clap:

Thanks! I forgot, I took a picture of it in use last weekend. Here it is:

attachment.php


They were really happy with it and apologized profusely for waiting until the last minute. No biggie! I got to play with some saws and tools for something productive for friends... Win-win to me. I must admit I was a bit grumpier about it when i was trudging around in the bush in the pouring rain looking for a usable piece on Friday afternoon, but it had already been a bad day at work at the mill, so that didn't help either. It was worth it though.
 
Gave them a single coat of polyurethane, without any stain. I'm not sure if there is a stain to enhance blue stained pine ? Anyway, here are a couple of representative boards.

Top board is blue/grey stained. It also has some brown water stains, because I left the log sitting out in the rain for a couple of years. Not sure if the pink streak is natural or from a chalk line that I sometimes use to snap a cut line ?

Bottom board has lots of bug holes. If this were a paying job, I'd have to charge extra for the added character. You can't buy boards like these at the lumber yard.

Yeah if you can find something that makes blue stain look better, or even so much as preserves its natural fresh-cut beauty, please let me know! Just about everything, even clearcoats like urethanes, makes it go a really drab grayish color, which is really unfortunate. I find Pine very tricky to stain in general because it doesn't like to take any kind of stain very evenly at all. It works out well for a more rustic or worn look though.

I'd say that bright pink is perfectly natural - once the trees die they're susceptible to any number of fungi, which each color the wood differently. Blue stain is caused by a fungus that feeds off the sap of the tree but leaves the wood fiber intact; heartwood stain-causing fungi tend to feed off the dead heartwood itself and eventually progress to rot. I've seen literally every color of the rainbow come across the grading tables at work in the Lodgepole boards. I've often wondered what the heck customers in, say, Boston would think when they pull a tarp off and see all these different colors and patterns in the lumber.


Well, you can find boards like that for sale... In 4/4, ask for some #5 Common and you'll see some really gnarly stuff allowed. It's such a crap grade that of what few mills remain that cut 1X, many largely only grade to #4 and zero anything worse. We've run #4 1X4 at the mill a couple times and even that can get pretty ugly - your grub/worm holes shown there would probably make it if they were that bad on one side but noticeably better on the other. With 1" common boards, you grade for the best side, and the reverse side can be one grade lower. I agree though, for utility use like shelving as you're using them for, the holes add some character. Floor joists would be another matter entirely...:monkey: :)
 
attachment.php


Wow Brad that turned out to be a wonderful collaboration! :clap: A very creative cake on a very creative cake stand. Your effort was well worth it and, as you say, just using some of your equipment to produce something so beautiful gives you a warm and fuzzy feeling.
 
attachment.php


Wow Brad that turned out to be a wonderful collaboration! :clap: A very creative cake on a very creative cake stand. Your effort was well worth it and, as you say, just using some of your equipment to produce something so beautiful gives you a warm and fuzzy feeling.
:agree2:

Job well done Brad!
 
Yeah if you can find something that makes blue stain look better, or even so much as preserves its natural fresh-cut beauty, please let me know! Just about everything, even clearcoats like urethanes, makes it go a really drab grayish color, which is really unfortunate. I find Pine very tricky to stain in general because it doesn't like to take any kind of stain very evenly at all. It works out well for a more rustic or worn look though.

Brad,
I don't use a pigmented stain on pine for the reason you mentioned above.
There is one thing that I've found that will work if you're willing to do it, and that is a hand rubbed wax finish. First it has to be sanded down to a minimum of about 220 grit. Then start waxing. 5 or 6 coats usually work well, but it takes an enormous amount of elbow grease.
Unfortunately, pine furniture won't command a price worthy of such an effort. So I only use this on furniture I make for the wife, and a few other family members.

Andy
 
Brad,
a hand rubbed wax finish. First it has to be sanded down to a minimum of about 220 grit. Then start waxing. 5 or 6 coats usually work well, but it takes an enormous amount of elbow grease.

Andy

There is nothing like a wax finish for smoothness and preservation. Bee's wax was the wax of choice in millionaire's mansions a hundred years ago but, of course, back then they had slaves or other real cheap labor to do the work.
 
This is a table I built with a blacksmith friend. We've been talking about doing this for years. The base isn't done yet but you get the idea. I'm kinda curious if any one can guess the species of the top. The strip running down the middle is Walnut. The finish is a natural plant based oil finish. We built the table for a local art show and the theme is a painter pallet.
 
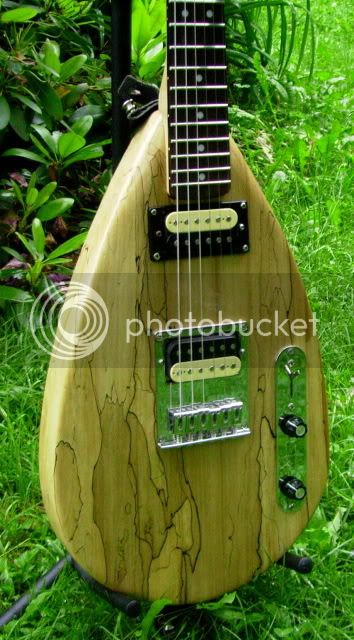
One of my recent guitar builds. Spalted Elm. Killer tone.
IMGP0633-1.jpg


I sent this picture to the lead guitar player in my band who also makes his own guitars. Nice job, nice wood.

Here is a picture of my maple Leedy drum kit I restored. I play it every week. I found a guy here in CA who makes complete drum kits from one maple log. He turns then on a lathe. They are really cool looking.

http://www.drummagazine.com/gear/post/jerry-alfaros-1964-leedy/

Thanks for posting.

jerry-
 
24' x 36' barn/woodshed taking shape. 8x8 doug fir for sills and vertical posts. Loft and trusses will be stick-built 'cuz there's no way I'm going to wrestle with 300 pound timbers on the 2nd floor. It's hard enough to wrestle with them on the ground.
attachment.php


It's going pretty slow, because I'm new to this, and don't have all the right tools (corner chisel has been backordered from Bailey's for a month).

Note how slabs are used for temporary bracing.
 
Silver Maple live edge table

This is a Silver Maple dining table 8' long x ~48" wide. Two boards glued together. Base and butterflies are black walnut. The Maple was milled in January and kiln dried over the winter/spring. The big end was 44". Take a look at the thread for surfacing large slabs: "http://www.arboristsite.com/showthread.php?t=144231" to see how it was flattened.

Finish is Deftoil Marine Teakwood.

Steve.
 
Back
Top