Federal Airtight 264CCL Questions

Arborist Forum

Help Support Arborist Forum:

This site may earn a commission from merchant affiliate links, including eBay, Amazon, and others.
Ray,

Check out post #81 in this thread. The guy who has the stove posted pics. Even the cat still looks like it has alot of life in it!

I plan on going over that stove very carefully. I don't want to get anything that I have to put alot of work into since my stove works great. I just want to get the larger version for the extended burn time.

I hear you about the 2461, but I'm not going to pass this one up if everything looks good. The door on the right is going to take some getting used to and I'll have to rearrange a chair in my living room so I can feed it, but small price to pay for longer burns.

Oh OK I remember that stove now.. Yes it looks pretty good.. Your stove legs and cat should fit on that stove too Brandon.. If you have a cooktop yours should also fit that stove.. Let me know how you make out on that stove.. The only difference between my stove and the cclr is the side load door is on the right.. Cool!

Good Luck!!

Ray
 
Made some progress :)

Got the tap extractor but it didn't work. What happened was the tap cracked in 1/2 (down the center) while breaking chips, then when trying to back it out the 2 pieces locked each other up and the top of it snapped off.
We cleaned out the flutes in the broken piece with a diamond bit and a dremel to use the extractor. But that didn't work, so we just kept grinding away at it until I was able to tap it out of the hole with a hammer and punch.
The holes was pretty torn up, and even drilling it out to the next size was questionable, but thats what I did. Tapped the hole out and there was enough threads for the new larger stainless bolt to grab and tighten down on. If it loosens up I'll put a washer and nut on the end of the bolt.

Next I installed the gasket, and well it would sorta latch closed, but there was allot of play in the latch and crank mechanism. I removed the pin that holds the assembly together and removed the bolt from the latch. The Latch pivots on the threads of the bolt holding it in place. The threads were worn down pretty bad...
Another new bolt with a long shoulder for the arm to pivot on would do the trick. The holes in the crank were larger than the holding arm so I machined out the hole in the arm by about 1000th of an inch so as to minimize the tolerances between the latch arm and the crank assembly. I shimmed the end of the crack where the hinge is connected to the stove top wall, and also shimmed the latch arm so as to push the widest part of the end that connects to the damper into the clamp. I also machined down the clamp end a bit, and re-bent the notch to eliminate play.

Finally it now "locks" into place.

I took pics of the the parts installed so I will post them up soon.

I also cemented in the airtubes, installed the cat and the grate/baffle that goes under the air tubes. I'm still not sure if I aligned it correctly though. In the baffle there are smaller holes on one side of it, I guessed that these would be facing loading door / inlet side of the air tubes. If this is not correct please let me know which way the baffle is supposed to be oriented.

I ordered the wrong thermometer, so the metal probe is too long. Can I simply cut it shorter?

Then all thats left is cementing the top on and baking the fresh paint. I think I may want to hold off on cementing the top back on until I have the chimney examined / swept. It just seems like it would be much easier with the top off of the stove.

Oh and I turned 30 yesterday!
 
Last edited:
Made some progress :)

Got the tap extractor but it didn't work. What happened was the tap cracked in 1/2 (down the center) while breaking chips, then when trying to back it out the 2 pieces locked each other up and the top of it snapped off.
We cleaned out the flutes in the broken piece with a diamond bit and a dremel to use the extractor. But that didn't work, so we just kept grinding away at it until I was able to tap it out of the hole with a hammer and punch.
The holes was pretty torn up, and even drilling it out to the next size was questionable, but thats what I did. Tapped the hole out and there was enough threads for the new larger stainless bolt to grab and tighten down on. If it loosens up I'll put a washer and nut on the end of the bolt.

Next I installed the gasket, and well it would sorta latch closed, but there was allot of play in the latch and crank mechanism. I removed the pin that holds the assembly together and removed the bolt from the latch. The Latch pivots on the threads of the bolt holding it in place. The threads were worn down pretty bad...
Another new bolt with a long shoulder for the arm to pivot on would do the trick. The holes in the crank were larger than the holding arm so I machined out the hole in the arm by about 1000th of an inch so as to minimize the tolerances between the latch arm and the crank assembly. I shimmed the end of the crack where the hinge is connected to the stove top wall, and also shimmed the latch arm so as to push the widest part of the end that connects to the damper into the clamp. I also machined down the clamp end a bit, and re-bent the notch to eliminate play.

Finally it now "locks" into place.

I took pics of the the parts installed so I will post them up soon.

I also cemented in the airtubes, installed the cat and the grate/baffle that goes under the air tubes. I'm still not sure if I aligned it correctly though. In the baffle there are smaller holes on one side of it, I guessed that these would be facing loading door / inlet side of the air tubes. If this is not correct please let me know which way the baffle is supposed to be oriented.

I ordered the wrong thermometer, so the metal probe is too long. Can I simply cut it shorter?

Then all thats left is cementing the top on and baking the fresh paint. I think I may want to hold off on cementing the top back on until I have the chimney examined / swept. It just seems like it would be much easier with the top off of the stove.

Oh and I turned 30 yesterday!

Happy Birthday JI!!

Wow JI sounds like you're kickin' a$$ and takin' names! Very nice work and you did the right thing upsizing that bolt after breaking a tap and removing it.. Like you said if it loosens up just add a nut and washer and you'll be good to go.. I would not cut the probe because the sensing part is located in the tip end of the probe so it would be destroyed.. Return it for the right one to save yourself some aggravation..

I'm glad you took the time to get the bypass mechanism working.. If it doesn't latch the cat will be useless.. I can see you learned alot on this project and if you ever get a newer stove you'll know what to look for..

:clap:

Ray
 
JI,

I think you can cut the probe, at least that is what the guys at Condar told me when I ordered one. I believe all the metal probe part, to be cut, does is transfer heat for the spring to register.

Maybe double check with who you ordered it from.
 
JI,

I think you can cut the probe, at least that is what the guys at Condar told me when I ordered one. I believe all the metal probe part, to be cut, does is transfer heat for the spring to register.

Maybe double check with who you ordered it from.

Hi Brandon,
I didn't know that sorry not trying to pass bad information around.. Thanx for the heads up.. BTW did you buy the FA264CCL you talked about earlier?

Ray
 
No money has traded hands yet, but it's mine. It is in ridiculously good shape. It even has the small metal pieces that go on the shaker grates. Now I'm just split on what to do with my current stove. I've got a friend who will most likely take it off my hands, but I also have a open fireplace in my upstairs bedroom. I'm thinking about putting it up there, but then I'd have run the SS line, do the block off plate again, etc. Plus I don't know how it would go with building codes. I've researched putting gas logs in there, but since it is a bedroom it has to have outside air for combustion, and can't be over 10000 btus. At that point it would be purely for aesthetics. Anway we'll see, but I will be burning the other stove this winter.
 
No money has traded hands yet, but it's mine. It is in ridiculously good shape. It even has the small metal pieces that go on the shaker grates. Now I'm just split on what to do with my current stove. I've got a friend who will most likely take it off my hands, but I also have a open fireplace in my upstairs bedroom. I'm thinking about putting it up there, but then I'd have run the SS line, do the block off plate again, etc. Plus I don't know how it would go with building codes. I've researched putting gas logs in there, but since it is a bedroom it has to have outside air for combustion, and can't be over 10000 btus. At that point it would be purely for aesthetics. Anway we'll see, but I will be burning the other stove this winter.

I assume you are talking about the blank metal plates that are mounted to the shaker grates? If so mine are still there too.. As for having a wood stove in a bedroom I think you're right as it may be against building codes so you should look into that..
Been real busy here stacking and moving firewood and I am tired from all that work! Still have 2 cords to stack and hope to get that done tomorrow before the snow flies tomorrow night..
JI has made good progress on his stove and it looks very good! If I were him I would have taken a sledge hammer to that stove before I ever started lol..

Ray
 
Sorry it took so long to get these pictures. been busting out the SLR but I'm too lazy to convert to JPG then upload. So much easier with my cell where I take the picture and press a button to upload it.

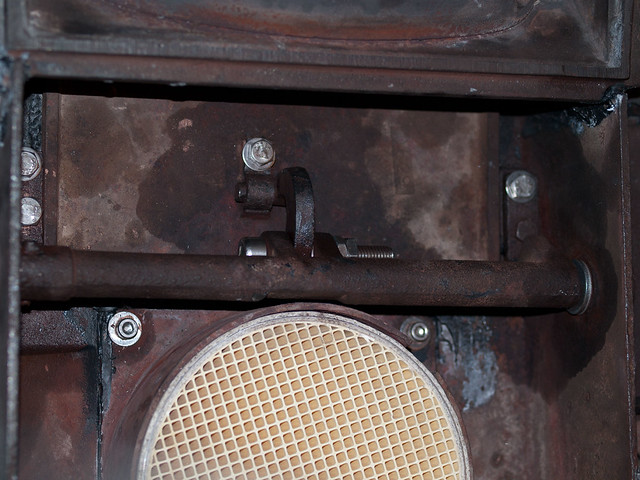
Heres the shimmed and repaired bypass damper.


ByPassDampterRepair by Glamisduner, on Flickr

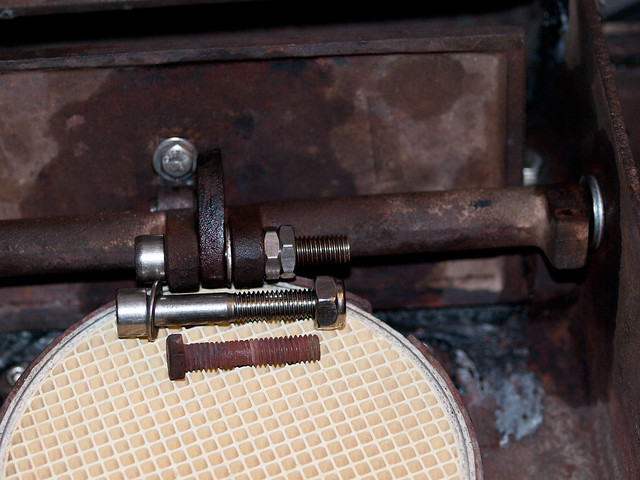
Here is another shot that shows the hold worth bolt, the new bolt shoulder length, the shim near the damper arm, and the shims for the crank. This really helped to eliminate some of the play. it keeps the wider end of the crank arm inside of the loop housing. I also filed down the end of the housing and then re-bent the hook down to get rid of most of the free play.


BypassDamperRepair2 by Glamisduner, on Flickr

The wet looking stuff is Pb Blast and cutting fluid heh.

Way to go JI that looks better than new! I like the longer bolt you used with the unthreaded shank that will make it tighter and stronger than the original bolt.. So when you gonna try firing it up?

Ray
 
Way to go JI that looks better than new! I like the longer bolt you used with the unthreaded shank that will make it tighter and stronger than the original bolt.. So when you gonna try firing it up?

Ray

I'm trying to decide whether or not to have the chimney inspected or try to do it myself. I was thinking I could get a brush, pull it through a few times, then get up on the roof and look down it myself? It's only 1 story house and airplane wire and a weight would be pretty cheap. Outer chimney itself needs some repairs, lots of cracked and broken bricks, probably from when they over-fired it. Gotta get someone up here to show me how to fix this as well. I want to do it myself, but I need some instruction.

Either way it seems like it would be an easier process without the top of the stove on. Any suggestions for my next move?

If you have any cracked chimney liner tiles you need to install an insulated s/s chimney liner.. This happened here and my homeowners insurance covered this.. In my case my old liner had to be busted out 1st because my chimney tile was not big enough to fit an insulated s/s liner.. The stove works much better with an airtight insulated s/s liner for sure.. You could probably do this yourself and save quite a bit.. It's a pretty simple job if you don't have to knock out the clay liner..

Ray
 
Well there is some kinda pipe that goes all the way up to the top. not sure if it is stainless or not, I think its just regular steel.

The house actually has a second chimney thats been covered up too, we have no idea what it was for lol.

So how do I get my insurance to cover this?
 
Well there is some kinda pipe that goes all the way up to the top. not sure if it is stainless or not, I think its just regular steel.

The house actually has a second chimney thats been covered up too, we have no idea what it was for lol.

So how do I get my insurance to cover this?

In my case I had a CSIA certified sweep inspect the chimney and he took pics and wrote a report and I notified the ins. co.. The sweep sent along the pics and the report then the ins. co. sent along their expert and they agreed I had a fire.. Bottom line my liner cost me the $500.00 deductible.. Either way it would be smart to be sure your chimney is safe for peace of mind if nothing else..

Ray
 
My new 224A

Hi one and all. First, let me say this thread is fantastic, I have been reading all weekend.

I just picked up a Dutchwest India FA224ACL at my local auction. It appears to be pretty clean and complete, no coal grates, but I think everything else is there. The grates look very clean, and I think the pieces are complete. I will post some pictures when I get a chance. It came with a set of fireplace tools that the auctioneer said were original to the stove.

It has only one air intake on the side door, and no convection ports/fan. I am hoping to install it into my fireplace this spring/summer. I burn a lot of locust in the fireplace, nice and clean.

I am not sure if I will tear it down and recement it, but will definitely regasket it. Has anyone bought a kit for this? I figured to just buy material from my local stove guy.

Again, thank you all for the time you have invested making this thread so valuable and informative.

Chris

Good luck with the new stove and welcome to the forum! I believe that bsearcy who is a member here has this stove.. I do know it is older than mine probably mid 1980's vintage.. Yes you can buy gasket mat'l from a stove shop just make sure the gasket density is similar to what you're replacing.. I've used the gasket from lowes that comes with the gasket adhesive and it worked fine.. They sell a pack with about 7' of 3/8" rope plus adhesive for around $10.00 made by Imperial, a known gasket maker.. You can also buy a kit from FA224 ACL for about $40.00 that will do the entire stove and then some..

Ray
 
just got a new/used 288ccl

I just picked up a used 288ccl off of CL and it was in pretty good shape. No warped parts, cat still good and appears to be lightly used. It is the later model with the secondary air intake. I have pulled the top off and after further inspection of the firebox I can see light coming from two hairline cracks on the upper left and right hand corner where the two pieces of metal meet, there are no other visible joint cracks at all. So my question is can I just use this to seam everything up?
Dap 18854 High Heat Mortar Sealant, Black High Heat Mortar

I am getting rid of the VC defiant/encore after 25 years because the refractory has to be replaced again. I am looking forward to a stove with a little less maintenance. It is also missing the brass damper for the ash pan if anyone has one they would like to sell
 
Welcome aboard. I think the cement will work to seal the space at the joint. I don't have an extra brass dial, but I'll keep an eye out for one. Doc has a 288, so he'll have a lot of good info about operation.

Keep us posted.
 
Is the top piece suppose to have fiberglass rope that goes into the channel, or just cement? All it had yesterday was cement and no rope. If so what size 1/2? Thanks
 
The top is sealed with cement. I thought about using the gasket, but decided to stick with cement. I don't think any of the other guys have switched either.7
 
Back
Top