New Chain Sharpener

Arborist Forum

Help Support Arborist Forum:

This site may earn a commission from merchant affiliate links, including eBay, Amazon, and others.
Holey Guacamole, Batman. $125? Does it make the coffee in the mornings too? Think I'll stick with imperfect but cheap hand filing and now have 125 more reasons to take more care with the hand file, or $125 dollars towards a decent grinder.

It does just as good of job as my "decent" Silvey.........
 
It does just as good of job as my "decent" Silvey.........

Thanks for that. Silveys are supposed to be very good grinders. How long is this tool going to take compared to a grinder please (including raker setting by hand if this tool won't do it like a grinder will) if I have a few chains each day to knock back into shape?

And how long do those grinding bits last please?


I'm wondering if it might be a more versatile one-sharpener fits all tool than hand file in field + grinder at home.
 
I've got one of these and have a couple of issues with it.

1. It doesn't make the cutters the same length on both sides as it is advertised to do. I have to do one side and then adjust for the the other. Not too big of a deal as it's only one adjustment and a check of the tooth length. I can live with this.

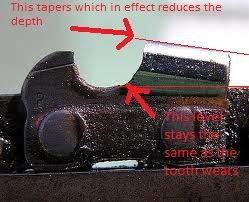
2. As the cutter wears it gets lower but the file(carbide cutter in the sharpener) doesn't have a depth adjustment. I've noticed that on the chains that I've sharpened a few times there is almost no hook on the cutters as it sits too high on the tooth. The only way around this that I can see is to set it up, remove the file, and then try and adjust it down a little bit.

Can anyone help? Am I doing something wrong?
 
Anyone have an answer for this? I am right on the edge of ordering one of these. Thanks, Russ
 
How to address the Low Hook cutter issue when using the Timberline sharpener.

Anyone have an answer for this? I am right on the edge of ordering one of these. Thanks, Russ

I could see this possibly happening if your not paying attention or if you try to take off too much material to fast or both. I agree the carbide will have a tendancy to "climb"
up the cutter resulting in a low hook cutter if too much pressure is applied to the back of the tooth. In my experiance in getting used to the tool this will happen a time or two, But when it does it's pretty obvious and easy to correct.

I have not found the problem with the cutters not being "un-even". In fact I think the cutters are closer to being "even" now than they have ever dreamed of
being when I was hand fileing and thus resulting in a very smooth/fast cutting chain.

I'm not as profecient as the guy doing the video is, but found it quite easy to get the hang of this tool. I would recommend getting the 13/64 carbide as well because you will
get better performance as the chain gets near end of life (about 2/3) through the useable length of the cutter due to the natural taper of the cutter .

I think you'll like it Russ. It works as advertisted provided you take heed to the instructions.

Here's the video link:Instruction- Timberline Chainsaw Sharpener - YouTube
 
Just to clarify, the carbide isn't climbing as I sharpen.
There is nothing on the tool to set the depth. The tool is positioned level using the existing depth to set it. As the cutter wears, the depth stays at the same level but due to the taper of the cutter, the depth of the carbide actually reduces. This is only noticeable once the chain has been sharpened a few times.

I overcome this by setting it up, removing the carbide and dropping the tool a touch. I don't see any other way around it. Don't get me wrong, apart from the 2 problems I listed above, it sharpens the cutters near perfect.

I'm not sure I see how that's possible. If the chain starts out even, it shouldn't matter if the cutter is worn a bit. Once you set it on the first tooth, the cutter should rest the same height in each tooth, regardless of the diameter of the cutter. Unless the chain is rocked, I can't see how the depth would vary from tooth to tooth. And if it is rocked bad, there's no way your going to get the teeth even on one go round.

Besides that, the cutters are only tapered on the first portion of the tip and uniform in the actual cutting surface. If your getting a taper or groove on the actual cutting portion when the bit is all the way in then you sharpen a heck of a lot of chain, the cutter is at the end of its service life and it's probably time for a new cutter.
 
Sorry, you must be misinterpreting my post.
When I said the taper on the tooth, I meant the angle of the top of the tooth from front to rear.
Here is a dodgy paint effort to try and explain better.

tooth.jpg
 
This tool truely looks incredibly functional. I know also that with 500 sets of eyes looking at it, each pair is looking at something different. So the nitpicking begins. But I do have three question about it.

One is with the grinding tips fitting into the alignment bushings, when the tooth is finished and the tip is pulled out for the next grind, does the filings get into the guide and could they cause premature wear?

Second is how is the length of each tooth kept the same? I've always been careful to keep the number of file strokes the same to account for this.

Third is the flipper stop looks as though it would be the first thing to wear for a replacement. How is this parts make for ease of replacement, or is it meant to be replaced?

I sure like the looks of and the edge results. Very nice. :msp_smile:
 
Sorry, you must be misinterpreting my post.
When I said the taper on the tooth, I meant the angle of the top of the tooth from front to rear.
Here is a dodgy paint effort to try and explain better.

tooth.jpg

I understand what your saying.
That's why I recommend both 7/32 and 13/64 not absolutly nessessary, but works better once the cutters are 2/3 or more through there life.
 
This tool truely looks incredibly functional. I know also that with 500 sets of eyes looking at it, each pair is looking at something different. So the nitpicking begins. But I do have three question about it.

One is with the grinding tips fitting into the alignment bushings, when the tooth is finished and the tip is pulled out for the next grind, does the filings get into the guide and could they cause premature wear?

Second is how is the length of each tooth kept the same? I've always been careful to keep the number of file strokes the same to account for this.

Third is the flipper stop looks as though it would be the first thing to wear for a replacement. How is this parts make for ease of replacement, or is it meant to be replaced?

I sure like the looks of and the edge results. Very nice. :msp_smile:

The length of the tooth is determined by how the stop is set. You can turn and turn until your hearts desire with the crank of the cutter but it will only take xx amount off the tooth.

Its a pin holding the flipper/pawl in the stop. Pop the pin out, replace pawl, and reinsert pin. I actually have a new pawl here waiting to go in. My original looks like a gopher got after it.

I just contacted Timberline about replacement parts and they gave me instructions on how to order them.

Excellent folks to deal with and if something messes up in your order they do their darnedest to make it right.
 
Last edited:
I read every post. I watched the video on the website. I want one. A lot of people I respect on here have one and I am going to join the club. Thanks guys, Russ
 
Some will love this tool. Some will tolerate it. Some may even consider it trash. I've used it to sharpen many loops and it serves me very well. Don't expect to get everything perfect the first time you use it. Tinker with it and you can make it work for you.

Some observations:
Once you tighten the screws to mount this on the bar pull the cutter back out and make sure you can spin the chain all the way around. I try to get mine low in the tooth for the reason mentioned above about tooth shape and have had a tooth catch about half way through and had to readjust.

Don't try to do the job in one pass if the chain is really dull or rocked. It is so much easier to run through a few light passes than fight through trying to get it done in one pass. If you maintain the chain as frequently as you should it will be a one pass touch up.

I have run across a few chains that were sharpened by a grinder and it's difficult to use the carbide in these. You'll know what I mean when you are lucky enough to fight with one of these. I use the dremel with the sharpening stone on it to get the shape right. Then sharpen with the carbide.
 
This tool truely looks incredibly functional. I know also that with 500 sets of eyes looking at it, each pair is looking at something different. So the nitpicking begins. But I do have three question about it.

One is with the grinding tips fitting into the alignment bushings, when the tooth is finished and the tip is pulled out for the next grind, does the filings get into the guide and could they cause premature wear?

Second is how is the length of each tooth kept the same? I've always been careful to keep the number of file strokes the same to account for this.

Third is the flipper stop looks as though it would be the first thing to wear for a replacement. How is this parts make for ease of replacement, or is it meant to be replaced?

I sure like the looks of and the edge results. Very nice. :msp_smile:


1) Yes some filings could end up in the bushing, simply blow them out... no big deal.
2) The backstop keeps the cutters all aligned the same. You will find that if you set it on your shortest cutter, it may not even make it into the longest cutter, depending on how far off they are. What I did was use the tapered part of the cutter to begin the shortening process. Make a few turns of the cutter w/ the tapper section and slowly push in until the true cutter size is in the tooth. You will feel when the cutter is sharp, and the same length as the carbide spins much more freely.
3) While I do not think, it would wear out, as there is no pressure on it as you drag the chain under. It does come out easily, so you could replace it, but their site does list it as a separate piece. I guess if you call, they will provide one for you.

Also just noticed mention of the 13/64" carbide cutter, they did not have this size when I ordered mine, and is why I held off for so long. All my files etc. were 13/64" and did not want to change over.... I just ordered that size cutter.


dw
 
Well, I'm interested, and tried to enter all the discount codes with none working. Is there a working discount code at this time?

I've been hand sharpening for a lot of years, and it never fails that one side of my chains are filed down a lot more than the other side.

Respects,

Richard
 
I installed the new pawl yesterday. I just used a small drill bit as the punch and then repressed the pin back in with a vise.

I also put in the 13/64 cutter and tried that.

Oh man, I tell you what. It was like cutting butter.

So, I dont know if that was from a new cutter or the 13/64 size.

I seemed to knock out an 84dl chain rather quick.:D

Again, a good product and a good company with really good customer service.
 
Curse you all! :hmm3grin2orange::hmm3grin2orange::hmm3grin2orange::hmm3grin2orange::hmm3grin2orange:

Well this is my review. The unit came in today and I was very impressed with the quality of it. I had a rocked chain on the right-hand side and that was the first chain that I sharpened.

Five minutes into the job I got very frustrated because of the slow going. Then I had a brainstorm, that's always dangerous. I have a 9.6 volt semi retired Makita two speed drill. I inserted the bit in the drill, and started using tool with enormous success. At low speed the drill does a good job pretty much identical to the crank handle.

It did take longer to sharpen this chain but it did a very good job. The cut was polished and the edges were sharp. One thing that I really enjoyed using this tool and was not expecting was the fact that you could see the glint and how much to sharpen to remove the glint from the tooth. With a good light over my right shoulder you could see the edge of the tooth being ground and know when to stop.

The tool does not seem to work well with a worn-out bar, but with a fairly new bar the teeth are well supported and the tool works as designed. Quite impressive,actually!

This tool is definitely a keeper especially with my cordless electric drill. Please remember that this drill turns very slowly. The speed at the low setting is comparable to the handcrank. I did not and will not use the high speed selector on the drill.

Oh ... I lubed the shaft and guide holes with DuPont Teflon spray to minimize wear and stop the squealing from it not being broken in. At the end of the second chain it was operating soundlessly and smoothly.

Curious to find out how the chain will handle those little metal shavings ...

Another unexpected plus is the tool in its high quality case fits into the Stihl plastic carry case by the saw throttle. How much more can you ask for?
 
Last edited:

Latest posts

Back
Top