Craftsman 2.3

Arborist Forum

Help Support Arborist Forum:

This site may earn a commission from merchant affiliate links, including eBay, Amazon, and others.
I just installed one of these today. On a Craftsman 2300CVA. It worked, thank goodness. Finally, oil to the bar. This thread helped. Thanks.

Glad it helped you. So I put some motor oil 10W-30 in and cranked it up. Let it idle a bit and then went to a fast idle. I did not have bar/clutch etc on it so I could watch the satisfying oil flow.

NOT.

I didn't get any oil output. Now I did check my other checkvalve/pump inside the oil tank, and remember that I was able to suck thru it but not blow which tells me that part of the system works. I have a few more thoughts on the system, as I am finding it pretty simple overall, but just frustrating. So here is a photo with some labels. The blue arrow points to the opening into the oil tank, the green arrow points to where the oil comes out of course, well, at least where it is supposed to come out.

DSCN8320-1.jpg


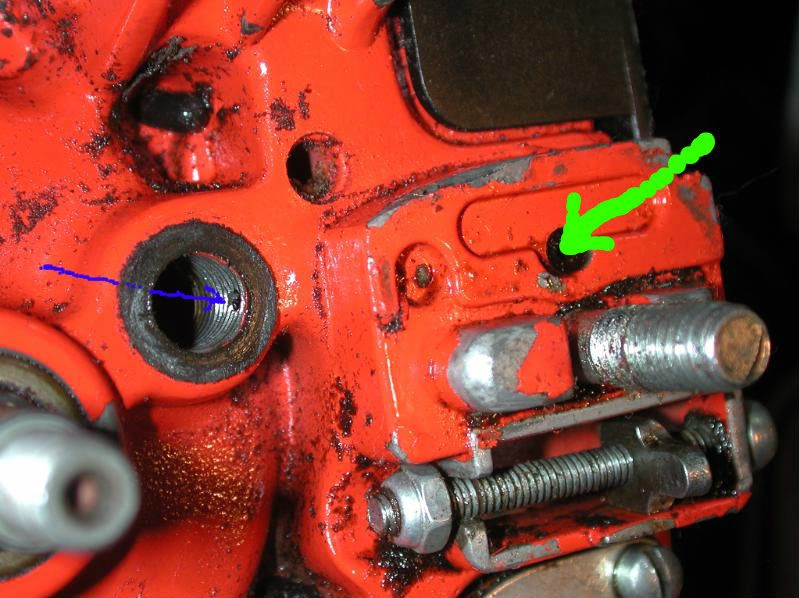
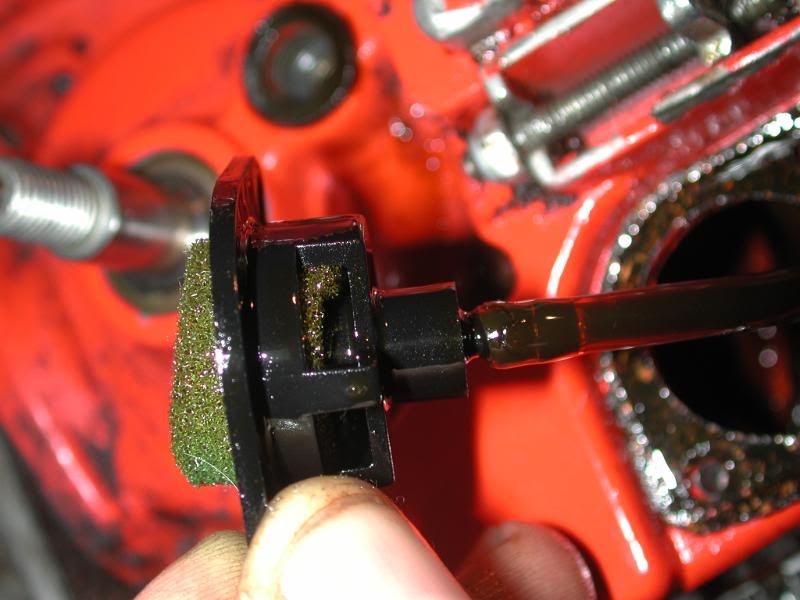
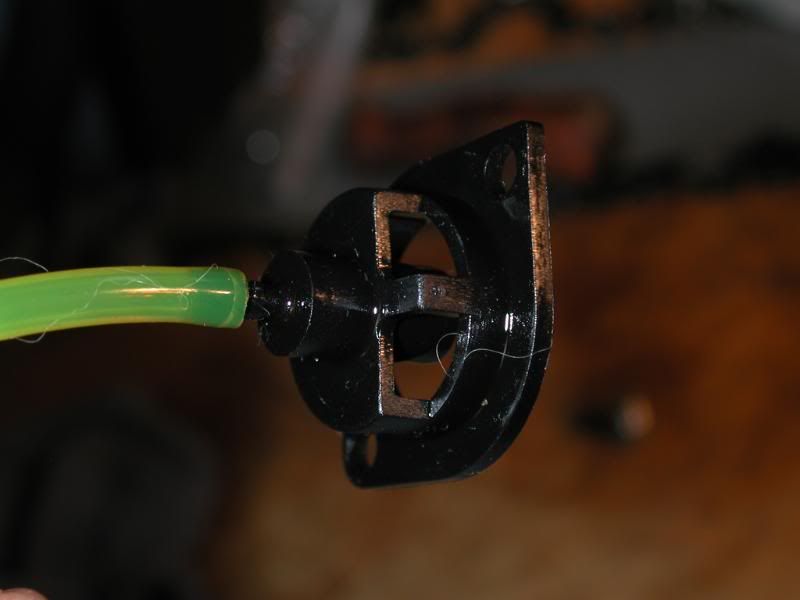
I ran a pipe cleaner thru this hole, and it passes unobstructed into the oil tank. The check valve has entry of crankcase pulse pressure in thru the end with the mesh wire, and the pressure then comes out the hole near the head of the check valve, as shown below.

DSCN8386.jpg


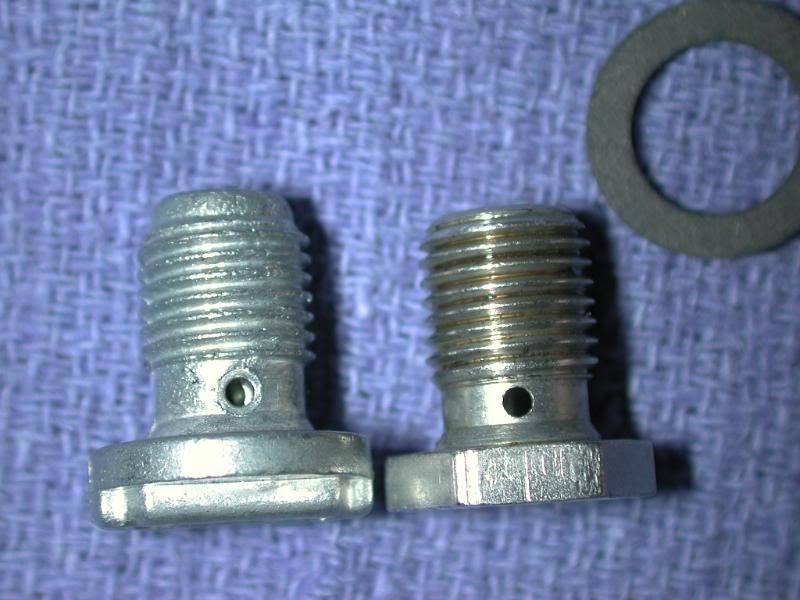
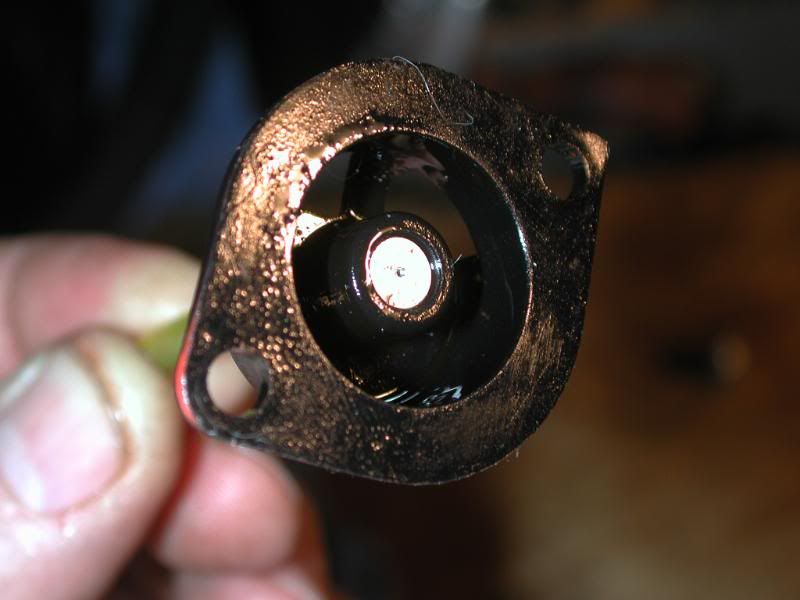
It is not necessary for the hole below the head to line up with the hole into the oil tank--the tapered/conical base of the check valve just below the head seals the outside, and pulse pressure is fed from the crankcase one-way into the circular donut area between the uppermost threads and the base of the head-and then it goes into the tank thru the little side hole in the case. In this interpretation the hole in the check valve does not have to line up in any way with the hole in the case, and in fact, it doesn't in my original, or in the replacement; it ends up in about the 6 O'clock position indicated by the blue arrow in the photo below where I made a small indexing scratch on the head.

DSCN8388-1.jpg


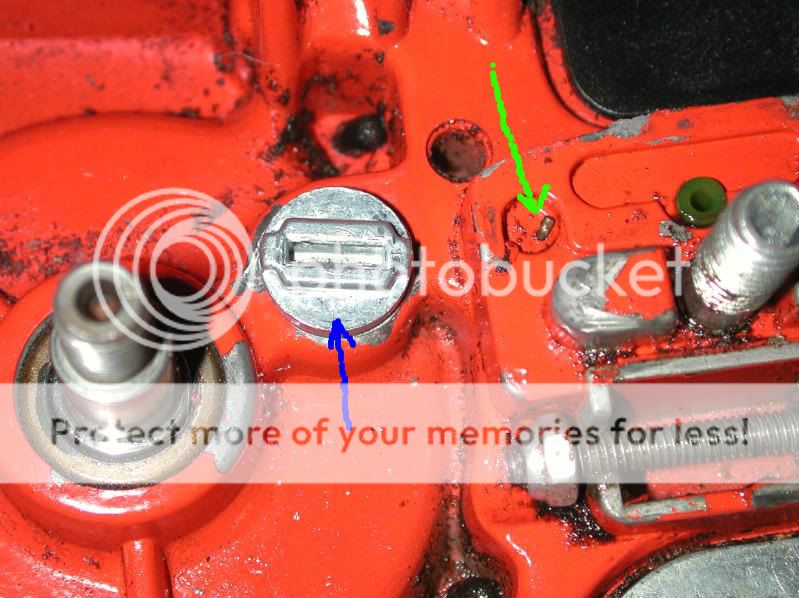
So now everyone is wondering what the green arrow is pointing at in the photo above...me too. This is a small bent piece of wire, that freely spins around in that dimple. When I put some oil over it while the saw was running, I got a few bubbles. I'm not sure of its purpose so if anyone else is, let me in on that secret. I am convinced that all is right with my oiler system, it just doesn't oil out the hole. I did run a pipecleaner into the oiler line, it is not pinched in any way and it is new from the original line. It isn't folded over and obstructed on the inside of the oil tank. It is possible I had low oil with just about 3 oz in the tank so it didn't build up enough pressure in there to start moving oil, and this may have been compounded by there not being enough RPM load on the motor to produce adequate pressure in the system to make it push oil out. I am really not sure. And that little wire thingey at the green arrow has me a bit confused as to its purpose, is it merely a safety to prevent the oil tank over pressurizing? Dunno. I know I have a tight cap on the tank, it isn't leaking and makes a good seal. Despite the new check valve, is pressure leaking back into the crank case around the threads, and should I teflon tape those and re-install it? I will have to mess with this more some other time, but for now, I'll just sit on it.
 
I just got home, and as I was reading your post, I was hoping someone had replied. I too would like to know what the green arrow is pointing at. I believe you are correct, in that the relationship of the two holes doesn't matter. I clocked mine anyway. I also saw some bubbles coming out around that bent wire, before the oil finally came out the hose. So, why isn't your oiler working? I'm going to go back and read the whole thread over. You guys know way more about these saws than me, but since I just did one, maybe I'll see something.
 
Maybe you could remove the metering device and attach a weight to the oil hose. If the oil hose is submerged, and the check valve is allowing crankcase pressure to build in the oil tank, oil should gush out the other end of the hose.
 
Maybe you could remove the metering device and attach a weight to the oil hose. If the oil hose is submerged, and the check valve is allowing crankcase pressure to build in the oil tank, oil should gush out the other end of the hose.

I do understand what you suggest, just have the in-tank end of the hose hanging loose into the oil pool, and see what happens, I can try that just to see how well the tank pressurizes. I'll give that a shot when I get a quiet moment.

This is the "pickup" end of the hose. The opening in the side of the cage is oriented down so that it picks up oil. If this cage is oriented upward, it will only pick up oil til it gets to the level of the cage opening.

DSCN8324.jpg


The opening in the cage may be seen better here. The other end of the hose is the "output" end that pokes out thru the case that the oil comes thru.

DSCN8325.jpg


This is the pickup end again. This includes another one-way valve in it, you should be able to suck thru the output end of the hose, but you should not be able to blow back thru it. This allows the pressure in the tank to force the oil thru the pickup end and thru the hose to the output end and oil the bar.

DSCN8326.jpg


So my next step is to teflon tape the threads in the check valve but not fully up to the point where the small hole is, also to fill up the tank completely and then run this saw at speed and look for results. All this after I just dunk the open end of the pickup tube into the oil pool to see if I get a gusher.

I have the service manual in front of me and it recommends sealing the threads with liquid thread sealer Loc Tite 242. There's no mention of the little hole with the wire sticking through it. Maybe it's to prevent over-oiling like Homelite did with their little saws. Position the pump end with the open side down. That's about all there is to it. Uses crancase pulses to push oil through the pump and line to the bar. Just make sure you don't have any leaks anywhere.
 
Last edited:
Well, I do have threadlocker, threadlocker tape as well. I do have the manual on this saw, it does show parts, but does not explain "function." It also does not describe conditions required for the oiler to work, like if it occurs at idle, or a high throttle under load, etc. I'm pretty sure I understand how this is designed to function, of course I'd like to see oil coming out of the hole before I put it into wood.

Another thought that came to me in the night was if the hose I used as a replacement is too weak-walled and could collapse (and occlude) when the pressure builds in the tank around it. Doesn't seem likely though. Just thoughts.

IIRC that little pin is the oil tank vent,small brass cotter key. Regards Jim
 
I have one suggestion to try, that green arrow you show, thats the oil tank vent wire. I think on some saws the wire jiggled so much it wore the opening bigger. Try placing your finger over it while running, I always wondered too if this was the culprit.

If your check valve works, pump works, oil cap seals good, and there is no leaks in the case seem, check the wire vent. If still nothing, mabe check into the reed valve, mabe it's sticking open???

My Dad has an almost brand new Poulan 2000 and that thing oils retardedly, when your finished you have to relieve the tank pressure by unscrewing the cap or you get bar oil all over.
 
This little saw is practically new based on the condition it is in, like the machining marks still on the rings, etc. It's just "old" purely by chronology. Based on that, I don't think that little wire rattled around enough in there to have wallowed out a larger hole, but it sounds like a good thought in the troubleshooting process. I have had the carb off of it and did a carb rebuild, the reed appeared to be fine, but I can always look very critically at it. I am not sure what the operating crankcase pressure should be, but I am sure I can figure out a mechanism to measure it if it comes down to that, and would have to find a low range pressure gauge that only reads like 0-10 PSI.

Maybe will put some duct tape over that wire, or is this a better role for some chewing gum.....?
 
Well, I do have threadlocker, threadlocker tape as well. I do have the manual on this saw, it does show parts, but does not explain "function." It also does not describe conditions required for the oiler to work, like if it occurs at idle, or a high throttle under load, etc. I'm pretty sure I understand how this is designed to function, of course I'd like to see oil coming out of the hole before I put it into wood.

Another thought that came to me in the night was if the hose I used as a replacement is too weak-walled and could collapse (and occlude) when the pressure builds in the tank around it. Doesn't seem likely though. Just thoughts.

Be carefull putting junk on those threads, you can plug up the hole going to the tank. Speaking of that, did you check to make sure that hole going to the plug is not plugged?


As said the cotter pin is for the vent to bleed off excess pressure.

The oiler recieves pressure to the tank everytime the piston makes a down stroke.

That hose you used will be fine.

Sometimes you have to give the saw a chance to build pressure up, its not like they start squirting right off the bat.

Last, I hate to say it but are you sure the new check valve is a good one. I had 3 NOS valves here and when I was checking these the other night, 2 of the 3 were no good. The rubber valves wouldnt work and were probably hardend from long term storage.

The oiler system on these is not voodoo, there amazinly simple yet effective. Like was also said before they put out lots of oil normally.
Thing is these saws were introduced in 1977 and are now getting old. They worked well for years and as long as the case is sealed, not leaking, the pressure hole isnt plugged and the check valves work so do the oilers.

Like I said before, I have a plan on getting a way to repair these check valves, just need to get to it.
 
Be carefull putting junk on those threads, you can plug up the hole going to the tank. Speaking of that, did you check to make sure that hole going to the plug is not plugged? Yep, I passed a pipe cleaner thru the opening with ease, and saw it inside the oil tank when I looked thru the fill hole. Of course, I'll be cautious applying any tape to the threads so it is only covering the portion of the threads that constitutes the case wall, and not have loose tape dangling into the crank case, or covering the air exit hole of the check valve.


As said the cotter pin is for the vent to bleed off excess pressure.

The oiler recieves pressure to the tank everytime the piston makes a down stroke.

That hose you used will be fine.

Sometimes you have to give the saw a chance to build pressure up, its not like they start squirting right off the bat. I did have that suspicion, likely I'll end up filling the oil reservoir to the brim before the next test.

Last, I hate to say it but are you sure the new check valve is a good one. I had 3 NOS valves here and when I was checking these the other night, 2 of the 3 were no good. The rubber valves wouldnt work and were probably hardend from long term storage. I did check by blowing/sucking thru the thing, it works very well. Can blow thru it mesh wire end/crankcase end to the output side hole, but cannot suck back thru it

The oiler system on these is not voodoo, there amazinly simple yet effective. Like was also said before they put out lots of oil normally.
Thing is these saws were introduced in 1977 and are now getting old. They worked well for years and as long as the case is sealed, not leaking, the pressure hole isnt plugged and the check valves work so do the oilers.

Like I said before, I have a plan on getting a way to repair these check valves, just need to get to it.


I appreciate your interest in this, I also have a new duckbill valve coming and a plan on how to put it in the old check valve and test that as well. Will submit the usual pictures etc and whether or not it is successful. Currently I am contriving a way to gauge check the crankcase pressure.
 
I appreciate your interest in this, I also have a new duckbill valve coming and a plan on how to put it in the old check valve and test that as well. Will submit the usual pictures etc and whether or not it is successful. Currently I am contriving a way to gauge check the crankcase pressure.

I have interest in this as I have several of these types of saws. It just dont sit well with me either that the powers that be NLA a vital part to keep one of the best selling saws of all time running. There are still bunchs and bunchs of these still out there in service.
 
I agree, there is definitely a market for these saws. One or two sell just about every day on ebay. Add to that C.L. and other markets, and the total number sold in a day, nation wide, might be _____? Possibly a nice little cottage industry. Opihi59, if you had bubbles at what we now know is the tank vent, does that mean your check valve is working? I know you did the blow and suck test on the metering diaphragm, but maybe that piece is the culprit.
 
I agree, there is definitely a market for these saws. One or two sell just about every day on ebay. Add to that C.L. and other markets, and the total number sold in a day, nation wide, might be _____? Possibly a nice little cottage industry. Opihi59, if you had bubbles at what we now know is the tank vent, does that mean your check valve is working? I know you did the blow and suck test on the metering diaphragm, but maybe that piece is the culprit.


Check valve (the "bolt") is verified to work. The in-tank part, which is best referred to as the pump, also works: That part, I can suck thru the hose, but not blow so it confirms one-way passage from the pump end, to the open end of the output hose.
I'm going to play with this a lot, just can't until the weekend hits. I sure won't be going downtown what with APEC here with the leaders of 21 nations including our own. Good time to be hanging out at the house and messing with my saws.
 
Homelite uses a similar oiling system, based on crankcase pulses. In one of their lines they have a sintered brass tube to keep it from over oiling. It kinda releases some of the pressure. I'm wondering if that's what the little vent is. If you have all the parts for the oiling system and they appear to be in good shape, why not go ahead and put it together and see if it oils? If it doesn't, a teardown only takes a few minutes.
 
I have interest in this as I have several of these types of saws. It just dont sit well with me either that the powers that be NLA a vital part to keep one of the best selling saws of all time running. There are still bunchs and bunchs of these still out there in service.

I've always been able to find about any part for the 25 or the micro series saws, sometimes I have to buy a complete parts saw to get what I need though. I'm currently just finishing up a Craftsman version of the micro.
 
In my opinion you should just get it running and not use it. I would think a saw that old in such good condition would be pretty rare. Judging by the pics it looks as though it literally hasn't been used. Keep it mint and it will stand out.
 
The Lizard King has spoken, interesting perspective. It is a nearly mint saw. Plenty of ugly saws that can cut. Myself, I'd use it, at least a little.
 

Latest posts

Back
Top